
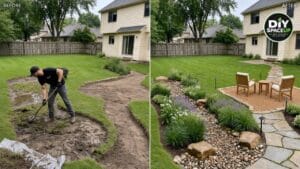

For years, this backyard had one spot nobody wanted to walk across. After every storm, a low patch of lawn turned into puddles, soggy turf, and boot-sucking mud. The opportunity was hiding in plain sight: instead of fighting that runoff, the yard could slow it down, soak it in, and look good doing it. This guide shows how to plan a muddy backyard rain garden with natural river rock, boulders, and layered plants, plus a pea-gravel coffee spot for two with a flagstone border and a flagstone walkway that connects to the house patio, while the open lawn stays free for family life.
Important: The original social post is an AI-generated renovation concept, and the images in this article are AI illustrations too. They show the look and the sequence, not a tested installation. Real drainage projects depend on your soil, slope, utilities, and local rules. The sizing method and steps below come from university extension and state agency rain garden guides (linked throughout), and the costs and timelines are estimates, not quotes.
Affiliate Disclosure: As an Amazon Associate I earn from qualifying purchases. Product links in this article may earn a commission at no additional cost to you. Use tools you already own when they suit the work.
Contents
- Muddy Backyard Rain Garden Overview
- Is a Rain Garden Right for Your Wet Spot?
- How to Size Your Rain Garden
- Materials and Tools
- Step-by-Step: Build It in the Right Order
- Plant List by Zone
- Estimated Cost and Time
- Common Mistakes to Avoid
- Rain Garden Planning Checklist
- Maintenance
- Frequently Asked Questions
Muddy Backyard Rain Garden Overview
A rain garden is a shallow, planted depression that collects runoff from a roof, patio, or lawn and lets it soak into the ground instead of sheeting across the yard. The EPA’s Soak Up the Rain program describes it as a cost-effective way to reduce runoff, filter pollutants, and add habitat for pollinators and birds. In this project, the rain garden is paired with two hardscape features that need to stay dry and walkable.
| Component | What it does | Key detail |
|---|---|---|
| Rain garden basin | Holds runoff briefly and lets it infiltrate | Flat, level bottom; typically 4–8 in. deep; drains within about 24–48 hours |
| Berm | Low soil ridge on the downhill side that keeps water in the basin | Compacted, gently sloped, about a foot wide at the top |
| Inlet and overflow spillway | Where water enters and where big storms safely exit | Armored with river rock so water does not erode soil |
| River rock and boulders | Erosion control at the inlet and spillway, plus the natural-stone look | Boulders set partly into the soil, not perched on top |
| Layered plants | Roots open the soil, take up water, and hold everything together | Wet-tolerant plants in the base, drier-tolerant plants on the edges and berm |
| Pea-gravel coffee spot | A small seating pad for two chairs and a side table | Compacted gravel base, flagstone border, kept above the ponding zone |
| Flagstone walkway | Connects the coffee spot to the house patio | Set on a compacted base so stones stay put |
| Low-voltage path lights | Safe evening access along the walkway | Plug-in transformer on a GFCI-protected outdoor outlet |
| Open lawn | Play space stays intact | Lawn runoff can feed the rain garden |
Is a Rain Garden Right for Your Wet Spot?
Here is the honest part the video skips. Extension guides warn against simply digging a rain garden where water already ponds. The Minnesota DNR rain garden manual puts it plainly: your yard’s wet patches often show where infiltration is slow. A puddle that sits for days may mean compacted clay, a high water table, or a spot where everything drains and nothing soaks in. A rain garden is meant to drain, not to become a permanent pond.
So the muddy patch is a starting clue, not a final location. Before you dig, confirm the site with a percolation test (Step 1). If water drains well enough, you can build there with soil amendments. If it does not, move the rain garden a few feet upslope onto better-draining soil and guide the water to it with a shallow grassy swale, or talk to a landscape professional about an underdrain. Either way, also check these siting rules from University of Wisconsin–Extension and the Minnesota DNR:
- At least 10 feet from the house foundation, so infiltrating water does not seep toward the basement.
- Not over a septic system or drain field, and clear of utility lines.
- On a slope under about 12%; steeper sites are best left to a professional.
- Full or partial sun is best; avoid digging directly under a big tree where roots are dense.
- Do not send water toward a neighbor’s property or create a new problem downhill.
If the wet area hugs the foundation or comes from a downspout dumping right beside the house, fix that first. Our guides to underground downspout drainage and building a French drain for backyard flooding cover those situations.
How to Size Your Rain Garden
Size depends on three things: how much area drains to the garden, your soil type, and how deep the garden will be. The Wisconsin and Minnesota guides use the same simple method.
1. Find the drainage area
If a downspout feeds the garden, measure the length and width of the roof section that drains to that downspout. If lawn or patio runoff also flows in, add that area. Example from the UW–Extension guide: a 100 ft. by 20 ft. house roof with four downspouts sends about 500 sq. ft. of roof to each one.
2. Identify your soil
Rub moist soil between your fingers: gritty and coarse is sandy, smooth but not sticky is silty, sticky and clumpy is clayey. The perc test in Step 1 tells you more.
3. Pick the depth from your slope
Measure slope with two stakes about 15 ft. apart, a string pulled level with a line level, and a tape measure (height difference ÷ distance × 100 = % slope). Then pick a depth:
| Lawn slope | Suggested rain garden depth |
|---|---|
| Under 4% | 3–5 in. |
| 5–7% | 6–7 in. |
| 8–12% | About 8 in. |
| Over 12% | Find another site or consult a professional |
4. Multiply by the size factor
Multiply the drainage area by the size factor below (UW–Extension/Wisconsin DNR). Use the first set if the garden is less than 30 ft. from the downspout and the last column if it is more than 30 ft. away, since the lawn soaks up some water on the way.
| Soil type | 3–5 in. deep (<30 ft.) | 6–7 in. deep (<30 ft.) | 8 in. deep (<30 ft.) | Any depth (>30 ft.) |
|---|---|---|---|---|
| Sandy | 0.19 | 0.15 | 0.08 | 0.03 |
| Silty | 0.34 | 0.25 | 0.16 | 0.06 |
| Clayey | 0.43 | 0.32 | 0.20 | 0.10 |
Worked example (planning numbers only): 500 sq. ft. of roof × 0.32 (clayey soil, 6–7 in. deep, within 30 ft.) = about 160 sq. ft. of rain garden, such as a curved bed roughly 8 ft. wide and 20 ft. long. The Minnesota manual notes most residential rain gardens land between 100 and 300 sq. ft. and recommends long, narrow shapes you can reach from the sides. Measure your own yard; nothing in the reference photos gives verified dimensions.
Materials and Tools
| Materials | Notes |
|---|---|
| Compost (and coarse sand if needed) | For amending the basin; heavy clay benefits most |
| River rock, mixed sizes | Inlet and spillway armor plus the winding rock band |
| Boulders | A few accent stones, set partly into the soil |
| Native or regionally adapted plants | Plugs or 1-quart to 1-gallon pots are typical |
| Shredded hardwood mulch | Heavier mulch stays put better than light bark nuggets |
| Crushed stone base gravel | Under the pea-gravel pad and flagstone walkway |
| Pea gravel | Top layer of the coffee spot |
| Flagstone | Border for the pad and stepping stones for the walkway |
| Stone dust or bedding sand | Fine leveling layer under walkway flagstones |
| Low-voltage lighting kit | Path lights, direct-burial cable, plug-in transformer |
Essential tools include a round-point shovel, flat spade or edger for cutting sod, wheelbarrow, bow rake, garden fork, stakes and string, a carpenter’s level with a straight 2×4, and a hand tamper or rented plate compactor. A pair of Mechanix Wear Original Work Gloves helps when you’re handling rock, flagstone, and gravel all day; pick the size that fits and add eye protection when cutting or splitting stone.
Step-by-Step: Build It in the Right Order
Step 1: Call 811, then run a percolation test
Contact 811 or your state’s 811 center a few business days before any digging, even for a shallow garden bed. Wait until every utility has responded and marked its lines with flags or paint. Private lines such as irrigation, landscape wiring, or a gas line to a grill usually are not marked by the free service, so locate those yourself.
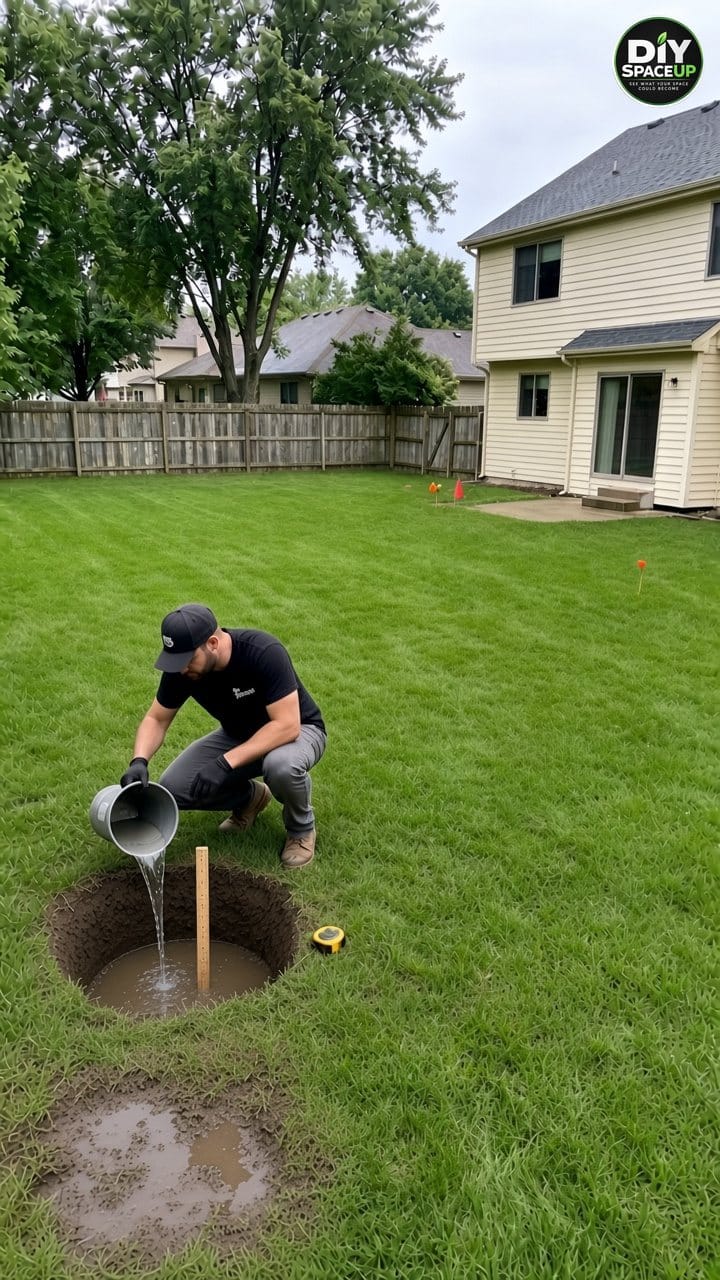
Next, test drainage. Dig a test hole about a foot deep where the garden will go (and a second one if the area is large), fill it with water, and time how long it takes to drain. The Wisconsin guide says the hole should drain within 24 hours. The Iowa DNR rain garden guide suggests filling with about 12 inches of water, repeating the test the next day, and treating roughly 0.5 in. per hour as a minimum workable rate. If the hole still holds water after 24 hours, use one of the alternatives in the section above. While you’re at it, a home kit like the Luster Leaf Rapitest Soil Test Kit gives a quick read on pH and nutrients before you pick plants; for detailed recommendations, a soil test through your local extension lab is more precise.
Step 2: Measure slope, size the garden, and lay it out
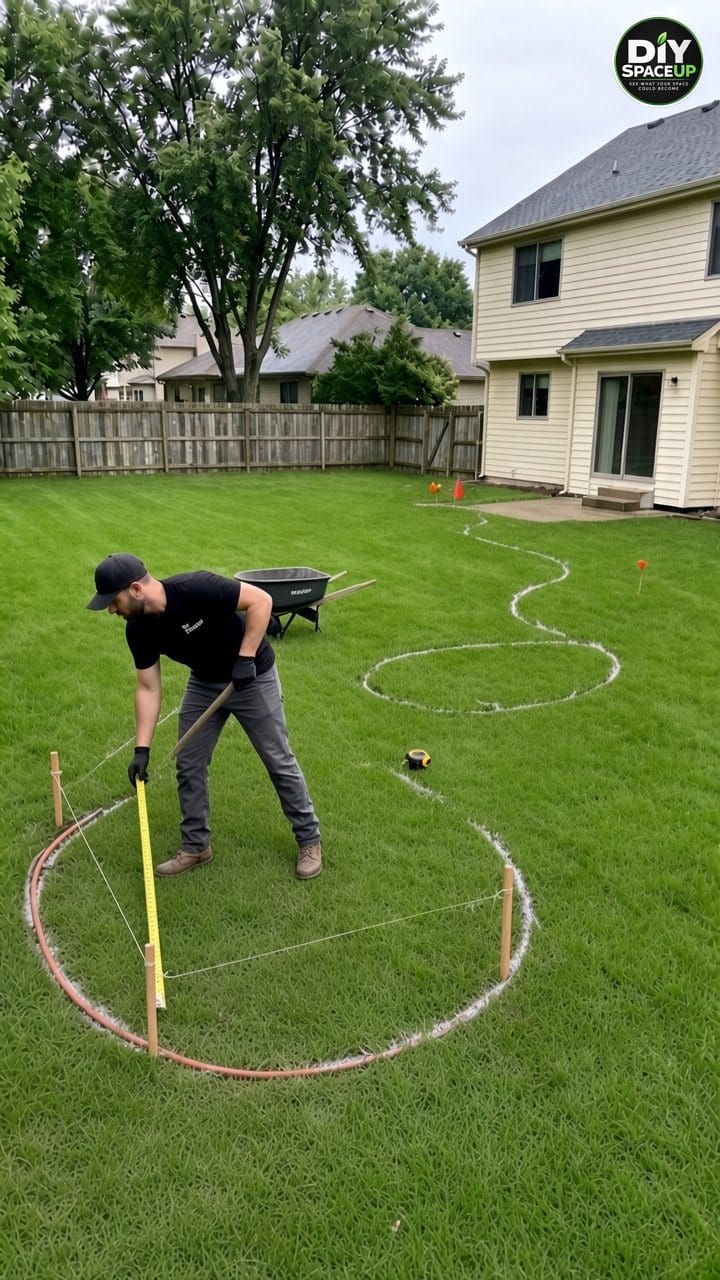
Use the sizing method above. Drive two stakes, run a string between them, and level it with a line level such as the Johnson Level 595 Structo-Cast Line Level (2-pack), whose multi-pitch vial reads slope in 1/8-inch steps. Measure the height from the ground to the string with a STANLEY FATMAX 25-Foot Tape Measure.
Lay out the curved basin with a garden hose and marking paint, keeping its long side across the slope. Mark the round coffee spot and the walkway at the same time so they sit outside the ponding area and the overflow path, and so the walkway meets the existing patio cleanly. Plan where water will enter: a downspout extension, a shallow grassy swale, or a solid pipe can carry roof water to the inlet. Pick the overflow point on the downhill side and make sure it spills onto lawn, not toward the house, the patio, or a neighbor.
Step 3: Dig a level basin, build the berm, and shape the spillway
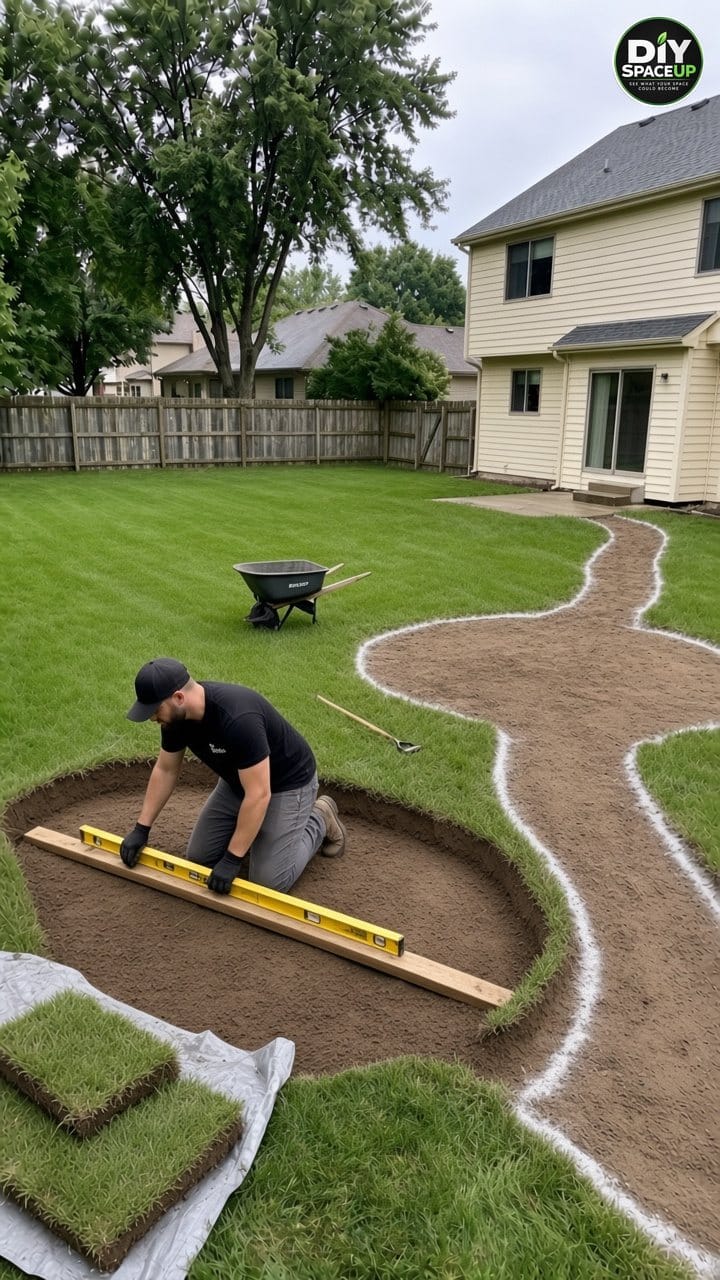
Wait for the soil to dry out enough to crumble rather than smear; digging wet clay compacts it and ruins infiltration. Remove the sod, then dig to your chosen depth, plus about 1–2 in. extra if you will add compost. The bottom must be flat and level from end to end so water spreads out instead of pooling at one end. Check it with a long straight board and a level.
Use the excavated soil to build a berm on the downhill side and partway up the sides, tapering as it goes uphill. The Minnesota manual describes a smooth ridge about a foot across, compacted firmly (stomping is fine), with gentle sides that blend into the lawn. Leave one slightly lower notch in the berm as the overflow spillway. Keep foot traffic and wheelbarrows off the basin floor as much as you can.
Step 4: Amend the soil
Loosen the basin bottom with a fork and mix in compost. The Minnesota manual suggests about 2 inches of compost for plant establishment. For heavy, compacted soils, the Rutgers Cooperative Extension fact sheet recommends adding sand to improve infiltration and, in high-clay sites, even reducing depth to about 3 inches so evaporation helps the garden empty. Rake the bottom level again when you’re done. Skip landscape fabric under the planting area: plants need to root into the native soil, and fabric can clog with silt.
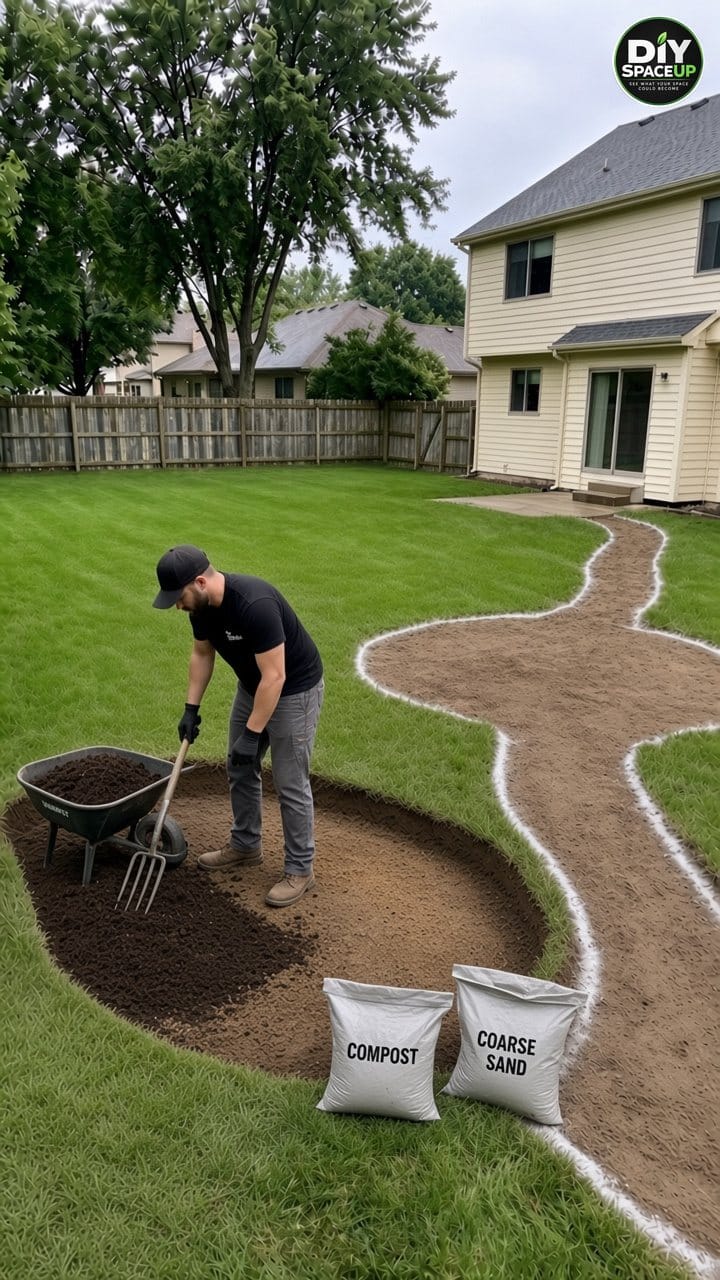
Step 5: Build the base for the coffee spot and walkway
Now switch to the hardscape. Excavate the round pad and the walkway path to about 4–6 in., depending on your soil and the materials your supplier recommends. Add crushed stone base gravel in thin layers and compact each one. A hand tamper such as the BlumeTrec 10 x 10 in. Steel Tamper is practical for a small pad and a short path; rent a plate compactor if the area is larger or the soil is soft. Give the pad and path a slight pitch so rain sheds toward lawn or the rain garden inlet, never toward the house.
Optional: a woven landscape fabric under the pea-gravel pad (not under the rain garden) helps keep gravel and soil from mixing. For more on gravel seating areas, see our DIY gravel patio makeover.
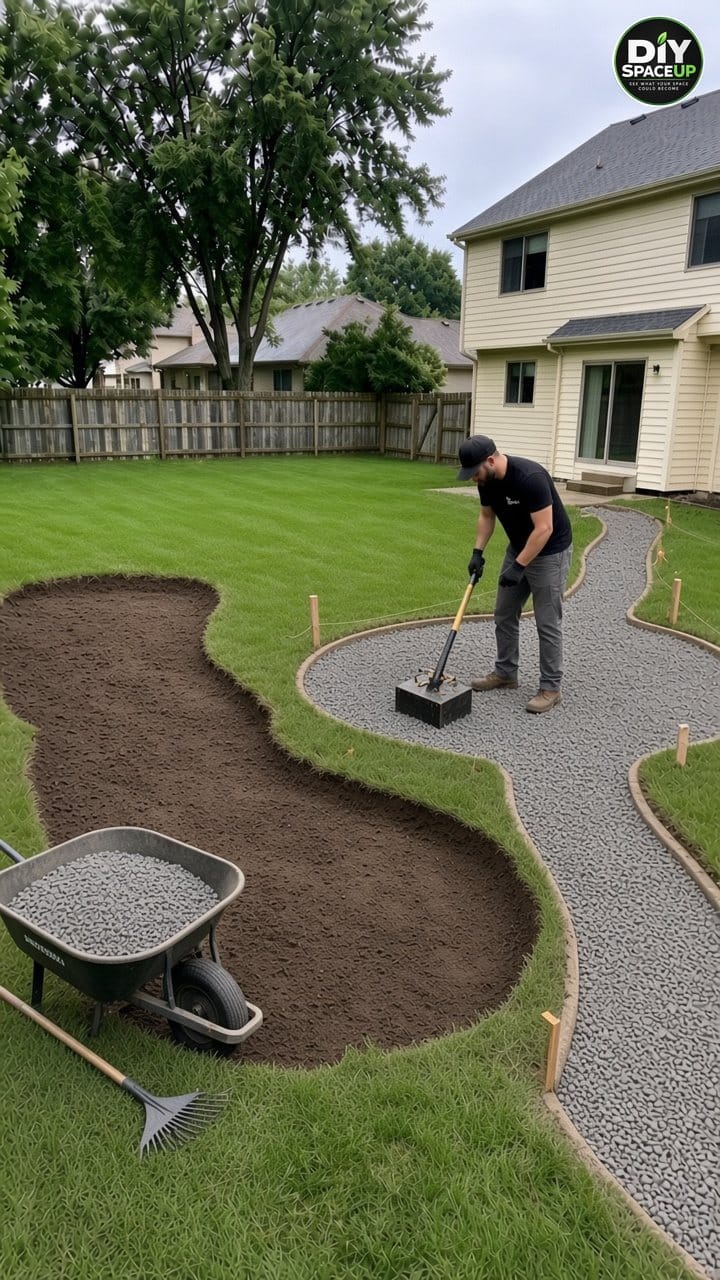
Step 6: Set boulders, river rock, flagstone border, and walkway
Place boulders first, burying each about a third of its height so it looks natural and cannot roll. Armor the inlet and the overflow notch with river rock over the soil so moving water cannot scour a channel. The winding rock band in this design runs through the level basin as a decorative and erosion-resistant feature; keep the basin floor level underneath it so it does not turn into a sloped creek that rushes water straight out. If you want a true flowing channel, that’s a different project, covered in our dry creek bed with bridge guide.
Set the tan flagstone border around the pad on the compacted base, leveling each piece and tapping it down with an ESTWING 18 oz. Deadhead Rubber Mallet. The border acts as edging, so set it firmly; some installers bed border stones in mortar for extra hold. Lay the gray walkway flagstones on a thin bed of stone dust or sand over the compacted base, checking that each stone sits solid without rocking and that edges line up to avoid trip lips. Fill joints with fine gravel, stone dust, or polymeric sand per the product instructions.
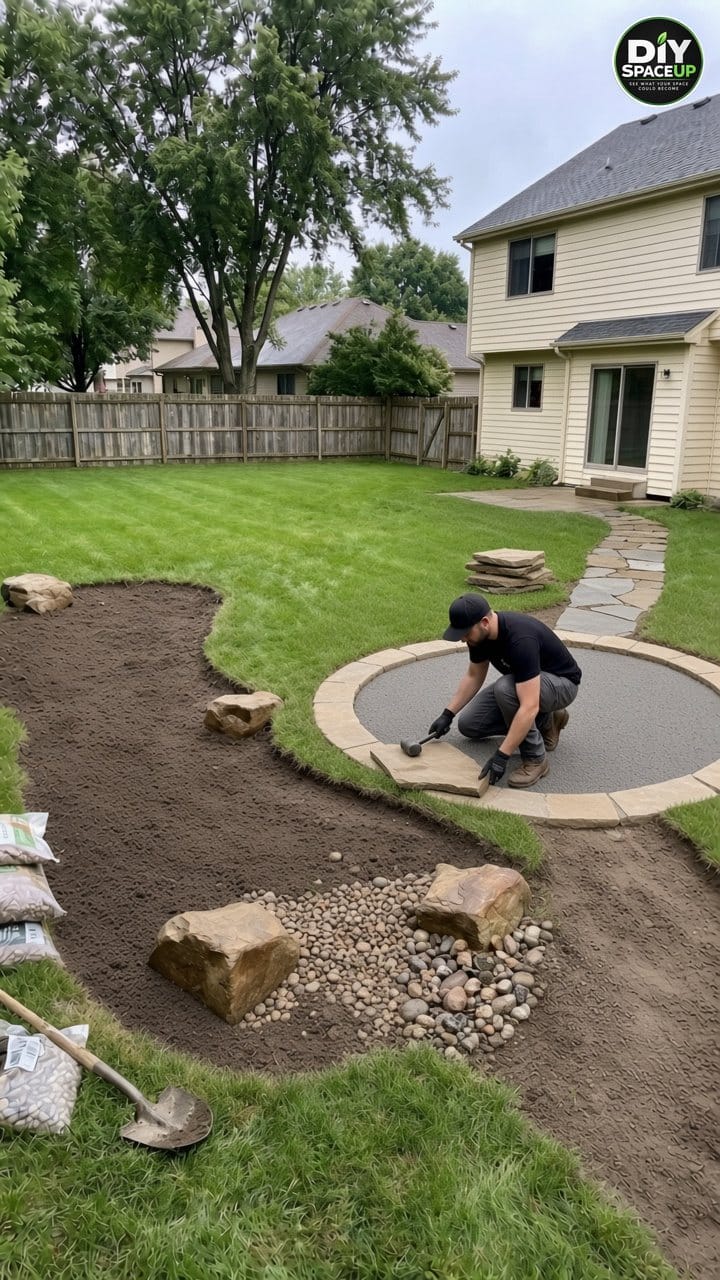
Step 7: Plant by zone, mulch, and water in
Arrange plants in their pots before planting. Put the most water-tolerant species in the base, plants that handle occasional wet feet on the side slopes, and drought-tolerant plants on the berm and outer edges (see the plant list below). Space them closer than a typical border so roots fill in quickly. Plant at the same depth they grew in the pot, then spread about 2–3 in. of shredded hardwood mulch, keeping it a little away from stems and off the inlet rock, where it would float away.
Water thoroughly right after planting and regularly through the first growing season, especially during dry spells, until roots are established. A rain garden still needs watering in year one.
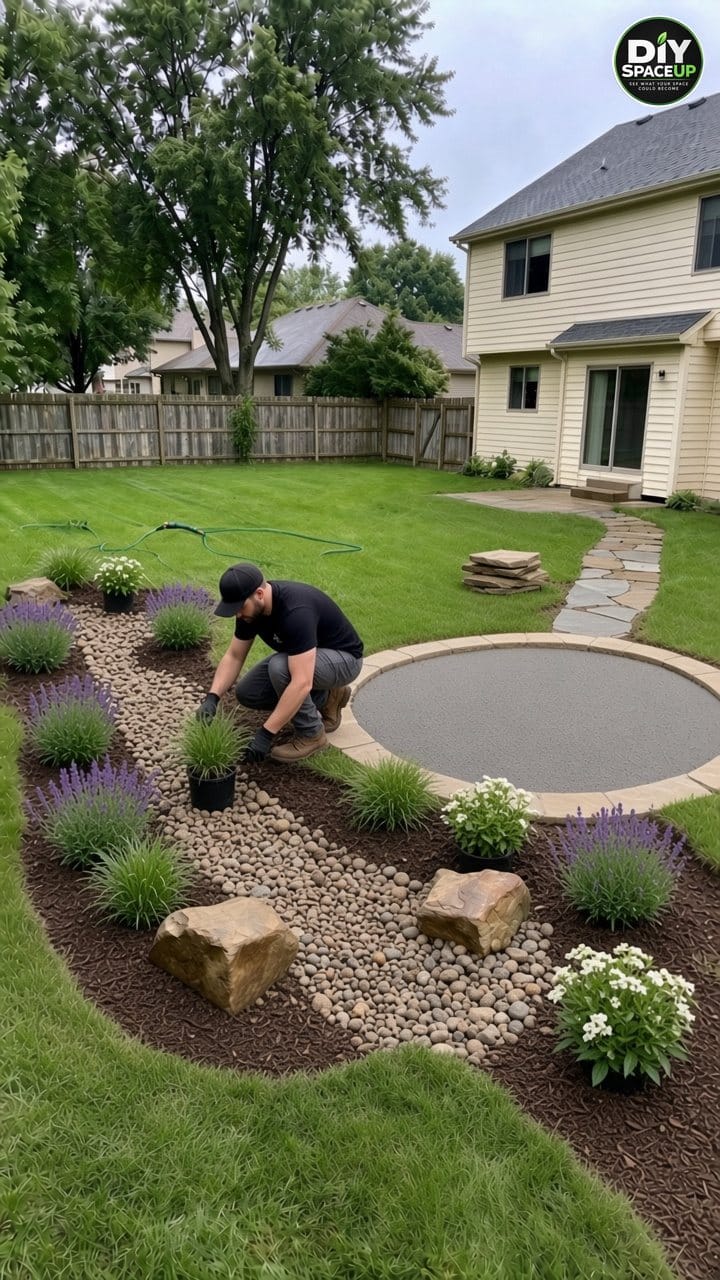
Step 8: Install the low-voltage path lights
Plan the light locations along the walkway and around the pad, then mount the plug-in transformer near a GFCI-protected outdoor outlet with a weatherproof in-use cover. Run the kit’s direct-burial cable along the walkway edge, connect each fixture with the supplied connectors, and test the lights before burying the cable. Bury the cable at the depth the manufacturer recommends, keep it out of the ponding zone, and note its route so a future edging spade does not cut it. Anything that involves a new outlet or line-voltage wiring belongs with a licensed electrician.
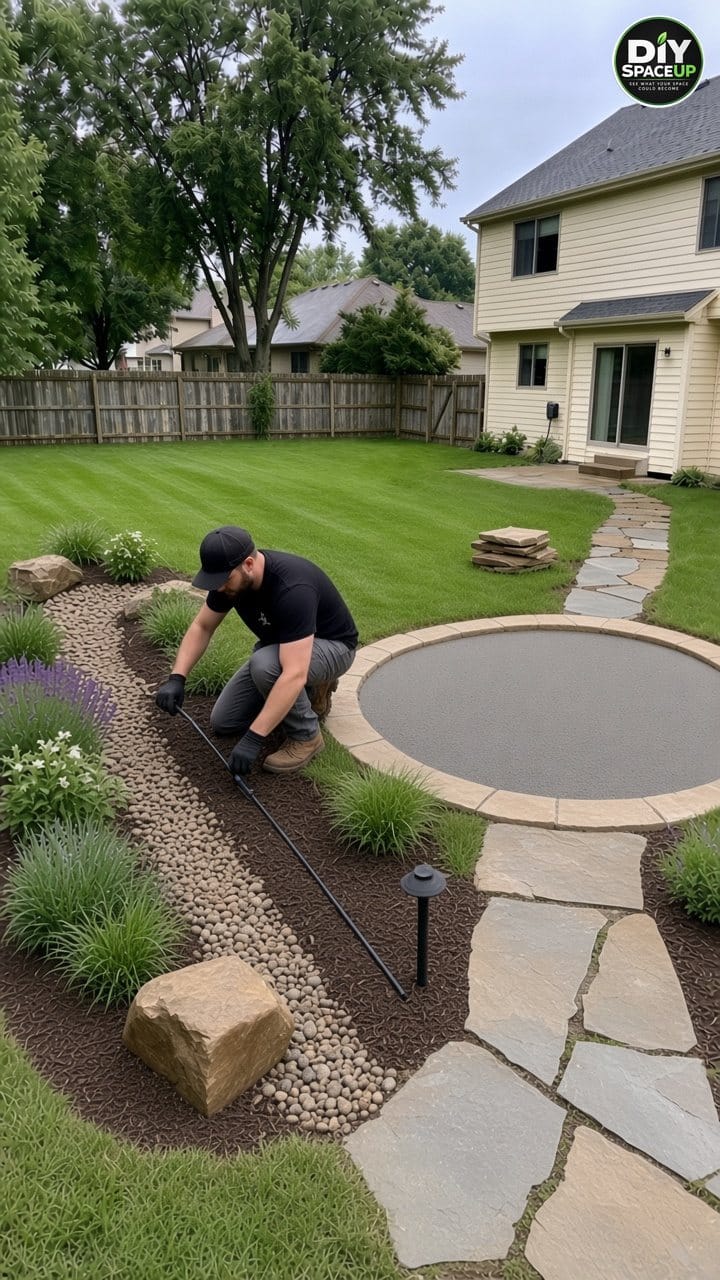
Step 9: Finish the coffee spot with pea gravel
Spread pea gravel inside the flagstone border and rake it level. Keep this top layer fairly thin, roughly 1.5–2 in., because deeper pea gravel rolls underfoot and makes chair legs sink. Top it up as needed over time. Then bring out the two chairs and the little side table.
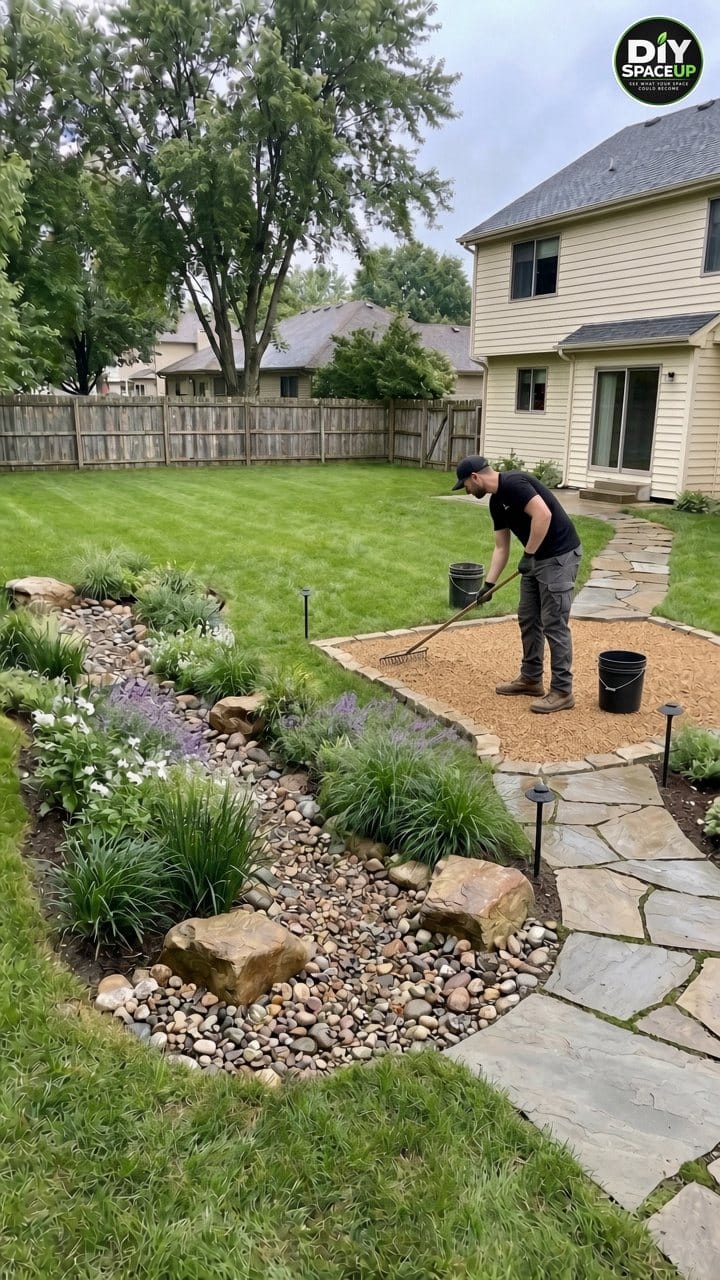
Step 10: Watch the first few storms
After the first good rain, check that water enters at the inlet, spreads across the level bottom, and leaves through the armored spillway when the basin is full. It should drain within about 24–48 hours. Rutgers notes that designing for 48 hours keeps a safety margin against mosquito breeding, which needs standing water for several days. Fix low spots, reinforce any eroding edge with more rock, and replant anything that washed out.
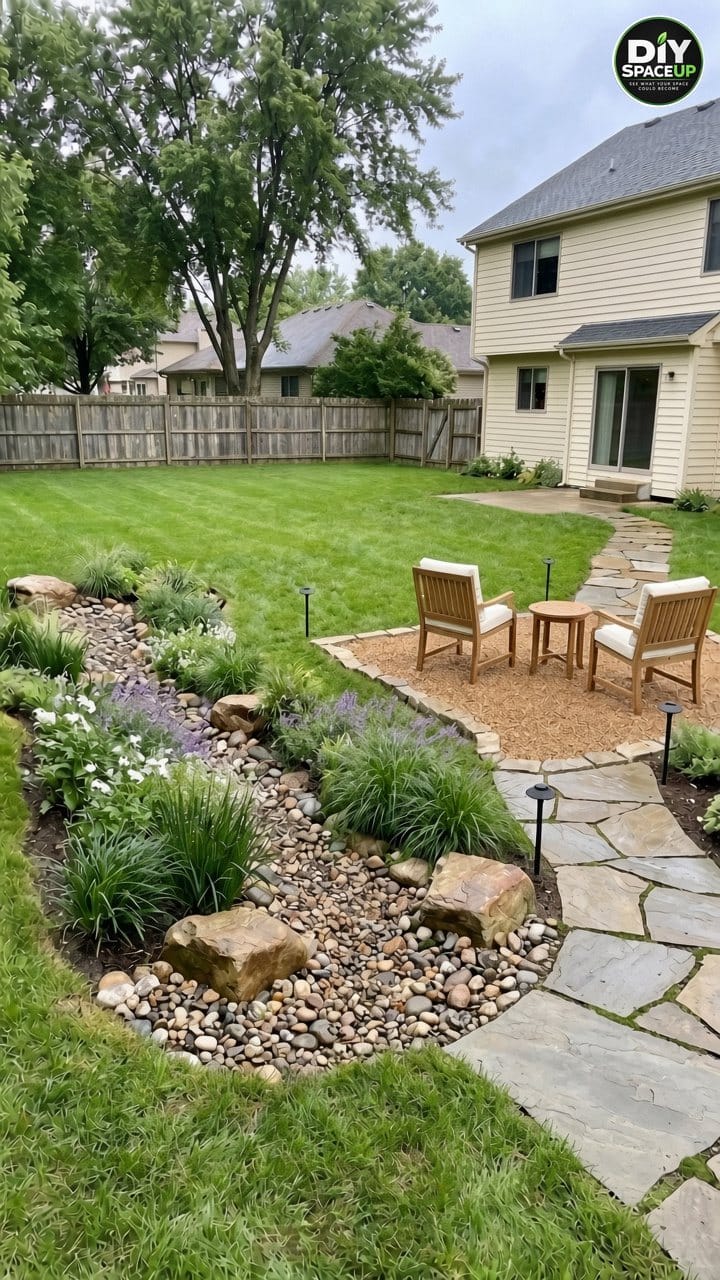
Plant List by Zone
The reference concept uses ornamental grasses, purple spiky flowers, and white blooms. Here are common rain garden choices from Midwest and Northeast extension plant lists that create a similar look. Native species vary by region, so confirm picks for your hardiness zone with your local extension office or a native plant database before buying.
| Zone | Conditions | Example plants |
|---|---|---|
| Base (deepest) | Wet for a day or two after storms, dry in between | Blue flag iris, swamp milkweed, tussock sedge, boneset, blue vervain |
| Side slopes | Occasional wet feet | Purple coneflower, black-eyed Susan, New England aster, switchgrass, Joe-Pye weed |
| Berm and edges | Mostly dry | Little bluestem, prairie dropseed, wild bergamot, butterfly weed, catmint |
About the purple flowers in the photo: they look like lavender, but lavender dislikes wet soil and usually struggles in a rain garden base. If you want that silvery-purple look, use it only on the driest edge, or substitute catmint, blue vervain, or wild bergamot.
Estimated Cost and Time
Costs vary widely by region, material choice, and how much you do yourself. These are rough planning estimates for a DIY build similar to the concept (roughly a 150–200 sq. ft. rain garden, a pad about 10 ft. across, and a short walkway), not quotes. UW–Extension’s older guide estimated about $3–$5 per sq. ft. for a DIY rain garden with purchased plants and about $10–$15 per sq. ft. for professional installation; expect current prices to be higher.
| Category | Rough estimate | What changes the number |
|---|---|---|
| Plants | $300–$900 | Plug vs. gallon sizes, quantity, local native nursery prices |
| Compost, sand, mulch | $100–$300 | Bulk vs. bagged, delivery |
| River rock and boulders | $300–$1,200 | Rock size, tonnage, delivery and access |
| Base gravel and pea gravel | $200–$600 | Pad and path size, base depth |
| Flagstone (border + walkway) | $600–$2,000 | Stone type, square footage, local stone yards |
| Low-voltage lighting kit | $150–$500 | Number and quality of fixtures |
| Tool rental (plate compactor) | $0–$150 | Hand tamper vs. rental |
| Estimated DIY total | About $1,650–$5,650 | Excludes furniture, professional labor, permits, and drainage fixes at the house |
Estimated time: about 3–5 weekends for one or two people, plus a day or two for the perc test and waiting for utility locates, and drying time if the site is wet. Rock and gravel deliveries are the heaviest part of the job.
Common Mistakes to Avoid
| Mistake | Better approach |
|---|---|
| Digging the garden right in a spot that ponds for days | Run a perc test first; move upslope or add an underdrain if it fails |
| Building it close to the house | Keep it at least 10 ft. from the foundation |
| Skipping the 811 call for a shallow dig | Contact 811 a few business days ahead and wait for all marks |
| Sloped or uneven basin bottom | Level the bottom so water spreads and soaks in evenly |
| No overflow spillway | Leave a rock-armored low point that spills onto lawn |
| Digging or tilling wet clay | Wait until soil crumbles; keep traffic off the basin floor |
| Landscape fabric under the planting area | Plant directly into amended native soil |
| Putting the seating pad in the overflow path | Keep hardscape higher and outside the ponding zone |
| Pea gravel piled too deep | Keep it about 1.5–2 in. over a compacted base |
| Lavender in the wettest zone | Use wet-tolerant natives in the base; keep lavender on the driest edge |
| Forgetting to water new plants | Water regularly through the first season |
Safety checklist: wait for all 811 marks and locate private lines; wear gloves, eye protection, and sturdy boots when handling stone; lift boulders with help or a dolly; use GFCI protection outdoors; keep kids and pets away from open holes; and stop and call a professional if you uncover unknown pipes, cables, or persistent groundwater.
Rain Garden Planning Checklist
- 811 contacted; all utilities marked; private lines located
- Garden at least 10 ft. from the foundation and away from septic systems
- Perc test done: water drained within about 24 hours
- Drainage area measured and soil type identified
- Slope measured and depth chosen
- Size calculated with the size factor
- Inlet route and overflow spillway marked
- Coffee spot and walkway placed outside the ponding zone
- Plants chosen by zone and checked for your region
- Rock, gravel, flagstone, and mulch quantities ordered
- Lighting plan, transformer location, and GFCI outlet confirmed
- Watering plan for the first season
Maintenance
In the first year, water during dry weeks and weed regularly while plants fill in. After that, a rain garden is fairly low-care: pull weeds, top up mulch in spring, cut back dead stems in late winter or early spring, and clear sediment or leaves that build up at the inlet. Check after big storms for erosion and for any standing water that lasts longer than about 48 hours. Rake pea gravel back into place as needed and re-level any flagstone that settles.
Frequently Asked Questions
Will a rain garden fix my muddy backyard?
It can help when runoff is the cause and the soil drains reasonably well. If the mud comes from a high water table, very heavy clay, or water against the foundation, you may need grading, a French drain, or downspout changes first. A perc test tells you which situation you’re in.
How deep should a rain garden be?
Typically 4–8 inches, chosen by slope: about 3–5 in. on slopes under 4%, 6–7 in. on 5–7% slopes, and about 8 in. on 8–12% slopes. Deeper gardens can hold water too long and become a tripping hazard.
Will a rain garden attract mosquitoes?
A properly sited and built rain garden should drain within about 24–48 hours, which is shorter than the time mosquitoes need to develop in standing water. If yours holds water longer, improve the soil or adjust the design.
Can I put the rain garden right next to the patio?
Keep the rain garden at least 10 feet from the house foundation. The seating pad and walkway can sit beside it as long as they stay higher than the ponding level and outside the overflow path.
Do I need a permit?
Usually not for a small residential rain garden, but rules vary. Check with your city, county, or HOA, especially if you’re redirecting downspouts or changing drainage near a property line.
How is this different from a dry creek bed?
A rain garden has a level bottom and holds water so it can soak in. A dry creek bed is a sloped channel that moves water from one place to another. See our dry creek bed guide and our muddy backyard drainage channel guide if moving water is what your yard needs.
Done in the right order, with the utility call, perc test, level basin, safe overflow, and plants matched to each zone, a muddy backyard rain garden turns the soggiest corner of the yard into a spot you’ll actually want to sit in, coffee in hand, with the lawn still wide open for play.
[…] guide to underground downspout drainage covers pipe sizing and burial. If the whole yard is wet, a muddy backyard rain garden can serve as the outlet […]
[…] way our underground downspout drainage guide shows. If your yard has room for something bigger, our muddy backyard rain garden guide walks through sizing a full rain […]
[…] Site and size it properly; see our rain garden guide […]