Some outdoor spaces are easy to overlook because they do not initially look like usable spaces at all.
That was exactly the case here. Beside the existing concrete walkway was a long, neglected strip of ground filled with weeds and uneven soil. It sat between the building and railing, wrapped around an established tree, and included an access cover that still needed to remain usable.
Instead of trying to turn the area into another concrete patio, this makeover uses a much simpler idea: clean up the ground, create a properly prepared gravel surface, define it with edging, and turn the finished area into a small outdoor lounge.
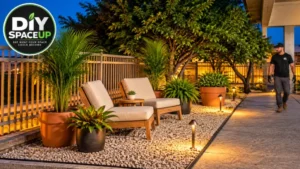
The result is a dramatic change without changing the basic architecture of the property. Two lounge chairs, a small side table, container plants, and low landscape lights make the previously forgotten strip feel intentional and inviting.
The photos show the major stages of the transformation, but they do not reveal every construction specification. Exact excavation depth, base thickness, gravel depth, drainage conditions, edging anchors, and lighting connections should therefore be determined for the actual site rather than copied from appearance alone.
Affiliate disclosure: As an Amazon Associate, DIY SpaceUp earns from qualifying purchases. Some links below are affiliate links, which means we may earn a commission at no extra cost to you.
Table of Contents
What We’re Building
This project converts an existing soil and weed area beside a concrete walkway into a defined gravel sitting area.
Component
Function
Prepared subgrade
Creates the foundation for the new surface
Compacted aggregate base
Helps provide a firmer, more stable surface
Landscape/geotextile fabric
Separates layers and helps with weed management
Landscape edging
Keeps the gravel contained and defines the perimeter
Decorative gravel
Creates the finished walking and seating surface
Existing tree
Remains integrated into the landscape
Existing access cover
Remains accessible
Container plants
Add greenery without requiring new planting beds
Lounge furniture
Turns the gravel area into usable seating
Low landscape lights
Provide nighttime accent and path lighting
The important thing is that this is not simply gravel poured over an existing patch of dirt. The preparation underneath the visible finish is what makes the transformation practical.
Before You Start: Evaluate the Existing Area
Before removing anything, spend some time studying the site.
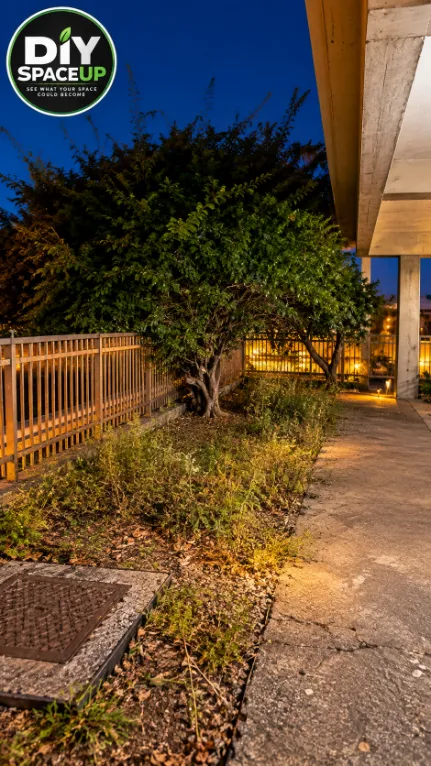
The original space in this project has several conditions that matter: an existing concrete walkway runs alongside the proposed gravel area, a railing borders the opposite side, mature vegetation and a substantial tree remain in place, and a utility or access cover occupies part of the foreground.
Those existing elements should drive the layout.
Measure the entire area with a STANLEY FATMAX 25-Foot Tape Measure or a similar durable tape. Do not rely on dimensions estimated from photos.
Record the length and width at several locations because long outdoor strips are rarely perfectly rectangular.
Also locate anything that cannot be buried or permanently blocked.
The original neglected outdoor strip before clearing, ground preparation, and installation of the new gravel lounge.
Check Before Digging
Before excavation, determine whether underground utilities, irrigation, drainage, electrical wiring, or other services could pass through the work area. In the U.S., use the appropriate utility-locating service before digging and comply with local requirements.
Also verify any condominium or HOA restrictions before altering a shared or limited-common outdoor area.
This project is especially important in that regard because the setting appears associated with a larger residential structure rather than an isolated private backyard.
Planning the Finished Height
One of the most important measurements is not the overall width of the patio. It is the finished surface elevation.
The gravel should not accidentally end up higher than adjacent surfaces in a way that sends water toward the building, blocks drainage, buries structural components, or creates an unnecessary trip edge.
Use the existing walkway and other fixed elevations as references.
A 48-Inch Box Leveland straight board can help transfer elevations across the work area. For a larger project, a laser level can make this considerably easier.
For a longer, narrow installation like this one, a quality self-leveling laser can also save considerable time when transferring reference elevations. A DEWALT Green Cross-Line Laser Level is the type of upgrade worth considering if you regularly tackle landscaping, framing, tile, or renovation projects; for a one-off patio, a basic level and straight board may be perfectly adequate.
Planning Depths
The photos confirm that soil was removed and that a compacted aggregate layer was installed before the decorative gravel. They do not establish exact depths.
For your own installation, calculate excavation from the required combination of:
compacted base + finished gravel layer + required finished elevation
The appropriate base thickness depends on soil conditions, drainage, expected use, aggregate type, climate, and manufacturer or local construction recommendations.
A pedestrian sitting area does not necessarily require the same construction as a driveway, but that does not mean the base can be ignored.
Step 1: Remove Weeds, Debris, and Unwanted Growth
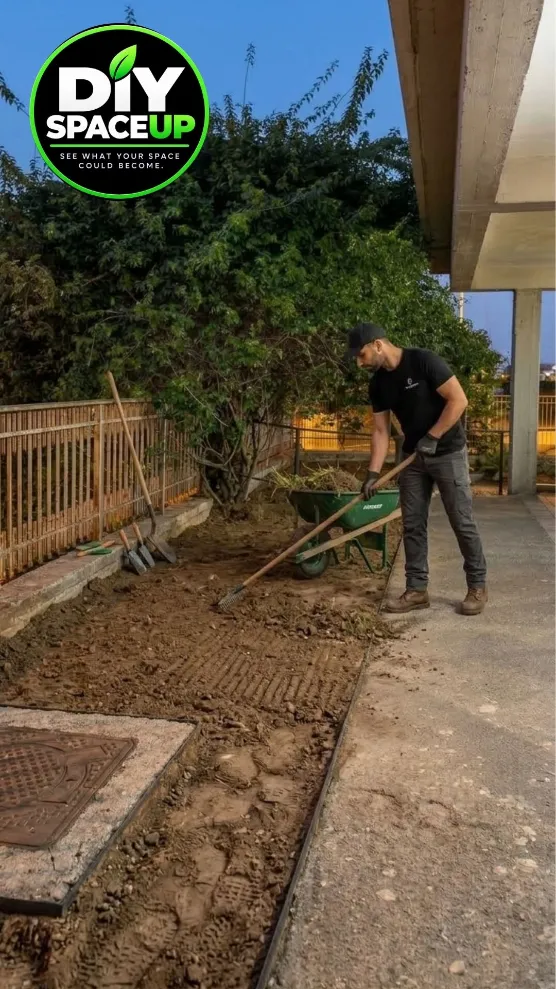
The first major construction photo shows the area stripped back to soil.
Remove weeds and unwanted vegetation from the footprint rather than hiding them beneath the new surface.
A shovel, garden rake, hoe, and wheelbarrow are useful here. The project shown uses a wheelbarrow to move removed material away from the work zone.
Be particularly careful around vegetation you intend to preserve.
The mature tree in this project remains a major feature of the finished space, so excavation around its root zone should not be treated the same way as excavation through an empty patch of soil.
Avoid indiscriminately cutting major roots. Significant root disturbance can damage or destabilize a mature tree. If substantial excavation is required within the critical root zone, consult a qualified arborist.
Step 2: Excavate and Rough-Grade the Area
After clearing the vegetation, the exposed soil is excavated and rough-graded to prepare the area for the gravel lounge base.
Once the surface is cleared, remove enough soil to accommodate the planned construction layers.
Work gradually.
The objective is not necessarily to make the soil perfectly level. Exterior surfaces need to work with drainage conditions, and the appropriate grade depends on the site.
Use a rake to spread and shape the exposed soil, checking elevations against the surrounding fixed surfaces as you go.
Ground preparation is also where sturdy tools are worth paying for. AFiskars Pro Digging Shovel and a rigid landscape rake are more appropriate here than lightweight garden tools, particularly when you are repeatedly cutting, moving, and grading compacted soil.
A long straightedge and level are useful for spotting humps and depressions.
Don’t Forget the Access Cover
The access cover visible in the original area remains exposed in the completed project.
That is an important detail.
Do not permanently cover a utility, drainage, cleanout, inspection, or service access point merely to create a continuous-looking patio. Maintain whatever clearance and access are required for that specific installation.
Step 3: Plan the Drainage Before Building Up the Surface
This step is easy to miss because drainage is mostly invisible in the final photograph.
Before adding the base, determine where rainwater currently travels and where it needs to go after the project is completed.
The finished surface should not create a basin beside the building.
Do not assume that gravel automatically solves drainage problems. Water passes through loose stone, but what happens afterward depends on the underlying soil, grading, base construction, surrounding hardscape, and drainage system.
If the existing area already holds water, diagnose that problem before covering it.
Local requirements and site conditions determine appropriate slope and drainage details, so there is no universal percentage that should be copied blindly for every project.
Step 4: Prepare and Compact the Base
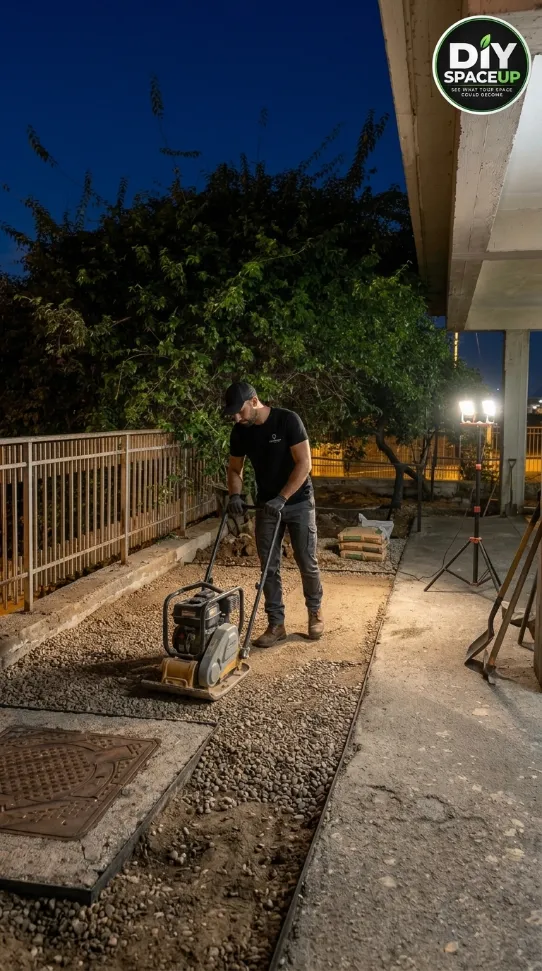
The aggregate base is mechanically compacted at night to create a firmer, more stable foundation before the decorative gravel is installed.
The construction reference shows a granular aggregate layer being mechanically compacted.
This is one of the most important stages of the project.
Spread the selected base material in appropriate lifts rather than dumping a thick layer and expecting the surface to compact evenly in one pass.
A plate compactor, like the one visible in the project, is useful for larger areas. If you expect to build additional patios, walkways, paver areas, or hardscape projects, a quality vibratory plate compactor can be a legitimate equipment purchase rather than a project-specific tool. Look for a machine designed for granular base materials, with manageable controls and specifications appropriate for the work you actually plan to do. For most homeowners completing only this lounge, however, renting a professional-grade compactor for the day will usually make more financial sense than buying one. A hand tamper can help around obstacles and locations where a machine cannot safely reach.
A 10 x 10-Inch Steel Hand Tamper is especially useful around the access cover, edging, tree area, and other places where bringing the plate compactor too close would be awkward.
Compact according to the aggregate supplier’s recommendations and site requirements.
Check the grade again after compaction.
Adding decorative gravel over soft, uneven soil may look good initially, but chairs can sink, footprints become more pronounced, and the finished surface can become uneven much more quickly.
Step 5: Install the Landscape Fabric
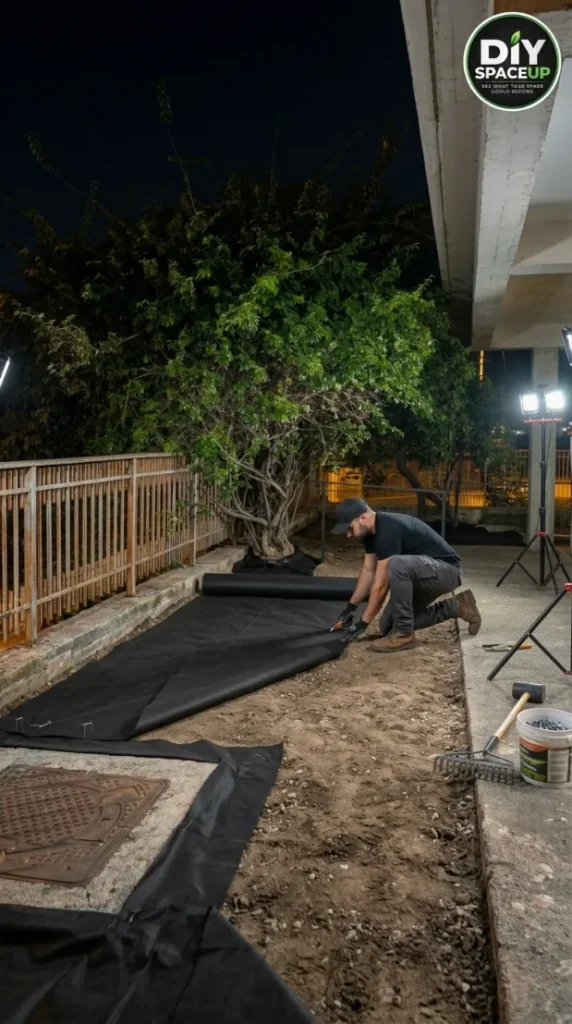
Landscape fabric is positioned over the prepared base at night while the existing tree and access cover remain clear and accessible.
The construction photos show black landscape fabric covering portions of the prepared area.
The role of fabric in a gravel installation depends on the product and assembly. A suitable geotextile can help separate soil or aggregate layers and can contribute to weed management, but it should not be presented as a permanent guarantee against weeds.
New weeds can eventually germinate in organic debris that accumulates above the fabric.
Use a product intended for the application, follow its overlap and installation instructions, and avoid assuming that any thin plastic sheet is an equivalent substitute.
For a gravel installation, choose a heavy-duty woven geotextile landscape fabric intended for ground separation rather than selecting the thinnest weed-control sheet available. A sharp OLFA Utility Knife also makes cleaner cuts around fixed features than repeatedly tearing or stretching the fabric.
Where fabric must fit around fixed objects, cut carefully rather than leaving large uncontrolled gaps.
Around the existing tree, avoid tightly wrapping material against the trunk or burying the root flare.
Step 6: Install the Perimeter Edging
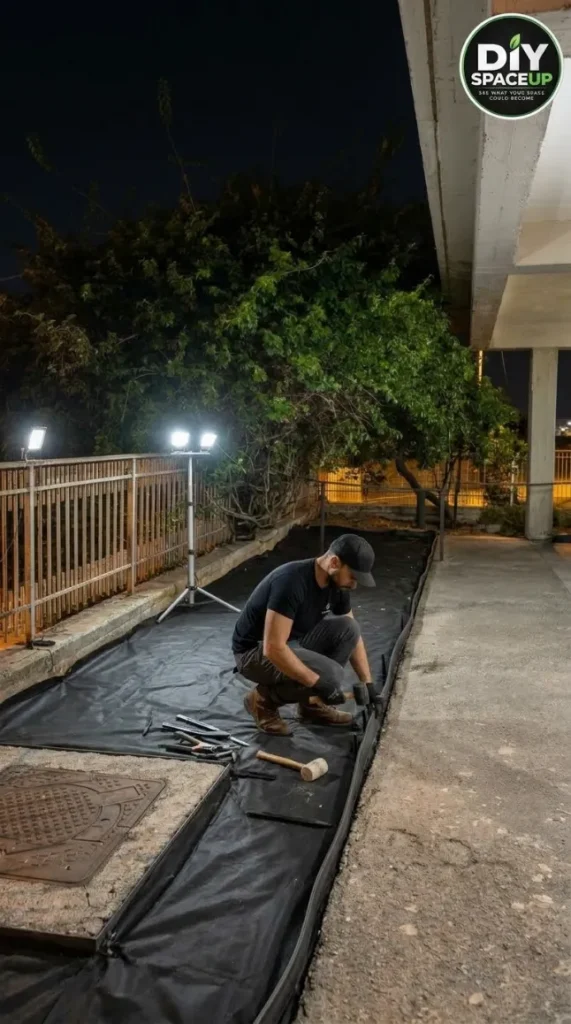
Dark landscape edging is installed along the existing concrete walkway to define the lounge area and help contain the decorative gravel.
The references show dark edging creating a clear boundary between the gravel and the neighboring concrete walkway.
Edging has an important practical purpose here: it contains the loose gravel.
Without containment, small stone will gradually migrate onto the walkway, especially where people enter and leave the seating area.
Lay out the edging before committing to its final position. A TEKTON Rubber Malletis useful for seating compatible edging stakes without repeatedly striking them with a steel hammer. Use the anchors specified for the edging system you actually purchase rather than substituting generic stakes without checking compatibility. Check the line from several angles, then secure the system using the manufacturer’s specified anchors and spacing.
Because the photographs do not establish the exact edging product or anchoring system, those details should not be copied from appearance alone.
The final height also matters. Edging needs to contain the stone without becoming an uncomfortable trip hazard.
Step 7: Add the Decorative Gravel
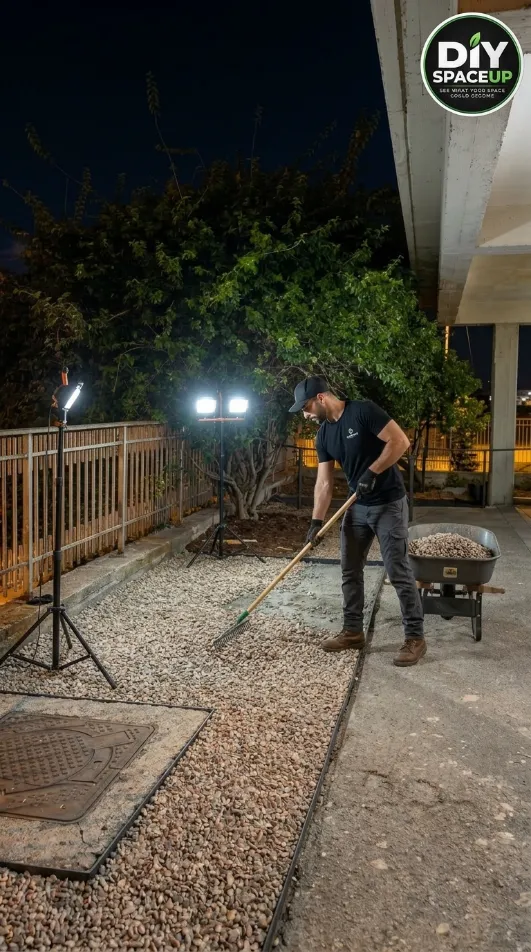
Decorative gravel is spread and raked evenly across the prepared base while the edging keeps the loose stone contained beside the walkway.
Once the base, fabric, and edging are ready, add the decorative gravel.
The finished project uses relatively small, naturally colored stone that contrasts nicely with the darker edging and existing concrete.
Before ordering, calculate volume from your actual measured area and planned gravel depth.
A basic calculation is:
Length × Width × Depth = Volume
Make sure all units are converted consistently before ordering.
For an irregular space like this one, divide the footprint into smaller rectangles or simple shapes, calculate each separately, and add the totals.
It is usually sensible to account for a modest amount of extra material for spreading, settlement, irregular edges, and future touch-ups rather than ordering to an unrealistically exact number.
Spread the stone evenly with a rake without damaging the fabric underneath.
If the aggregate delivery cannot be dumped immediately beside the work area, a Gorilla Carts Heavy-Duty Garden Cart can make repeated gravel runs considerably easier than carrying stone in buckets. A conventional wheelbarrow remains perfectly adequate for smaller quantities and tighter access.
Step 8: Detail the Gravel Around Existing Features
The difference between a gravel patch and an intentional landscape often comes down to the edges.
Carefully distribute the stone around the access cover, existing tree area, railing side, walkway edge, and other fixed features.
Keep required access points functional.
Avoid piling gravel against the tree trunk or against building components that were not intended to be buried.
This is also the right time to walk the area and look for low spots, excessive stone accumulation, unstable sections, or places where gravel spills onto the concrete.
Step 9: Add Low Landscape Lighting
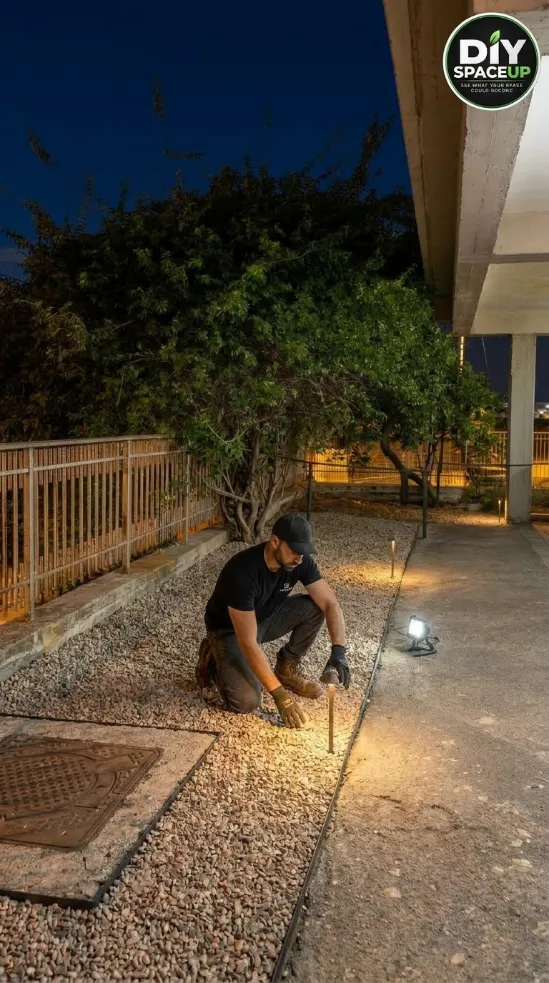
Small landscape lights are installed and tested at night along the finished gravel area before the lounge furniture and container plants are added.
Small, warm landscape lights are spaced along the finished gravel area in the completed project.
Their role is subtle. They illuminate the path and planting without turning the space into an overly bright outdoor room.
If you reproduce this feature, choose an outdoor-rated lighting system appropriate for the installation.
Follow the manufacturer’s instructions for the transformer, cable, connectors, fixture spacing, and wet-location requirements.
If the installation involves line-voltage electrical work, receptacles, new circuits, or modifications to the building electrical system, use appropriate qualified help and comply with applicable electrical requirements.
Do not route exposed cable where it can become a trip hazard or be damaged during future landscape maintenance.
Step 10: Furnish the New Lounge Without Overcrowding It
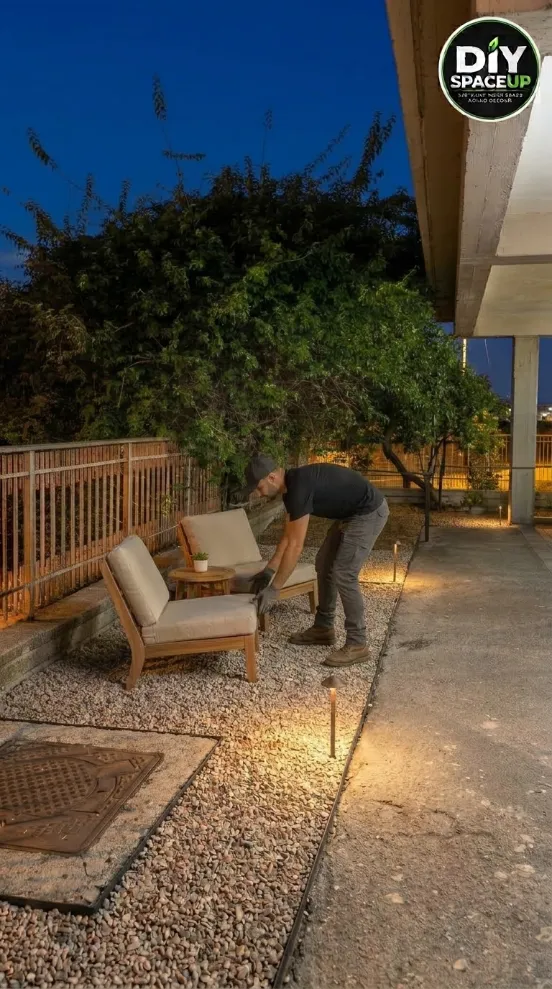
Two cushioned lounge chairs and a small round wooden table are positioned on the finished gravel area while keeping the walkway and access points clear.
The completed design stays surprisingly restrained.
There are two cushioned outdoor lounge chairs positioned on the gravel with a small round wooden side table between them.
If you want to recreate the same relaxed layout, look for a pair of deep-seat outdoor lounge chairs with weather-resistant cushions in a comparable low-profile style. Broad, stable feet are particularly useful on loose gravel. This should be treated as a similar option for recreating the look—not as identification of the exact chairs shown in the project.
A small round outdoor wood side table is enough between the two chairs; there is no need for a full-size coffee table in this narrow footprint. Choose an exterior-rated option sized to leave comfortable circulation around the seating.
That is enough.
One reason this makeover works visually is that the furniture does not fill every available inch.
Before purchasing furniture, use the actual patio measurements to check:
Chair footprint
Space required to sit down comfortably
Walking clearance
Access to the existing walkway
Access to the utility cover
Clearance around the tree and plants
For loose gravel, furniture with reasonably broad, stable feet generally performs better than very narrow legs that easily sink into the surface.
If otherwise suitable furniture has narrower feet, outdoor furniture leg pads or wide furniture foot protectors can help distribute contact at the gravel surface. Check that they fit the actual chair legs and remain stable before relying on them.
Step 11: Finish With Container Plants
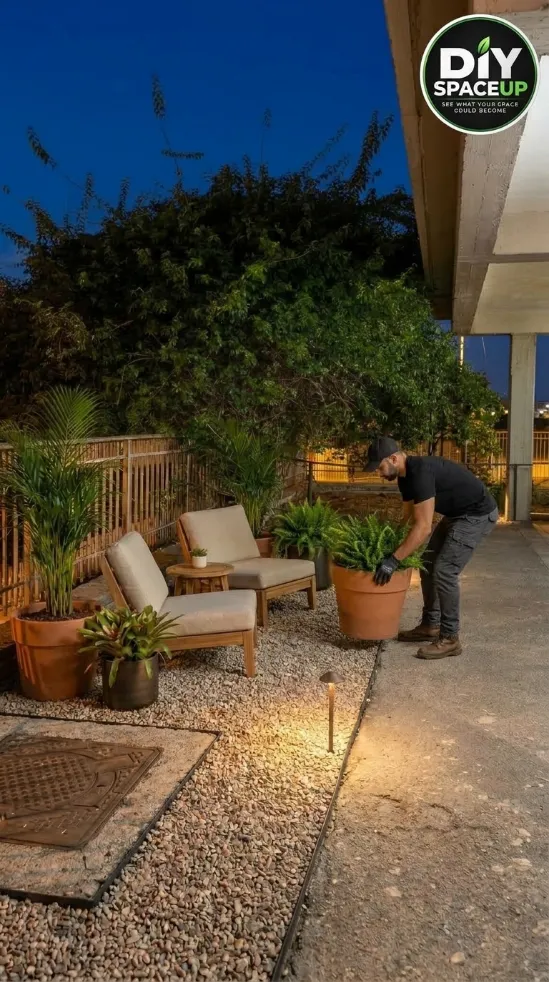
Container plants are positioned around the finished gravel seating area to soften the space while keeping the walkway and access cover clear.
Large terracotta-style planters and smaller dark pots bring greenery into the finished space.
To recreate the AFTER look without claiming an exact product match, combine large terracotta-style outdoor planters with a few smaller matte dark planters rather than buying every container in the same size and finish. The contrast in height and color is part of what gives this lounge its layered appearance.
Container planting is particularly useful here because it creates a lush lounge atmosphere without requiring additional permanent planting beds throughout the gravel.
The reference design uses different plant heights: taller foliage helps frame the seating area while lower plants soften the foreground.
Choose containers suitable for exterior conditions and plants appropriate for your climate and available sunlight.
Make sure pots can drain properly. Heavy-duty planter pot feet can be useful where appropriate to slightly raise compatible containers for drainage and make it easier to keep debris from accumulating beneath them. Choose a product suitable for the weight and base shape of the actual planter.
Very large containers can become extremely heavy after adding wet soil, so place them thoughtfully before filling them completely.
Estimated Project Cost
Because the photographs do not provide dimensions or material quantities, a precise project total would be misleading.
For planning purposes, a DIY gravel lounge of this type might fall into the following broad categories:
Expense
Typical Planning Range
Base aggregate
$50–$250+
Decorative gravel
$100–$500+
Landscape/geotextile fabric
$25–$100
Edging and anchors
$40–$150+
Compactor rental
$60–$150+
Hand tools/consumables
$25–$100+
Low-voltage lighting
$50–$250+
Planters and plants
$100–$500+
Two outdoor chairs + small table
$250–$1,000+
A reasonable planning range for the complete transformation could therefore be roughly $700 to $3,000+, depending heavily on area, local aggregate pricing, furniture, plants, lighting, delivery charges, and how many tools you already own.
That range is not a cost taken from the photographed project.
Professional excavation, tree work, drainage corrections, electrical work, permits, HOA fees, premium furniture, and major tool purchases are not included.
Tools That Make This Project Easier
You do not need a workshop full of woodworking tools for this makeover, but ground preparation requires more effort than the final result suggests.
Useful tools include a sturdy shovel, landscape rake, wheelbarrow, hand tamper, level, straightedge, utility knife, work gloves, and plate compactor.
For a project of this size, renting a plate compactor often makes more sense than purchasing one.
Safety Checklist
Before beginning, work through the site-specific risks rather than treating this as a purely decorative makeover.
Check
Why It Matters
Locate underground utilities before excavation
Digging can contact buried services
Identify the access cover
It may need permanent service access
Evaluate drainage
The new surface should not direct water toward the building
Protect major tree roots
Excessive excavation can damage the tree
Check condo/HOA rules
Exterior modifications may require approval
Use eye, hand, hearing, and foot protection
Excavation and compaction create physical hazards
Follow compactor instructions
Plate compactors are powerful machines
Verify outdoor electrical ratings
Exterior lighting is exposed to moisture
Keep gravel contained
Loose stone on concrete can become a slip or trip issue
Check furniture stability
Narrow furniture feet may sink into loose gravel
Wear appropriate gloves, eye protection, sturdy footwear, and hearing protection when operating powered compaction equipment.
Common Mistakes and Better Approaches
Mistake
Better Approach
Pouring gravel directly over weeds
Clear the area and prepare the underlying surface first
Guessing excavation depth
Work backward from the required finished elevation and material layers
Assuming gravel automatically fixes drainage
Evaluate grade and existing drainage before installation
Skipping compaction
Build a properly prepared base appropriate for the site
Covering a utility access point
Keep required covers and service points accessible
Cutting major tree roots without evaluation
Protect established roots and seek arborist advice when necessary
Using fabric as a substitute for base preparation
Treat fabric as one component of the system
Leaving gravel without containment
Install suitable edging where migration is likely
Burying the tree trunk in gravel
Preserve appropriate clearance around the trunk/root flare
Decorating before checking stability
Finish, inspect, and test the surface before furnishing
How Much Maintenance Does a Gravel Lounge Need?
A gravel patio is relatively simple to maintain, but it is not maintenance-free.
Occasionally rake the surface to redistribute displaced stone and remove leaves or organic debris before it builds up. Gravel that escapes onto the adjacent concrete should be swept back promptly.
Keeping a compact landscape rake dedicated to the area makes quick touch-ups easier, while a cordless leaf blower can help remove dry leaves from gravel without repeatedly disturbing the stone when used carefully.
Expect occasional weeds even when landscape fabric is present. Seeds can germinate in dust and organic matter deposited on top of the gravel.
Check the edging periodically as well. If sections loosen, repair them before significant amounts of gravel migrate outside the patio.
Container plants and lighting introduce their own maintenance requirements, including watering, pruning, drainage checks, fixture cleaning, and inspection of exterior cables or connectors.
Why This Small Outdoor Makeover Works So Well
The most successful part of this transformation is not any individual chair, plant, or light.
It is the decision to give an awkward leftover space a clear purpose.
The original area was essentially a transition zone: soil, weeds, an access cover, mature vegetation, and a concrete path running alongside it. The makeover does not try to erase those existing conditions.
Instead, it works around them.
The tree remains. The walkway remains. The railing remains. The access area remains. The architecture remains.
What changes is the ground plane and how the space is used.
Once the messy soil is replaced with a defined gravel surface, the same narrow strip suddenly has enough visual structure to support a small seating area. Container plants connect the lounge to the existing greenery, while warm low-level lights make the space feel intentional after dark.
Is This a Beginner-Friendly DIY?
The concept is beginner-friendly, but the physical work can be demanding.
Clearing vegetation, excavating soil, moving aggregate, spreading gravel, and operating compaction equipment involve significant manual labor. Drainage, mature tree roots, underground utilities, or electrical work can also push a seemingly simple landscaping project beyond basic DIY territory.
The decorative part is easy.
The ground preparation is the part worth taking seriously.
If the site has straightforward drainage and no major underground or structural complications, much of the work can be handled by a capable DIYer. Bring in qualified help when the project involves significant tree roots, unresolved drainage, buried utilities, electrical modifications, or conditions you cannot confidently evaluate.
Final Result
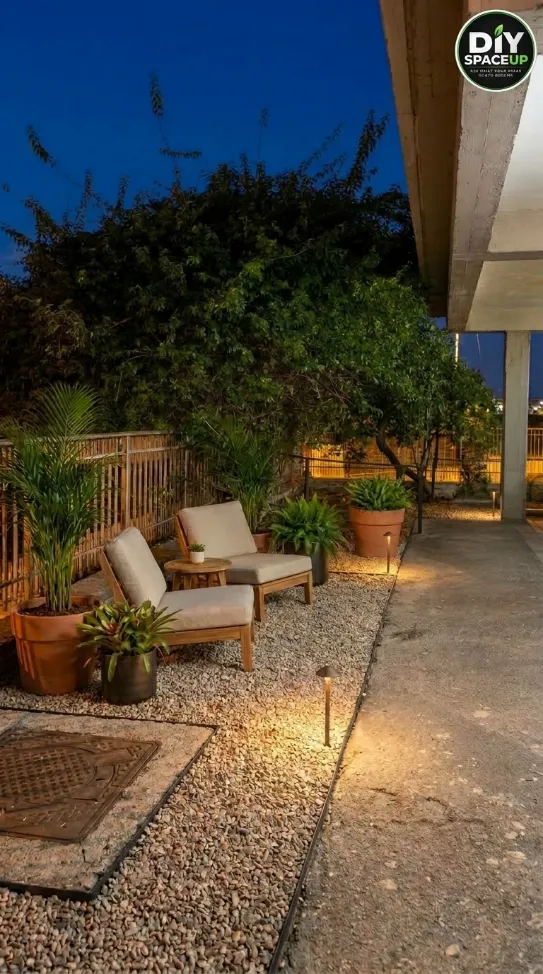
The completed gravel lounge turns the previously neglected outdoor strip into a comfortable nighttime seating area with two chairs, container plants, and subtle landscape lighting.
What started as an overgrown strip beside a condo walkway becomes a genuinely usable outdoor lounge without requiring a new deck or large poured patio.
The transformation comes from a straightforward sequence:
clear the area → establish elevations and drainage → prepare the ground → compact the base → install the fabric and edging → spread the decorative gravel → add lighting → furnish → landscape with containers.
The finished space feels polished, but the underlying lesson is practical: the attractive gravel is only the final layer.
Put the effort into the preparation first, protect the existing features that need to remain, and design the finished area around how people will actually move through and use the space.
That is what turns a forgotten strip of ground into an outdoor space that finally feels like it belongs there.
Affiliate Disclosure: As an Amazon Associate I earn from qualifying purchases. Product links in this article may earn a commission at no additional cost to you.
We use cookies and similar technologies to help our website function properly, understand how visitors use the site, and improve your experience. You can accept or manage your preferences at any time. Some features may not work as intended if certain cookies are disabled.
Functional
Always active
The technical storage or access is strictly necessary for the legitimate purpose of enabling the use of a specific service explicitly requested by the subscriber or user, or for the sole purpose of carrying out the transmission of a communication over an electronic communications network.
Preferences
The technical storage or access is necessary for the legitimate purpose of storing preferences that are not requested by the subscriber or user.
Statistics
The technical storage or access that is used exclusively for statistical purposes.The technical storage or access that is used exclusively for anonymous statistical purposes. Without a subpoena, voluntary compliance on the part of your Internet Service Provider, or additional records from a third party, information stored or retrieved for this purpose alone cannot usually be used to identify you.
Marketing
The technical storage or access is required to create user profiles to send advertising, or to track the user on a website or across several websites for similar marketing purposes.