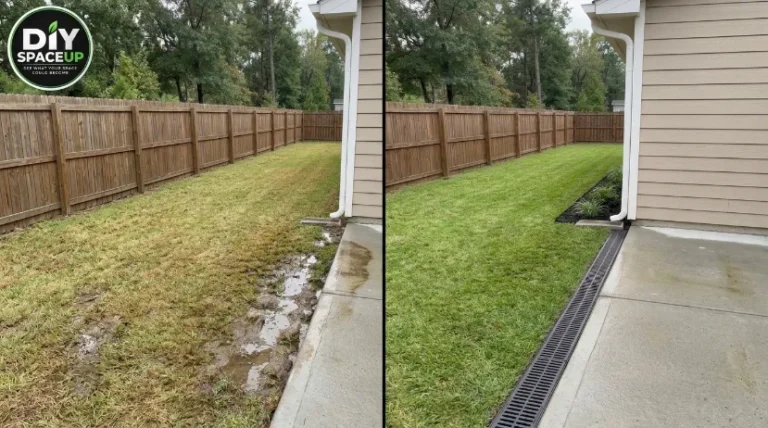
Every yard seems to have that one spot. After a good rain, the grass in the low dip stays soggy for days. Your shoes squish when you cross it, the mower leaves ruts, and nothing you plant there seems happy. A dry creek bed with bridge turns that problem area into the best-looking part of the backyard. Instead of hiding the low spot, you give the water a clear path and build the whole design around it.
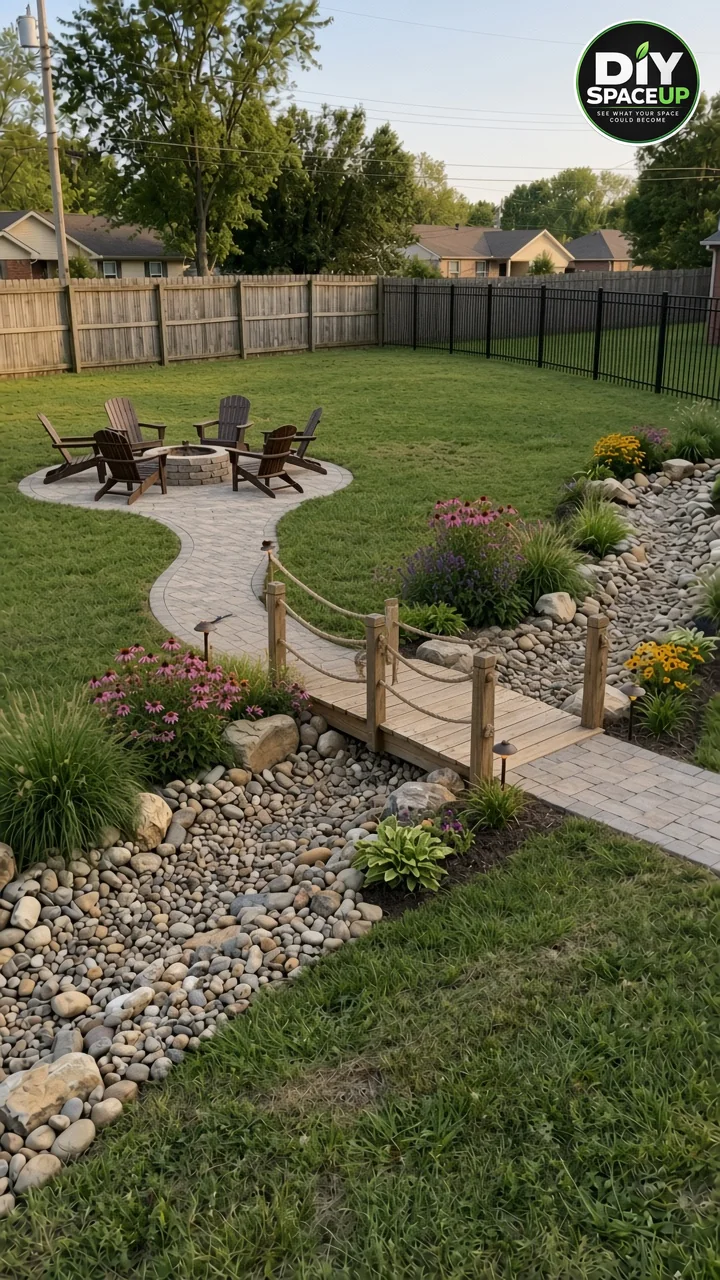
This project follows the idea in our recent DIY SpaceUp post. A winding river-rock creek bed follows the dip in the lawn. A little wooden footbridge with rope rails crosses it. A curving paver walkway leads over the bridge to a round patio with a stone fire pit and four Adirondack chairs.
Coneflowers, black-eyed Susans, ornamental grasses and hostas soften the banks, and low path lights guide you out after dark. Picture a cool evening, the crackle of the fire, and the soft knock of footsteps on the bridge boards as you head out to the chairs.
A quick, honest note: the images in this article are an AI-assisted DIY design visualization, not a record of a real, inspected build. The steps below are based on published guidance from university extension services, the concrete paver industry, model building and fire codes, and 811.
Every dimension is a planning example, not a measurement taken from the images. Actual drainage and construction requirements depend on your site conditions, so measure your own yard and check your local rules before you dig.
Affiliate Disclosure: As an Amazon Associate I earn from qualifying purchases. Product links in this article may earn a commission at no additional cost to you.
Table of Contents
What We’re Building
Here is every part of the design, and what each one does. Nothing else is added.
| Component | What it does |
|---|---|
| Dry creek bed | A shallow, curving channel of river rock and boulders that follows the low spot and guides runoff along a set path. |
| Wooden footbridge | A short, low deck of boards with square posts and rope rails, where the walkway crosses the creek. |
| Winding paver walkway | A curved path of concrete pavers on a compacted gravel base that leads across the bridge to the patio. |
| Round paver patio | A circular paved area that holds the fire pit and seating. |
| Stone fire pit | A round block fire pit in the center of the patio. |
| Four Adirondack chairs | Seating arranged around the fire pit. |
| Bank plantings | Coneflowers, black-eyed Susans, ornamental grasses and hostas that soften the rock edges. |
| Low path lights | Small fixtures along the walkway for safer walking after dark. |
Two things we can’t confirm from the images: whether there is a buried drain pipe under the rock, and what edge restraint holds the pavers. We cover both options below so you can choose what fits your yard.
Is a Dry Creek Bed With Bridge Right for Your Yard?
A dry creek bed is a shallow, rock-lined channel that looks like a natural stream bed. Most of the year it stays dry. When it rains, it guides surface water along a set path and helps slow erosion. The Clark County Master Gardeners at Washington State University describe dry stream beds as a way to handle soggy spots and storm runoff, often with stepping stones or small bridges.
It is a great fit when:
- The low spot is mostly a surface-water problem that dries out within a day or two.
- The ground has at least a gentle natural slope you can follow.
- There is a safe place on your own property for the water to go.
It is not enough on its own when:
- Water pools against your foundation or your basement leaks.
- The soil stays wet for long stretches, even in dry weather. That can point to groundwater or a spring.
- A lot of water arrives from a neighbor’s lot, a street or a large roof.
- You see deep erosion gullies, or the yard is steep.
In those cases, a buried perforated pipe may be needed. Our guide to a French drain and dry creek bed for backyard flooding walks through that version. If downspouts are part of the problem, see our underground downspout drainage guide. For serious or recurring water problems, talk to a licensed landscape contractor, a drainage specialist or a civil engineer.
Before You Dig: Water, Utilities and Rules
Watch Where the Water Goes
The most useful planning tool is free: a rainstorm. During a steady rain, walk the yard with an umbrella. Notice where water enters, where it collects and where it leaves. Take photos and mark the wettest spots with small flags.
Your creek needs a start (where water collects), a path that always runs downhill, and an end where the water can soak in or leave safely. Good endpoints include a planted area, a rain garden or another approved collection point. The model building code (IRC R401.3, viewable on UpCodes) asks that surface water drain away from foundations, with the ground falling at least 6 inches in the first 10 feet.
Never send water onto a neighbor’s property. Penn State Extension puts it plainly: when you install stormwater practices, don’t direct flows onto a neighboring property, and don’t block water that naturally leaves theirs.
If you plan a rain garden at the end of the creek, the EPA’s Soak Up the Rain program is a helpful starting point. EPA training materials also suggest keeping a rain garden at least 10 feet from the house. If the water would go to a street or storm drain, check with your city first. Some places require a permit.
Call 811 Before You Dig
This project involves a lot of digging, so contact 811 first. 811 is the free national call-before-you-dig service. You call or go online a few business days ahead, and utilities mark their buried lines with paint or flags. The exact notice period depends on your state.
Keep in mind that 811 usually marks the utility company’s lines, not private ones. Sprinkler pipes, low-voltage lighting wires, a gas line to a grill or a cable to a shed may not be marked. If you have any, locate them yourself or hire a private locator.
Check Local Rules and Your HOA
Before you buy materials, ask a few quick questions:
- Does your city or county need a permit for grading or drainage changes?
- Does your HOA have rules for patios, fire pits, structures or plant choices?
- Are there easements in your backyard? Utility and drainage easements often limit what you can build.
- What are the local burn rules for a wood-burning fire pit?
Planning Your Layout and Sizes
The sizes below are planning examples for a dry creek bed with bridge, not measurements from the images. Adjust them to your yard, your soil and your local rules.
| Element | Planning example | Why it matters |
|---|---|---|
| Creek width | About 2 to 4 ft, wider at bends | Sized to the yard and to the water it carries |
| Creek depth | Set by runoff, slope, soil and erosion risk, not a fixed ratio | The channel must carry its water to a safe outlet without overflowing or washing out |
| Creek slope | Steady downhill, even 1 to 2% | Water must keep moving to the outlet |
| Walkway width | About 36 to 48 in | Room to walk comfortably, and for two side by side at 48 in |
| Patio diameter | About 14 to 16 ft for 4 Adirondack chairs | Fits a fire pit, chairs and space to walk behind them |
| Paver surface slope | About 1/8 to 1/4 in per ft | Sheds rain without feeling tilted |
| Paver base | At least 4 in compacted; more on clay or in cold climates | Prevents sinking and heaving |
| Bridge span | Creek width plus firm bearing on each side; lumber sized for the actual span and loads | Supports stay outside the channel |
| Bridge height | Low, a step above the rock | Rope rails are decorative, not a guard |
Placing the Fire Pit Patio
Pick the patio spot with fire safety in mind, not just the view. The International Fire Code, which many cities adopt in some form, says recreational fires shall not be conducted within 25 feet of a structure or combustible material (section 307.4.2, on UpCodes).
A wooden privacy fence, a shed, a deck and low tree branches all count. Portable, manufactured fire pits follow their own rules and the maker’s instructions. Your local fire department has the final word, so call them or check their website. The EPA Burn Wise program also has tips for burning cleaner, drier wood.
Making the Bridge Make Sense
In a dry creek bed with bridge design, the walkway crosses the creek, and the bridge is where they meet. Put the crossing where the creek is narrow and straight. That keeps the bridge short and simple. The bridge should sit above the rock, with its supports outside the channel, so water can flow freely underneath.
Materials and Tools
You don’t need specialty skills for this project, but you do need a lot of muscle and a few good tools. Rock, base gravel, sand and pavers are heavy and bulky, so buy them by the ton or pallet from a local landscape supplier. Here are the tools and supplies that make the job easier.
Layout and digging
- Rust-Oleum Professional Inverted Marking Paint (Fluorescent Orange, 2-Pack) for marking the creek, path and patio on the grass.
- A Truper Tru Pro Round-Point Shovel and a flat spade for cutting sod.
- A True Temper 6 Cu. Ft. Steel Wheelbarrow for moving soil and rock.
- A Stanley Aluminum Line Level (3-Pack) with mason’s string, plus a 4-foot level, for checking slope.
- A Walensee Heavy-Duty Bow Rake for spreading gravel and sand.
Creek bed
- DeWitt Pro-5 Weed Barrier Landscape Fabric (optional, see Step 5).
- 6-Inch Galvanized Landscape Staples (100-Pack) to pin the fabric.
- River rock in mixed sizes, cobbles and a few boulders (local supplier).
Path and patio
- Crushed aggregate base (often sold as paver base or 3/4-inch minus), coarse washed concrete sand, and concrete pavers (local supplier).
- A rented plate compactor, plus a Bon Tool 10 x 10-Inch Hand Tamper for tight spots.
- A rigid paver edge restraint (local supplier) and 10-Inch Galvanized Spiral Edging Spikes.
- A IVY Classic 32 oz. White Rubber Mallet for setting pavers.
- DOMINATOR Polymeric Sand (Gray Beige) for the joints.
Fire pit
- A stacking-block fire pit kit or wall blocks rated for the job (local supplier).
- A 36-Inch Heavy-Gauge Steel Fire Pit Ring Insert to protect the blocks from direct heat.
- A First Alert Home Fire Extinguisher kept nearby.
Bridge
- Pressure-treated lumber rated for ground contact (local lumberyard).
- Deck Plus #10 x 2-1/2-Inch Exterior Deck Screws and hot-dip galvanized carriage bolts. Check that every fastener is rated for use with your treated lumber.
- A DEWALT 20V MAX Drill/Driver Kit (DCD771C2).
- 1-Inch ProManila Synthetic Rope (50 ft) for the rope rails.
Finishing touches
- BITPOTT Solar Pathway Lights (8-Pack, Warm White).
- Four POLYWOOD Classic Adirondack Chairs (Mahogany) (or similar).
- Perennials and grasses suited to your sun and climate.
Safety gear: DEWALT Concealer Anti-Fog Safety Goggles, 3M PELTOR X4 Earmuffs for the plate compactor, sturdy gloves and boots.
Step 1: Map the Low Spot and the Water Path
Start by learning how your yard drains. Walk it during and after a rain. Then check the slope on a dry day.
Drive two stakes along the path you think water takes. Tie a string between them, level it with a line level, and measure down to the ground at each stake. The difference over the distance tells you the slope. For example, a 6-inch drop over 50 feet is a 1% slope. That is enough to move water slowly.
Sketch the yard on paper. Mark the creek, the walkway, the bridge crossing, the patio and the creek’s outlet. Keep the creek on your own property from start to finish.
Step 2: Call 811 and Confirm the Rules
Submit your 811 request and wait for every utility to respond before you break ground. While you wait, confirm permits, HOA rules, easements and fire pit rules. This is also a good time to order rock, gravel, sand and pavers, since delivery can take a week or more in busy seasons.
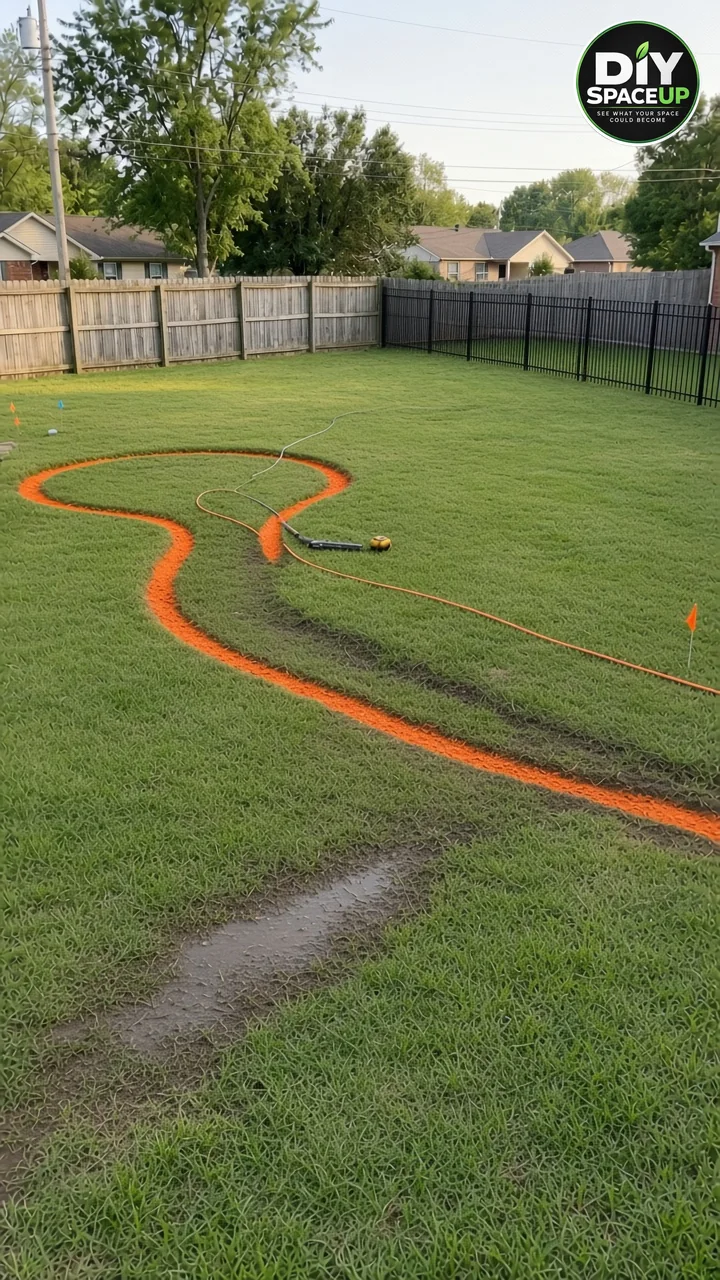
Step 3: Lay Out the Creek, Path and Patio
Lay garden hoses on the lawn to shape the creek. Real streams wander, so use soft, wide curves and avoid sharp bends that slow the water. Make the creek wider at the bends, the way a natural stream looks.
Next, lay out the walkway with two hoses spaced to your path width. Mark the round patio by driving a stake at its center and swinging a string to trace a circle. Step back, look from the house, and adjust until it feels right. Then paint every line.
Step 4: Remove the Sod and Excavate
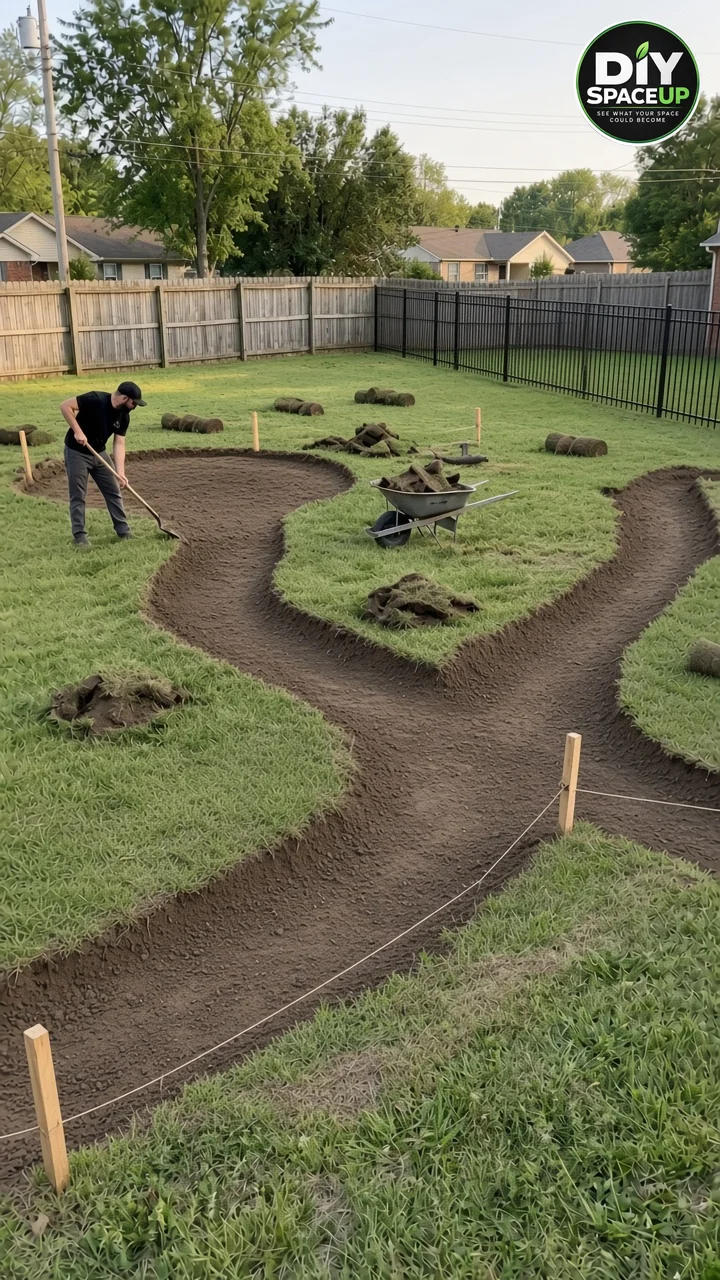
Cut and lift the sod inside the painted lines. Healthy sod can patch bare spots elsewhere in the yard.
For the creek, dig a shallow, dish-shaped channel. Make the center the deepest point and keep the bottom sloping downhill the whole way. There is no standard width-to-depth ratio. Size the channel to what you saw in Step 1: how much water arrives in a heavy rain, how steep the slope is, how your soil drains and erodes, and where the safe outlet is. A creek that carries real storm runoff, sits on a steep grade or has easily eroded soil may need a wider, deeper or more heavily armored channel. If you’re unsure, ask your local extension office, conservation district or a drainage pro before you dig. Pile the extra soil along the banks to create gentle berms, then firm it with a tamper.
For the path and patio, dig deep enough for every layer. Add up the paver thickness, about 1 inch of bedding sand, and the compacted base. For example: 2-3/8-inch pavers + 1 inch of sand + 4 to 6 inches of base = roughly 7.5 to 9.5 inches.
Shape the bottom so the finished surface will shed water gently, about 1/8 to 1/4 inch per foot, away from the house and toward the lawn or the creek. Compact the soil at the bottom before adding any gravel.
Check depths often with your string line. It is much easier to fix the grade now than after the rock goes in.
Step 5: Line the Creek and Set the Boulders
Landscape fabric: yes or no? Fabric under the rock is common. It helps keep the river rock from sinking into soft soil and mixing with mud. It does not give permanent weed control, though. Dust and leaves collect on top, and weeds will sprout in that layer. The University of Saskatchewan gardening program explains this well. If you use fabric, choose a heavy, water-permeable woven type, not plastic sheeting.
If you use fabric, start at the low end of the creek and work uphill. Overlap each strip by at least 6 inches, with the uphill piece on top, so water flows over the seams and not under them. Let the fabric run up past the banks and pin it with landscape staples. You will trim the excess later.
Now set the boulders. Put the biggest stones on the outside of curves and at the bends, where a real stream would leave them. Group them in twos and threes, and bury each one partway so it looks settled, not dropped.
Step 6: Fill the Creek With River Rock
Use a mix of sizes for a natural look. Line the banks with larger cobbles, roughly 3 to 6 inches. Fill the channel floor with smaller river rock, roughly 1 to 3 inches, deep enough to hide the fabric completely. Place a few medium stones in the middle of the channel too, so it doesn’t look raked.
Finish the outlet carefully. Spread wider, flatter rock at the end of the creek so water slows down and spreads out instead of cutting a hole in the lawn. If you are ending in a rain garden, follow its own design guidelines.
Once the rock is in, trim any visible fabric with a utility knife.
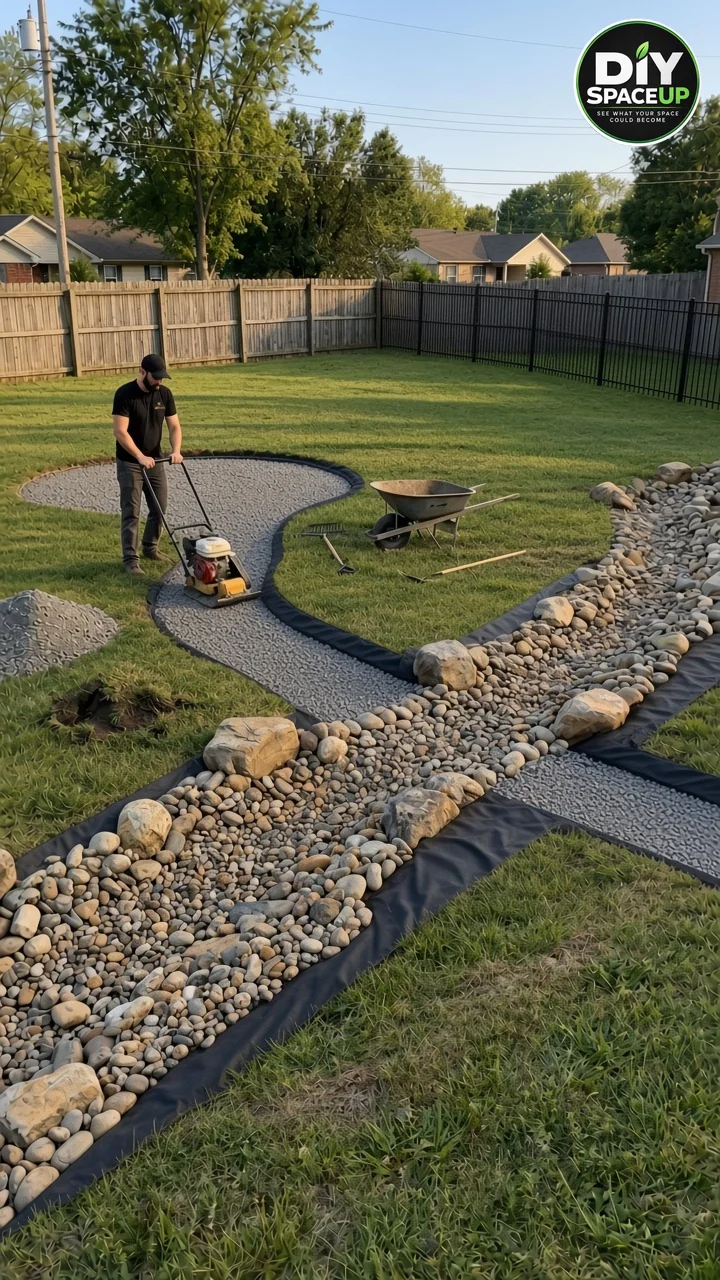
Step 7: Build and Compact the Paver Base
The base is what keeps the walkway and patio flat for years. Industry guidance from the Concrete Masonry & Hardscapes Association (formerly ICPI) calls for at least 4 inches of compacted aggregate under patios and walkways on well-drained soil. Wet, weak or clay soils and cold climates need a thicker base.
Here’s the routine:
- If your soil is soft clay, consider a layer of geotextile fabric over the compacted soil first. It helps keep the base and the soil from mixing.
- Spread the crushed aggregate base in thin layers. Lightly dampen it.
- Compact each layer with a plate compactor before adding the next. Thinner layers compact better, especially with a small rental machine. Follow the rental shop’s guidance.
- Keep checking with your string line so the base follows the planned slope.
Wear hearing and eye protection when you run the compactor. Keep it away from the creek’s edge so you don’t push rock or soil into the channel.
Step 8: Set Edge Restraints and Screed the Sand
Pavers need a firm edge, or they will slowly spread apart. Install a rigid paver edge restraint along both sides of the walkway and around the patio. Spike it into the compacted base, not into loose soil. Flexible lawn edging alone is not designed to hold pavers in place.
Next, lay two pipes or screed rails on the base. Spread coarse, washed concrete sand and pull a straight board across the rails to create a smooth, even layer about 1 inch thick. Don’t walk on the screeded sand. Fill the rail grooves as you remove them.
Step 9: Lay the Pavers and Lock the Joints
Start at a straight edge, often where the path meets the patio, and set the pavers straight down onto the sand. Don’t slide them. Tap them level with a rubber mallet. For the curves, lay full pavers first, then mark and cut the edge pieces with a masonry saw. Wear a respirator for cutting, since concrete dust contains silica.
Once all the pavers are in, sweep dry sand over the surface. Run the plate compactor over the pavers (with a protective pad if the maker recommends one) to settle them into the sand. Then finish the joints with polymeric sand. Follow the bag’s directions exactly for sweeping, cleaning off the surface and wetting.
Our step-by-step DIY paver patio and walkway guide covers paver cutting and patterns in more detail.
Step 10: Build the Stone Fire Pit
In this design, the fire pit sits in the center of the round patio. Most DIY versions use a block fire pit kit set on the compacted base. Stack the first course level, since every later course follows it. Many kits use construction adhesive between courses. Check the kit’s instructions for which adhesive to use and where.
A steel fire ring insert protects the blocks from direct heat, which helps prevent cracking. Leave the bottom open to gravel or follow the kit’s base design so water can drain.
Before the first fire:
- Re-check the distance to fences, sheds, trees and the house.
- Keep a fire extinguisher, a hose or a bucket of sand within reach.
- Burn only dry, seasoned firewood. Never use gasoline to start a fire.
- Leave a comfortable gap between the fire pit and the chairs. Never leave a fire unattended.
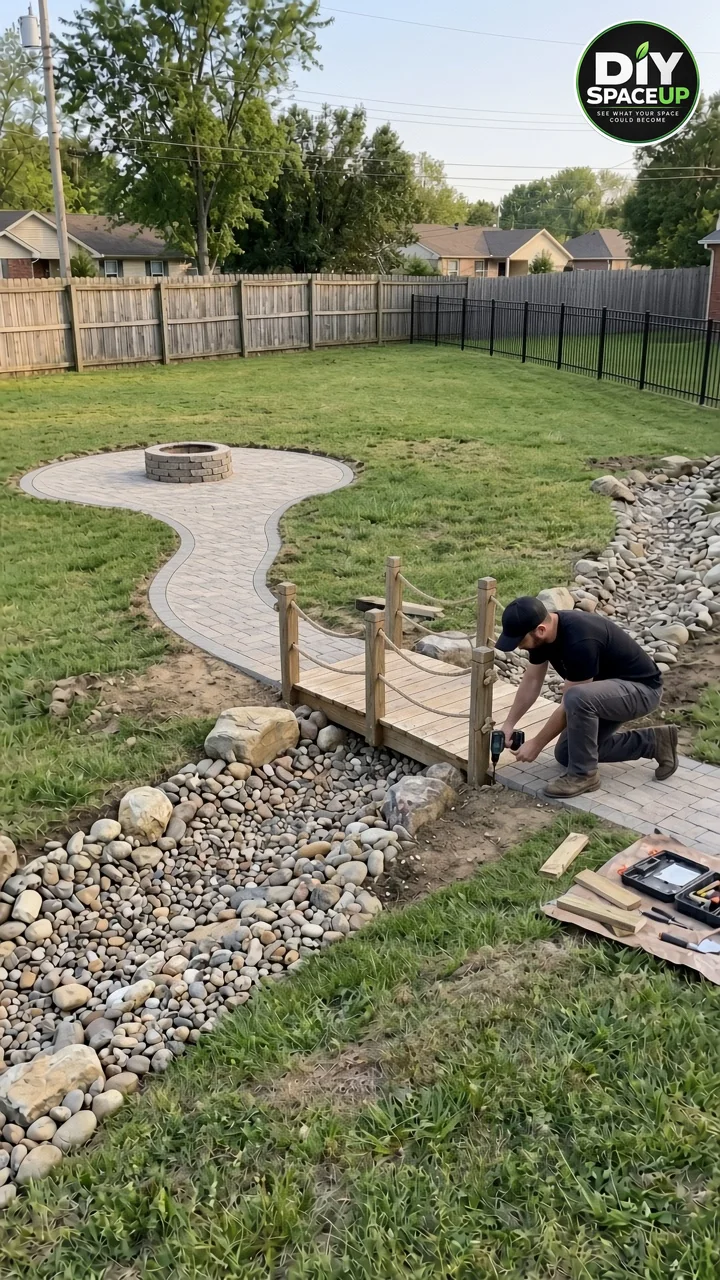
Step 11: Build and Install the Footbridge
The bridge in this design is short and low, with square wooden posts and thick rope strung between them. Here’s a simple, sturdy way to build one.
Use the right wood. For any part that touches the ground or sits close to it, use pressure-treated lumber labeled for ground contact (often marked UC4A). The American Wood Council’s DCA 6 deck guide is a helpful reference on treated lumber, fasteners and guards. Use fasteners rated for treated lumber.
Build the frame. The bridge is a set of stringers (the beams that span the creek), deck boards and supports at each end. There’s no one-size-fits-all board size: the number, size and spacing of the stringers depend on the span, the lumber species and grade, and the loads the bridge will carry, such as a group of people or a loaded wheelbarrow. Use a published span table for your lumber or have a builder or engineer size it. Rest the ends on firm ground outside the creek channel, never inside it, where they could block water or wash out.
Check these before you build. Confirm the span and lumber size, the expected loads, the connections (how stringers, posts and deck boards are fastened, with hardware rated for treated wood), the foundations (supports on stable soil that won’t settle, heave with frost or erode in a storm), the anchoring (so the bridge can’t slide, tip or float off its supports when water runs) and your local requirements, since some towns require a permit or inspection for structures in drainage areas or easements. For a longer or higher bridge, heavy loads or a channel that carries real flow, have a qualified contractor or engineer design it.
Add the deck and posts. Screw deck boards across the stringers, leaving a small gap between boards for drainage. Attach short 4×4 posts to the outside of the stringers with carriage bolts, not just screws. Then run rope between the post tops. Drill holes and knot the rope, or use eye bolts.
Know what the rope rail is. Rope makes the bridge look charming, but it is a visual handrail, not a safety guard.
Model codes require guards on walking surfaces more than 30 inches above the ground. Keep your bridge low, a step or so above the rock, and ask your building department if you plan anything taller or longer. If the bridge will get heavy use, older visitors or kids running across, consider a sturdier wood handrail.
Once your dry creek bed with bridge is built, walk across and look for rocking, sagging, gaps or loose fasteners. This quick check can reveal an obvious problem, but it doesn’t prove the bridge is structurally safe. The sizing, connection and foundation checks above do that. Inspect boards, fasteners and supports every season and after heavy storms.
Step 12: Plant the Banks and Add the Lights
The plants are what make the creek feel natural. The finished design shows purple coneflowers, black-eyed Susans, ornamental grasses and hostas. Coneflowers and black-eyed Susans love sun. Hostas prefer shade. Choose plants for your actual sun exposure and climate zone. Your local extension office or a native plant nursery can suggest varieties that handle both wet spells and dry spells.
Plant in pockets along the banks, not in the channel itself, where water will flow. Mulch the planting pockets to hold moisture.
Add low path lights along the walkway. Solar lights are the simplest, since there’s no wiring. For low-voltage wired lights, follow the transformer and cable maker’s instructions, including how deep to bury the cable. Any new 120-volt outlet or circuit is a job for a licensed electrician.
Finally, bring in the four Adirondack chairs and set them in a loose circle around the fire pit.
Step 13: Test It With a Hose and the First Storm
Run a garden hose at the top of your dry creek bed with bridge for 15 to 20 minutes. Watch where the water goes. It should follow the channel, stay off the paths, pass under the bridge, and slow down at the outlet. If water pools or escapes over a bank, adjust the rock or the grade.
Check again during the first real storm. This is the true test. Note any trouble spots and fix them while the project is still fresh.
What This Project Does, and What It Doesn’t
A dry creek bed with bridge guides surface water and adds beauty. It doesn’t stop groundwater, fix a leaking basement, or replace proper grading around a foundation. The design will also only work if water has somewhere safe to go at the end. If you are unsure, a site visit from a drainage pro is money well spent, especially before you pay for tons of rock and pavers.
For a smaller, simpler water fix, our guide to fixing a muddy backyard with a drainage channel may be all you need.
Safety Checklist
| Risk | What to do |
|---|---|
| Buried utilities | Contact 811 a few business days before digging and wait for all responses. Locate private lines yourself. |
| Water damage to your home or a neighbor | Grade away from the foundation. Never send water onto a neighbor’s lot. Get a pro for basement or foundation issues. |
| Fire | Follow local burn rules and setbacks (often 25 ft from structures and combustibles). Keep an extinguisher, hose or sand nearby. Never leave a fire unattended. |
| Heavy lifting | Use a wheelbarrow and lift with your legs. Get help for boulders. Order delivery close to the work area. |
| Plate compactor | Wear hearing and eye protection and sturdy boots. Read the rental instructions. |
| Cutting pavers | Wet-cut when possible and wear a respirator, eye and hearing protection. Concrete dust contains silica. |
| Bridge falls | Size the framing for the span and loads, set it on stable, anchored supports outside the channel, and inspect boards and fasteners every season. Rope rails are not a guard. |
| Kids and pets | Supervise around the fire pit. Teach kids that the bridge is for walking, not jumping. |
| Electrical | Use solar or low-voltage lights installed per the maker’s instructions. Hire a licensed electrician for any 120-volt work. |
Estimated Project Cost
These are rough DIY material estimates for a mid-size dry creek bed with bridge project (about a 40- to 60-foot creek, a 30- to 50-foot walkway and a 14- to 16-foot round patio). Prices vary a lot by region, supplier, delivery distance and material choice. Get local quotes before you commit.
| Category | Rough DIY range |
|---|---|
| River rock, cobbles and boulders (plus delivery) | $400 to $1,500 |
| Landscape fabric and staples | $60 to $200 |
| Crushed base, sand and geotextile | $400 to $1,200 |
| Concrete pavers (walkway and patio) | $1,000 to $3,000 |
| Edge restraint, spikes and polymeric sand | $200 to $600 |
| Plate compactor rental (1 to 2 days) | $100 to $300 |
| Fire pit kit and steel ring | $250 to $800 |
| Bridge lumber, bolts, screws and rope | $150 to $500 |
| Plants and mulch | $150 to $600 |
| Path lights | $40 to $300 |
| Estimated total, without chairs | About $2,750 to $9,000 |
| Optional: 4 Adirondack chairs | About $400 to $1,600+ |
Not included: professional labor, permits, tool purchases, drainage pipe, regrading by a contractor, or premium upgrades like natural stone pavers. Hiring a pro for the whole project typically costs several times the DIY material budget.
Time and Difficulty
Difficulty: Intermediate to advanced. The skills are simple, but the work is heavy and the grading needs care.
Estimated time: a full dry creek bed with bridge, walkway and patio takes about 2 to 4 weekends for two people, plus the 811 waiting period. Here is a rough breakdown, labeled as estimates:
| Phase | Estimated time |
|---|---|
| Watching drainage, planning and 811 wait | About 1 week (mostly waiting) |
| Layout, sod removal and excavation | 2 to 3 days |
| Creek bed fabric, boulders and rock | 1 to 2 days |
| Paver base, edging, sand and pavers | 3 to 5 days |
| Fire pit | Half a day |
| Footbridge | 1 day |
| Planting, lights and testing | 1 day |
Common Mistakes and Better Approaches
| Mistake | Better approach |
|---|---|
| Digging before calling 811 | Contact 811 and wait for every utility to respond. |
| A creek that runs uphill in places | Check the slope with string and a level before adding rock. |
| Sending water toward the house or a neighbor | Plan a safe outlet on your own property first. |
| Rock all one size | Mix boulders, cobbles and smaller river rock. |
| Thin or poorly compacted paver base | Use at least 4 in of compacted base, in thin layers. |
| No edge restraint | Use a rigid paver edge restraint spiked into the base. |
| Bridge supports inside the channel | Rest the stringers on pads outside the creek. |
| Treating rope as a safety rail | Keep the bridge low, or add a sturdy wood handrail. |
| Fire pit too close to the fence | Check local setbacks and measure before you build the patio. |
| Plants in the flow path | Plant on the banks and leave the channel clear. |
Care and Maintenance
A little seasonal care keeps a dry creek bed with bridge looking natural and working well.
- After big storms: check the creek for washed-out rock and the outlet for erosion. Reset stones as needed.
- Spring and fall: pull weeds while they’re small and clear leaves out of the rock so they don’t break down into soil.
- Pavers: top up joint sand as needed and rinse off dirt. Reset any paver that sinks.
- Bridge: check bolts, screws and boards each spring. Replace worn or frayed rope. Synthetic rope resists rot, but sunlight weakens it over time.
- Fire pit: remove ash once it is completely cold and check the blocks for cracks.
FAQ
How deep should a dry creek bed with bridge be?
There is no single number or ratio. Depth and width depend on how much runoff the channel carries, the slope, your soil, the erosion risk and where the water can safely exit. The bottom must slope downhill the whole way to that outlet. For heavy flows, steep ground or water near a foundation, get advice from your extension office or a drainage professional.
Do I need landscape fabric under a dry creek bed?
It’s optional. Fabric helps keep river rock from sinking into soft soil, which is useful in clay. It won’t stop weeds forever, because seeds still sprout in the dust that collects on top. Use a heavy, permeable woven fabric if you use it at all.
Will a dry creek bed fix my drainage problem?
It helps with surface runoff that follows a natural low path. It won’t fix groundwater, a wet basement, or water that has nowhere to go. For those, consider a French drain or call a drainage professional.
How far should a fire pit be from my fence?
Many local codes are based on the International Fire Code, which keeps recreational fires 25 feet from structures and combustible materials, like a wooden fence. Some places allow less for manufactured fire pits, and some ban wood fires on certain days. Check with your local fire department.
Does a small garden bridge need a railing?
Model codes require guards where a walking surface is more than 30 inches above the ground. A low garden bridge usually sits well below that, but local rules vary. A rope rail is decorative and isn’t a safety guard. Keep the bridge low and ask your building department if in doubt.
How much does a dry creek bed with bridge cost to DIY?
For the full design with walkway, patio, fire pit and plants, a rough DIY material budget is several thousand dollars, depending on size and region. The creek alone can cost much less. See the cost table above, and get local quotes for rock and pavers.
Why This Backyard Transformation Works
The best part of a dry creek bed with bridge is that it doesn’t fight the yard. The low spot becomes the creek, the creek gives the walkway a reason to curve, and the bridge ties it all together. Plan the water path first, respect the rules on digging and fire, and build each layer in the right order. The result is a backyard that handles rain better and invites you outside on every cool evening.
Want more ideas like this? Browse all our outdoor space projects, or try a smaller weekend project like our gravel patio makeover.