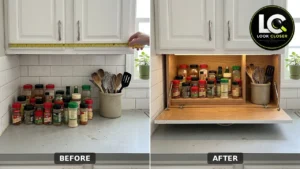

Spice bottles have a way of spreading. First it is five jars by the stove, then fifteen, then a utensil crock joins them, and suddenly the best stretch of counter under the upper cabinets is a crowded shelf. That was the starting point in this white kitchen: two rows of spice jars and a crock of wooden spoons and whisks lined up against the subway tile, right where food prep should happen.
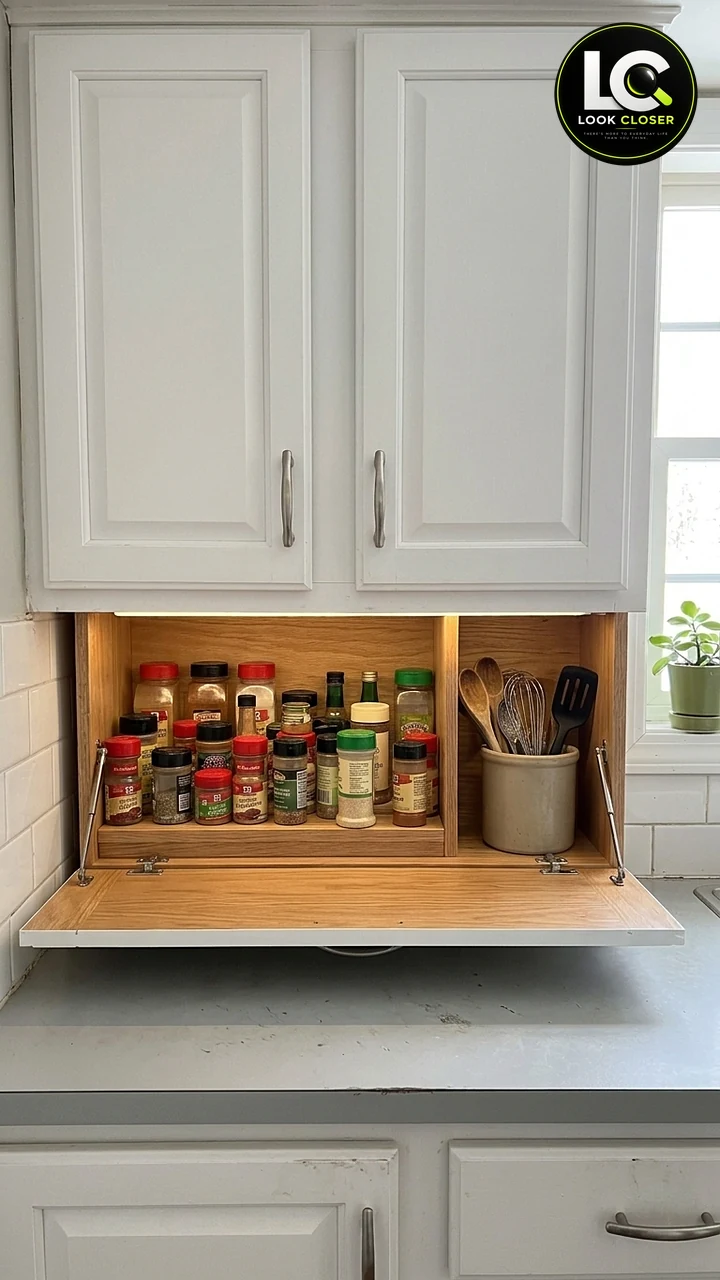
The Look Closer idea looks up instead of out. The gap between the counter and the upper cabinets is mostly empty wall, so it becomes a flip-down spice cabinet: an oak plywood box fitted under the uppers, with a center divider, a tiered spice riser on the left, a utensil bay on the right, a warm LED light under the top, and a front panel that hinges at the bottom and drops down on stays. Closed, it reads as a neat wood cabinet. Open, every label faces you. Same spices, same utensils, just a smarter place for them.
The original shows the result, not the construction, so the plan below is a constructed build method rather than a copy of a measured original. It adds what the images cannot show: outlet and clearance checks, anchoring into studs, hinge and stay choice, and safe lighting. Every dimension here is an example. Measure your own kitchen. If you want the slide-out version of this idea, compare it with our pull-out tilt-down spice rack, which uses the same space in a different way.
Affiliate Disclosure: As an Amazon Associate I earn from qualifying purchases. Product links in this article may earn a commission at no additional cost to you.
What’s in This Post
- What We’re Building: A Flip-Down Spice Cabinet
- Would a Flip-Down Spice Cabinet Free Up Your Counter?
- Measure the Gap, the Depth, and the Outlets
- Choose the Hinge and Flap Stays
- Safety First
- Materials and Tools
- Example Cut List (Use Your Own Numbers)
- Build the Cabinet, Step by Step
- Check the Anchoring, Load, and Clearance
- Lighting and Electrical Safety
- Finish, Heat, and Steam
- Estimated Project Cost
- Renter-Friendly and Budget Alternatives
- Common Mistakes and Better Approaches
- FAQ
- Final Thoughts
What We’re Building: A Flip-Down Spice Cabinet
The component list follows what is visible in the Look Closer images. Anything the images do not show, such as the hanging rail and the cord path, is marked as a recommendation.
| Component | Function |
|---|---|
| Open-front box in oak-veneer plywood, sized to the gap under the upper cabinets | Holds everything off the counter in the dead wall space below the uppers |
| Center divider | Splits the box into a wide spice bay on the left and a narrower utensil bay on the right |
| Two-tier spice riser in the left bay | Lifts the back row so every label is visible when the front is down |
| Utensil bay on the right | Holds the existing crock of spoons, whisks, and spatulas |
| Bottom-hinged drop-down front (flap) | Hides the contents when closed and opens to a level stop |
| Flap stays on both sides | Control the drop and hold the flap level; one stay alone would twist the flap |
| Catch at the top of the flap (recommended) | Keeps the flap closed; a magnetic catch or touch latch both work |
| Hanging rail screwed into wall studs (recommended, not visible) | Carries the load so the thin cabinet bottom is not doing all the work |
| Warm LED light under the box top | Lights the labels; plug-in and listed, or hardwired by an electrician |
| Cord clips and a grommet (recommended) | Keep the light cord out of the flap, hinge, and stays |
If you like this kind of upgrade, the lift-up coffee station uses a similar oak interior and warm lighting inside an upper cabinet, and the hidden cutting board drawer insert turns a drawer into a prep station.
Would a Flip-Down Spice Cabinet Free Up Your Counter?
In this kitchen, the counter under the uppers goes from a crowd of jars and a crock to bare stone. You reach the same spot for the same things; you just flip the front down first.
It works best when:
- The gap between the counter and the upper cabinets is at least a typical height. Many kitchens have about 18 in here, but some have less, so measure yours.
- The section of wall you want to use has no outlet, or the cabinet can stop short of it (see the outlet section below).
- The spot is away from the cooktop.
- You can reach at least one wall stud behind the area.
It is not ideal if that stretch of counter holds a stand mixer or coffee maker, since the box takes the full height of the backsplash.
Measure the Gap, the Depth, and the Outlets
This step decides whether the project works. Measure in three places across the width, since counters and cabinets are rarely parallel, and write each value down as a variable for the cut list.
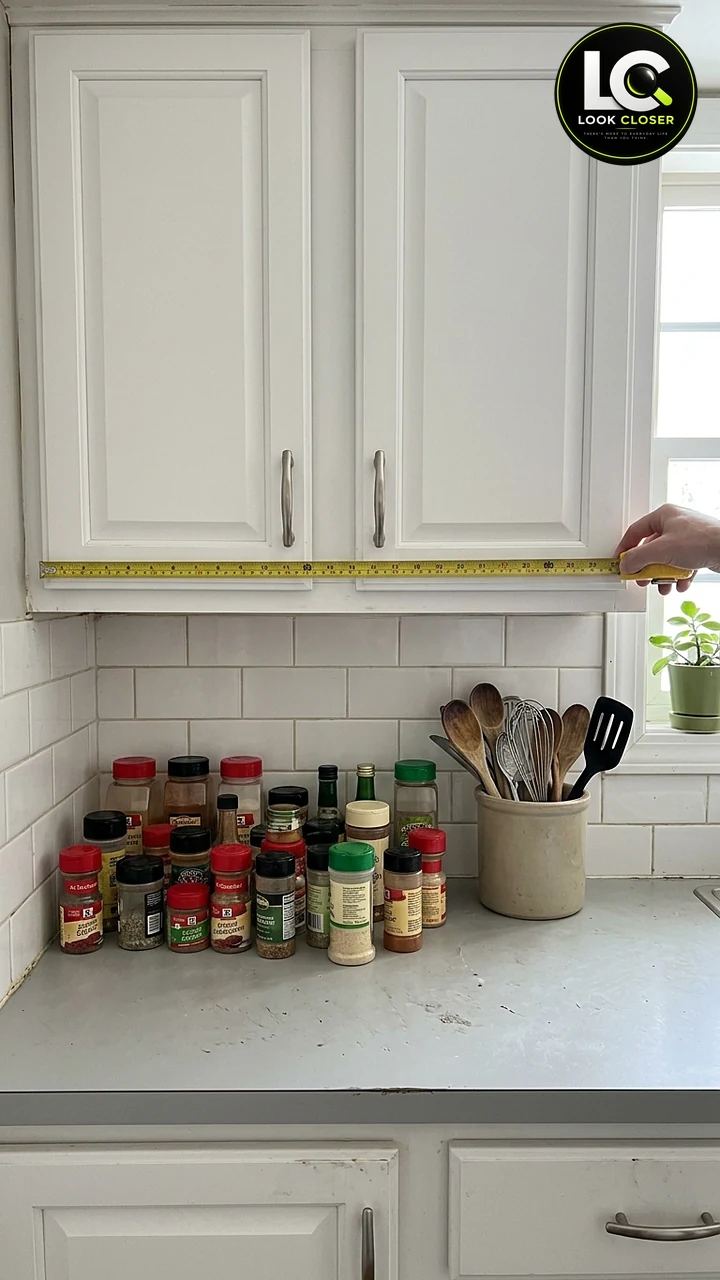
- Gap height (G): countertop to the underside of the upper cabinets, at the front and the back. Use the smallest number.
- Width (W): the width you want to fill, usually matching one upper cabinet or a pair of doors. In the before image, the tape runs across both doors of the upper cabinet, which is the width the finished box matches.
- Cabinet depth (Dc): outside depth of the upper cabinet from the wall, not counting the doors. Many wall cabinets are about 12 in deep, but measure.
- Cabinet bottom thickness (Tb): open the upper cabinet and check its floor. Many are only about 1/4 to 1/2 in thick, which matters for screw length and for how much load the bottom can carry.
- Studs: scan the wall between the counter and the cabinets and mark stud centers on painter’s tape.
- Outlets, switches, and pipes: mark every receptacle and switch in the backsplash.
- Range distance: measure from the box’s planned edge to the cooktop.
Leave a small gap under the box, for example 1/2 to 1 in, so you can wipe under it. And remember the flap swings forward through a quarter circle as tall as the flap, so keep that zone in front of the box clear.
Outlets come first. Do not build the box over a receptacle, and do not cut a hole to enclose one inside the box. Plan the width so every outlet stays outside the box and fully reachable, or have a licensed electrician relocate the outlet before you build. Kitchen countertop receptacles have required GFCI protection in new work since 1987, and current editions of the National Electrical Code extend it to all kitchen receptacles. The CPSC GFCI fact sheet explains what that protection does. Test the GFCI that will power your light before you start.
Choose the Hinge and Flap Stays
A drop-down front hangs on its hinge and stays every time it opens, so the hardware matters more than the wood.
Hinge: piano hinge or flap hinges
A piano (continuous) hinge along the full width of the bottom edge is the simplest choice for a DIY build. It spreads the load across many screws and keeps a wide flap from racking. Buy one a little longer than the opening and cut it to length, or buy it to size. Specialty flap hinges (also sold as drop-front or secretary hinges) give a flush look with the flap level to the box bottom, but they need precise boring and the maker’s template.
Stays: two, sized to the flap
Flap stays, also called lid stays or drop-front supports, are rated by the flap weight they control, and many brands also limit flap height and depth. Use one stay on each side. A single stay twists the flap and loads one side of the hinge. Pick a stay that is designed for a downward-opening flap and holds it at 90 degrees, and that is rated for your flap’s weight with some margin.
Two things trip people up. First, the rating is for the flap, not for what you put on it. An open flap is not a shelf, so do not lean on it or set heavy things on it unless the stay maker says it can carry that load. Second, the farther the flap extends from the hinge, the more force reaches the stay. Weigh the finished flap on a bathroom scale and follow the stay maker’s mounting dimensions exactly, because moving the brackets changes the leverage.
Keep the flap light: 1/2 in plywood and a finger notch or small knob instead of a heavy pull.
Safety First
This project combines woodworking, wall fastening, and a light near water and heat. Work through this checklist first.
- Wear safety glasses or goggles for every cut and drilling step, and hearing protection with a circular saw or router. Collect dust as you go; OSHA notes that wood dust can irritate the eyes and airways.
- Use a stud finder with live-wire detection before drilling into the wall, and stay away from the area directly above, below, and beside outlets and switches, where cables usually run.
- Turn off the breaker for any circuit you work near. Never open a receptacle box or splice a light into an outlet yourself. Hardwiring is a job for a licensed electrician, and many areas require a permit.
- Check every screw length before driving it. Screws up through the cabinet bottom must not poke into the cabinet above, and screws into the wall must not reach pipes or wires.
- Use stays on both sides of the flap and test them before loading the box. Keep fingers clear of the hinge line and the stay arms while closing.
Materials and Tools
Check your measurements before ordering. Product names below are examples that fit the plan; confirm sizes and ratings against your own box and flap.
| Item | Why you need it | Example |
|---|---|---|
| 3/4 in plywood, oak veneer or cabinet-grade birch | Top, bottom, sides, and center divider | Home center or lumberyard |
| 1/2 in plywood | Flap (keeps it light) and riser steps | Home center or lumberyard |
| 1/4 in or 1/2 in plywood | Back panel | Home center or lumberyard |
| 1×3 or 1×4 hardwood | Hanging rail at the back, screwed into studs | Home center |
| Wood glue | Joints in the box and riser | Titebond II Premium Wood Glue, 16 oz |
| Pocket-hole jig (if not cutting dados) | Strong hidden joints in 3/4 in plywood | Kreg Pocket-Hole Jig 320 with 2 in Face Clamp |
| Piano hinge | Bottom hinge for the drop-down flap | Hardware Essentials Continuous Hinge, 30 x 1-1/2 in, stainless |
| Flap stays, one pair | Control the drop and hold the flap level | RUYUFE Soft-Close Lid Stays, 2 pack (rated 40 lb per pair) |
| Magnetic catch or touch latch | Holds the flap closed | Hardware store |
| Plug-in LED under-cabinet light, listed | Warm light under the box top | UltraPro 24 in Plug-In Under Cabinet Light, 2700K |
| Cord clips and a cord grommet | Route the cord away from the flap and hinge | Hardware store |
| Clear water-based finish | Wipeable surface that resists splashes | Minwax Polycrylic Protective Finish, Satin, 1 qt |
| Tiered riser (optional, instead of building one) | Lifts the back row of jars | Lenwi 3-Tier Expandable Bamboo Spice Rack |
| Stud finder with live-wire detection | Locates studs and warns of live wires | Franklin Sensors ProSensor M210 |
| Safety goggles | Eye protection for cutting and drilling | DEWALT DPG82 Concealer Anti-Fog Goggles |
| Cabinet screws (for studs) and short wood screws (for the cabinet bottom) | Fasten the rail to studs and the box top to the cabinet | Hardware store; lengths from the screw rules below |
| Tape measure, level, square, pencil, clamps | Layout and assembly | Your toolbox |
| Circular saw, track saw, or table saw; drill/driver; 120 to 220 grit sandpaper | Cutting, drilling, smoothing | Your toolbox, or ask the store to rip the plywood |
| Carbide or diamond tile bit (only if screwing through tile) | Drilling clean holes through the backsplash | Hardware store |
The linked products were checked on Amazon on the day this guide was written. Some are sold by third-party sellers, so check the seller, and look for the listing mark on the light’s own label.
Example Cut List (Use Your Own Numbers)
Use these formulas with your own measurements. T is the plywood thickness (3/4 in for the box), Tf is the flap thickness, g is the gap under the box (for example 1/2 to 1 in), and D is the box depth you choose, no deeper than the upper cabinet depth Dc so the box does not stick out past the cabinet face.
| Part | Qty | Size formula | Notes |
|---|---|---|---|
| Top | 1 | W × D | Fastens to the cabinet bottom; the light mounts under it |
| Bottom | 1 | W × D | Spices and the crock sit on it |
| Sides | 2 | (G − g − 2T) × D | Fit between top and bottom (or add dados) |
| Center divider | 1 | (G − g − 2T) × D | Place it to suit your crock width, about one third from the right in the images |
| Back | 1 | W × (G − g) | Thin plywood, glued and screwed into a rabbet or onto the back edges |
| Hanging rail | 1 | (inside width of the bay or full inside width) × 3 in | Glued and screwed to the back, under the top; screws go through it into studs |
| Flap | 1 | (W − small gap) × (G − g − T) | Hinged at the bottom; check its weight against the stay rating |
| Riser steps | 2 to 3 | (spice bay width) × 3 to 4 in | Each step about 1-1/2 to 2 in higher than the one in front |
A quick height check: the tallest utensil in the crock must clear the underside of the top and the light with the crock sitting on the bottom. Stand your crock next to a tape before you settle on G − g.
Build the Cabinet, Step by Step
Step 1: Clear, measure, and mark
Clear the counter, wipe the backsplash, and record G, W, Dc, Tb, the stud centers, and every outlet as described above. Mark the box outline on painter’s tape on the wall and the cabinet bottom. A cardboard mockup of the box and flap is a free way to check the flap arc.
Step 2: Cut the parts
Cut the top, bottom, sides, and divider from 3/4 in plywood, the flap and riser steps from 1/2 in plywood, and the back from thin plywood. Straight, square edges matter for a flap that closes evenly, so use a track saw, a guide, or a store cutting service. Sand every edge.
Step 3: Assemble the box, divider, and riser
Join the box with glue plus either dados (shallow grooves for the bottom, top, and divider) or pocket screws. With a pocket-hole jig, drill the pockets on faces that will be hidden: the top surface of the top, the underside of the bottom, and the outside faces of the sides that sit against the wall or cabinet. Use the screw length the jig maker specifies for 3/4 in material. Check the box is square by measuring both diagonals. Glue and screw the back and the hanging rail, then build the riser from two or three plywood steps on side supports, with a small lip on each step so jars do not slide off. If you prefer, drop in a store-bought riser such as the Lenwi 3-Tier Expandable Bamboo Spice Rack instead.
Step 4: Finish before installation
Apply a clear water-based finish such as Minwax Polycrylic in thin coats, sanding lightly with fine paper between coats. Minwax recommends three coats and 24 hours before normal use. Finish the flap on both faces and all edges so it does not warp.
Step 5: Dry-fit the box and fasten it
With a helper, lift the box into place and shim it level. Drive cabinet screws through the hanging rail into at least two studs if you can reach them; through tile, pre-drill with a tile bit (no hammer mode). Then drive short screws up through the box top into the cabinet bottom, and where possible into the thicker cabinet sides or face frame. Screw length for the cabinet bottom equals T + Tb minus about 1/8 in. For a 3/4 in top and 1/2 in bottom, about 1-1/8 in. Test one screw first and look inside the upper cabinet to confirm nothing pokes through.
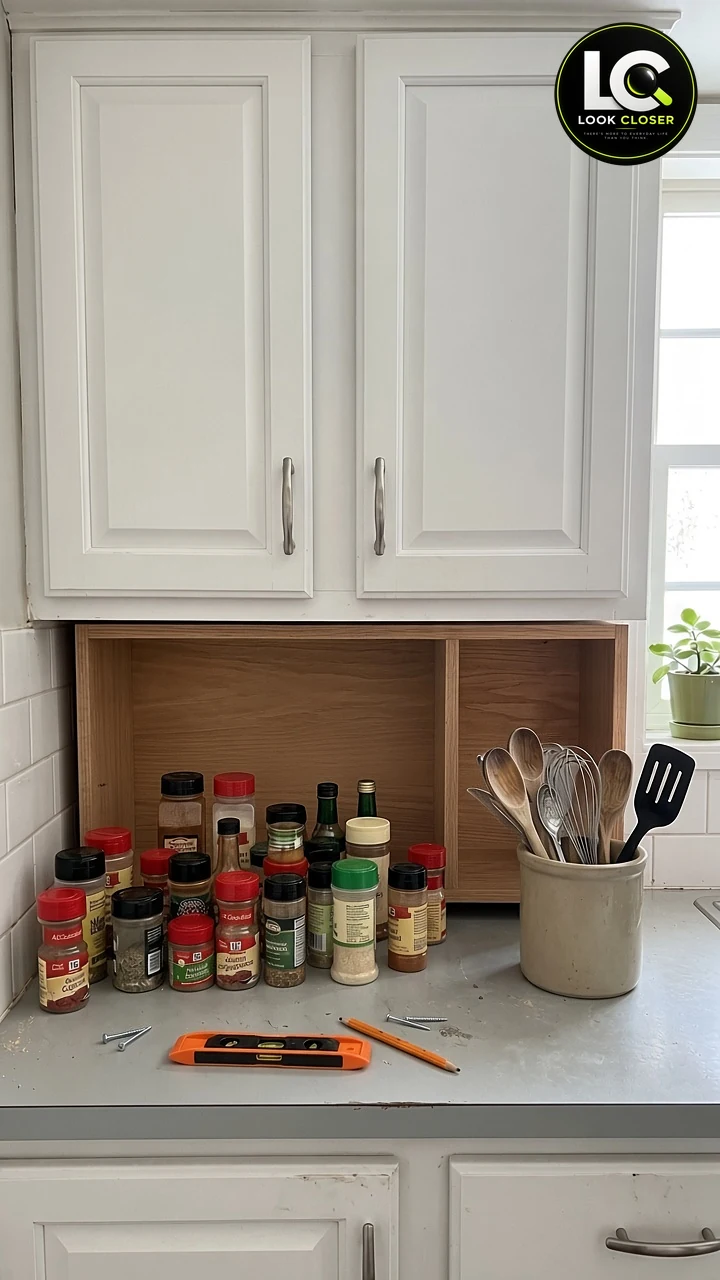
Step 6: Hang the flap and install the stays and catch
Support the flap on blocks. Screw the piano hinge to the bottom edge of the box and the bottom edge of the flap, leaving an even gap at both sides. Install the stays on both sides following the maker’s drawing, set them so the flap stops level, and adjust the soft-close tension if they have it. Add a magnetic catch or touch latch at the top. Open and close the flap a dozen times before anything goes inside.
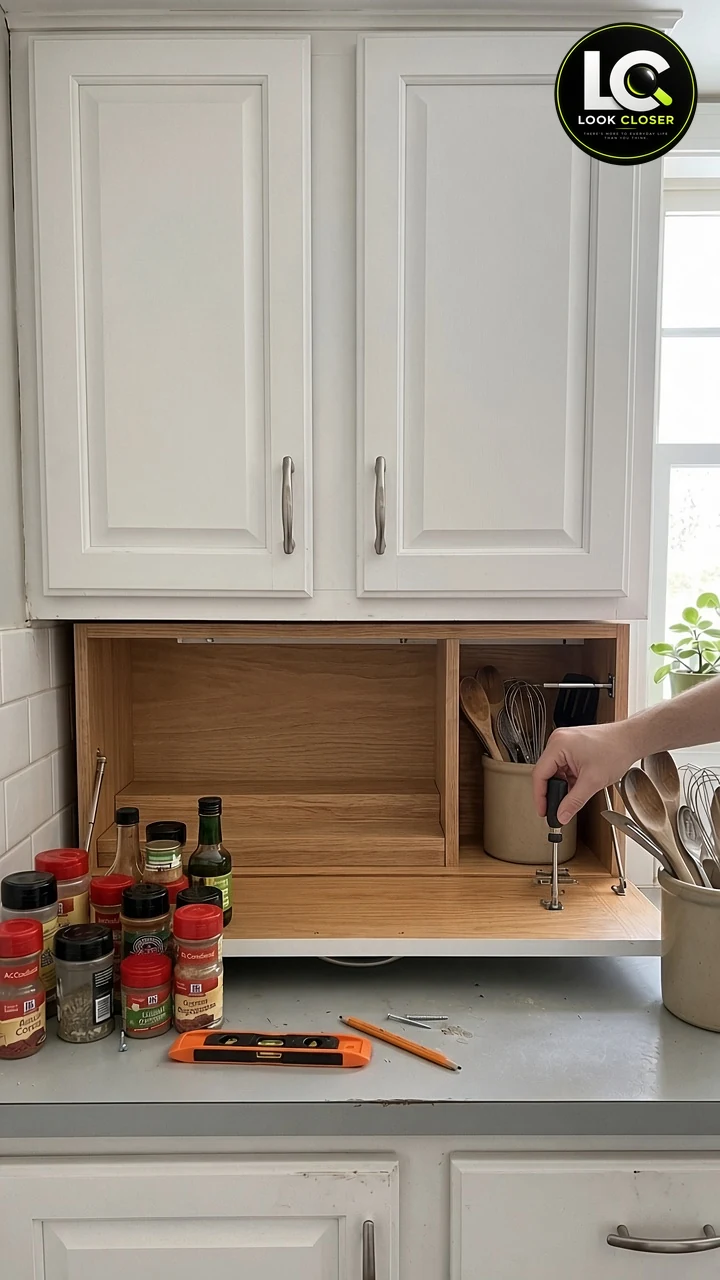
Step 7: Add the light and route the cord
Mount the fixture under the box top, near the front, so it lights the labels and not your eyes. Plan the cord path before you drill. Run it along the underside of the top toward the back, down a back corner, and out through a small grommet in the side or back panel close to the wall, then in clips to the nearest outlet outside the box. The cord must never pass through the hinge line, the stay arms, or the flap opening, and it should not hang below the box. If the fixture has a separate plug-in driver or adapter, leave it outside the box where air can reach it. The cabinet door charging station guide covers more cord-safety habits for cabinets.
Step 8: Load the riser and the utensil bay
Put the jars you use most at the front of the riser, set the crock in the right bay, and check the tallest utensil clears the light.
Step 9: Test, then live with it for a week
Turn on the light, open and close the flap with the box full, and check that the flap still stops level, the catch holds, and nothing rubs. Recheck the screws and stays after a week of daily use.
Check the Anchoring, Load, and Clearance
The box carries jars, a ceramic crock, a plywood shell, and a flap that opens many times a day. Three checks keep that safe:
- Weight: weigh the loaded spice bay contents and the full crock on a bathroom or kitchen scale. Add the empty box.
- Where the weight goes: a thin cabinet bottom held by its own glue and staples is not designed to carry a hanging load. Let the hanging rail and its stud screws carry most of the weight, and use the cabinet bottom screws mainly to keep the box from shifting. If you cannot find a stud, do not rely on the cabinet bottom alone; use the freestanding version described below.
- Clearance: with the box full and the flap open, nothing should touch the counter, and the flap should close without pinching the cord or catching on jars.
We are not giving a weight rating, because the original does not list one and walls and cabinets vary too much for one honest number. If anything sags or moves, unload it and add stud fasteners.
Lighting and Electrical Safety
There are two safe ways to power the light under the box top.
- Plug-in (DIY friendly): use a fixture or kit with a listing mark from a recognized testing lab, such as UL or ETL. UL explains its marks here. Low-voltage LED kits with a plug-in adapter are a good fit inside a small cabinet. Plug it into a GFCI-protected outlet that stays outside the box and reachable.
- Hardwired: some fixtures can be converted to direct wiring with a junction box. That work belongs to a licensed electrician, who will add a proper box and a switch where code allows. Do not splice the fixture into a receptacle, and do not run a cord through the wall.
The UltraPro plug-in light in the materials list is a 24 in, 2700K warm white bar with a high/low/off switch, a flat plug, and a 5 ft cord, per its listing. A shorter size suits a narrow box. LEDs run cooler than older lights but still make some heat, so leave air around the fixture and any driver. For other warm-light projects on the site, see the window breakfast bar with LED lighting.
Finish, Heat, and Steam
Finish: the box is a storage surface, not a food-prep surface, and the spices stay in their jars. A clear water-based finish gives it a wipeable surface that resists splashes and grease. Let it cure for the full time on the label before loading. If you want a surface that may touch loose food, choose a product whose label says it is safe for food contact once cured.
Heat and steam: the spot beside a range or a kettle sees heat and steam that can swell plywood edges and loosen finish. Spices also keep their flavor longer away from heat and moisture. Keep the box away from the cooktop and follow your range’s installation clearances.
Estimated Project Cost
These are rough ranges and depend on your region, materials, and the tools you already own.
| Item | Budget range | Mid range |
|---|---|---|
| Plywood and hardwood rail | Birch plywood partial sheet: low to moderate | Oak-veneer plywood: moderate |
| Hinge, stays, catch | Piano hinge and basic stays: low | Concealed flap hinges and branded stays: moderate |
| Light and cord parts | Plug-in bar or puck kit: low | Larger linkable kit or electrician hardwiring: higher |
| Glue, screws, finish, sandpaper | Low | Low |
| Pocket-hole jig (if you do not own one) | Not needed with dados | Moderate |
| Overall, tools already owned | Roughly $120 to $220 | Roughly $250 to $450, more with an electrician |
Renter-Friendly and Budget Alternatives
If you rent or cannot reach a stud, you can get most of the benefit without screwing anything to the wall.
- Freestanding version: build the box a little shorter than the gap and stand it on rubber bumpers, with no screws and a plug-in light. It leaves with you.
- Riser in a tray: a tiered riser on a tray under the cabinets gives you the visible-label benefit, and the tray lifts out to wipe the counter. The Lenwi expandable riser adjusts in width.
Avoid adhesive hooks or heavy adhesive-mounted racks under the cabinets for jars and crocks; adhesive is a poor choice for a hanging load. For another hidden fix that needs no wall drilling, see the hidden paper towel drawer.
Common Mistakes and Better Approaches
| Mistake | Better Approach |
|---|---|
| Building over an outlet or cutting a hole to enclose it | Keep every receptacle outside the box, or have an electrician move it first |
| Hanging the box only from a thin cabinet bottom | Add a hanging rail screwed into studs and fasten into the cabinet sides or face frame |
| Using screws that are too long for the cabinet bottom | Use T + Tb minus about 1/8 in, and test one screw first |
| One stay, or stays rated for a smaller flap | Use a pair, sized to the flap weight and size, mounted to the maker’s dimensions |
| Using the open flap as a shelf | Treat it as a door; set things on the counter instead |
| A cord hanging below the flap or through the hinge line | Route it to the back, out through a grommet, and clip it to the outlet |
| Splicing the light into an outlet | Use a listed plug-in light, or hire an electrician to hardwire it |
| Measuring the gap in one place only | Measure G at the front and back in three places and use the smallest |
FAQ
Will a flip-down spice cabinet fit under any upper cabinet?
It needs a reasonable gap between counter and cabinet, often about 18 in in many kitchens, a stretch of wall with no outlet in the way, and something solid to fasten to, ideally wall studs. Measure the gap, depth, and outlets first, and use the freestanding version if any of those are missing.
Can I screw it only into the bottom of the upper cabinet?
Not as the only support. Many cabinet bottoms are thin panels. Screw a hanging rail into wall studs, and use the cabinet bottom, sides, or face frame as extra fastening points with screws short enough not to poke through.
Which stays should I buy?
A pair designed for a downward-opening flap, rated for your flap’s weight, and suited to its height and depth. Follow the maker’s mounting dimensions, since the bracket positions change the force on the stay.
Is a plug-in LED safe inside a wood box?
A listed low-heat LED fixture is generally fine if you leave air around it and any driver, keep the cord out of the moving parts, and plug it into a GFCI-protected outlet outside the box. Hardwiring should be done by a licensed electrician.
Can I build it if I rent?
Yes, as a freestanding box that stands on the counter on rubber bumpers with no screws into the wall, lit by a plug-in light. Ask your landlord before drilling into tile or cabinets.
Final Thoughts
A flip-down spice cabinet turns the empty wall under the upper cabinets into storage you actually use, and gives the counter back to cooking. The parts that make it work in real life are the ones the finished image cannot show: measure the gap and the outlets, hang the load from studs rather than a thin cabinet bottom, size two stays to the flap, and keep the light listed, plugged in outside the box, and its cord out of the moving parts. Do that, and the same spices and the same utensils have a smarter place to live.