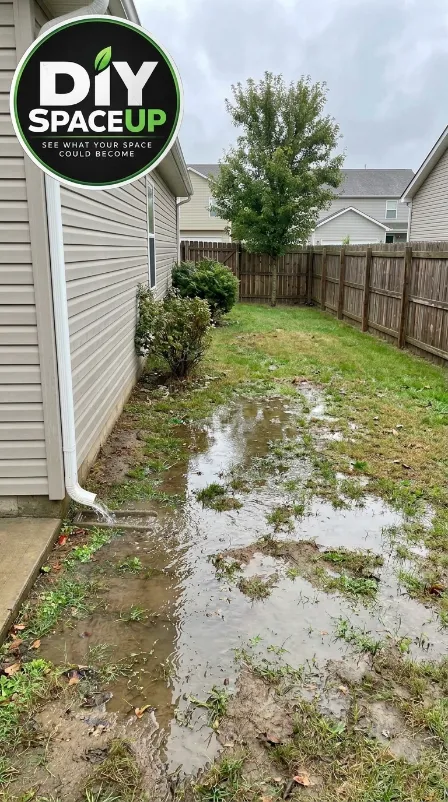
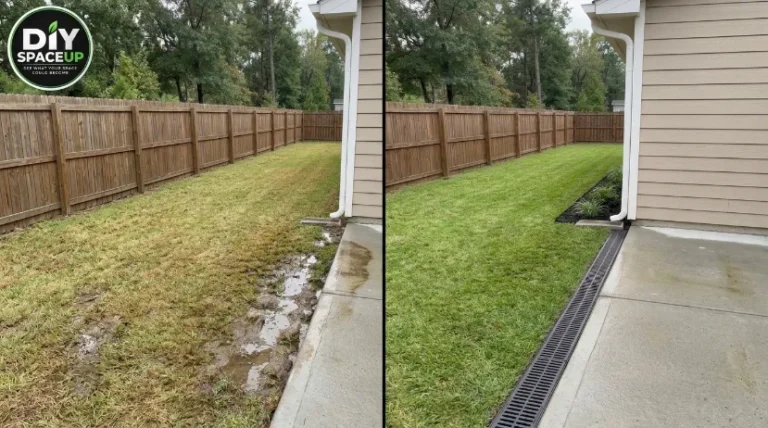
Every time it rained, this side yard turned into a muddy, unusable strip of lawn. Water collected beside the house, the grass stayed saturated, and simply waiting for the ground to dry was not solving the problem.
The opportunity was to give that water somewhere intentional to go.
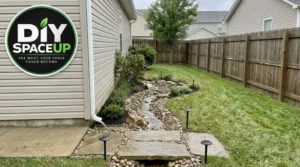
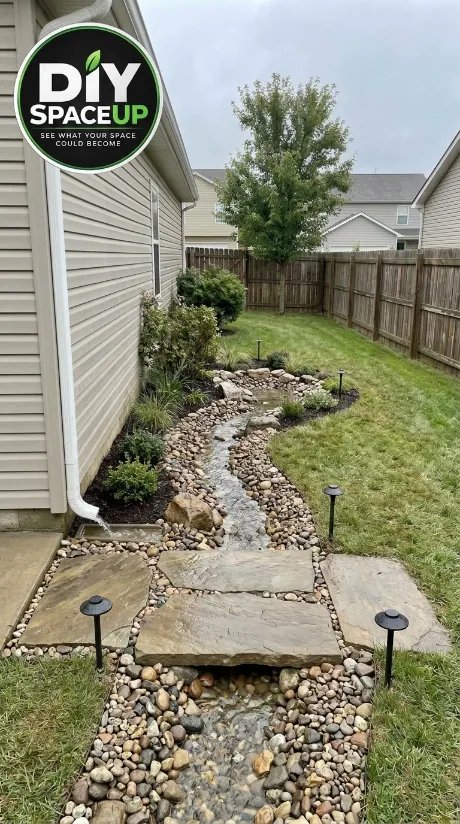
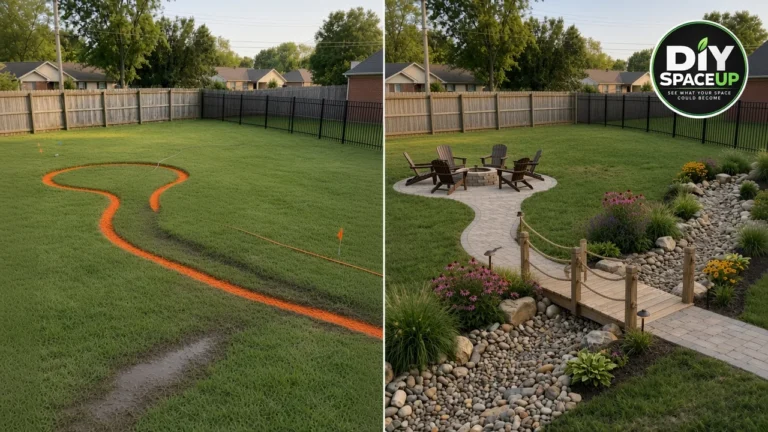
The finished project combines an underground drainage trench with a visible rock-lined drainage channel and large stepping stones. Instead of leaving the yard as a muddy low spot, the drainage path becomes part of the landscape.
The important part is not just the decorative stone. The real work happens underneath: planning the drainage route, excavating the trench, creating a suitable gravel bed, positioning perforated drain pipe, and making sure the water has a legitimate place to discharge.
Affiliate disclosure: As an Amazon Associate, DIY SpaceUp earns from qualifying purchases. Some links below are affiliate links, which means we may earn a commission at no extra cost to you.
Table of Contents
What We’re Building
The side yard before construction, showing the wet and muddy drainage problem.
The reference project shows a drainage system running along the side of a suburban house and through the backyard.
Component
Function
Excavated drainage trench
Creates the route and volume needed for the drainage system
Perforated drain pipe
Collects water entering the gravel-filled trench
Drainage gravel
Provides a permeable zone around the pipe
Geotextile/landscape fabric
Separates soil from the drainage aggregate
River rock and larger stones
Creates the visible drainage channel
Large flat stones
Form crossing/stepping areas over the channel
Existing downspout
Remains part of the site’s overall water-management situation
Landscape plantings
Remain around the finished drainage feature
One important detail is visible in the references: the perforated pipe is installed within the gravel trench, while the finished surface is later shaped into a more natural-looking rock channel. The photographs do not prove exactly how the entire system connects to a municipal storm sewer, dry well, daylight outlet, or other downstream destination, so that part needs to be determined for the actual property.
Before You Dig: Plan the Water Route
A drainage project should begin with the water, not the rocks.
Walk the yard during or immediately after a significant rain and identify:
Where water is coming from
Where it naturally collects
Which direction the yard already slopes
Where the house foundation is located
Where downspouts discharge
Where water could safely leave the drainage system
Whether neighboring properties could be affected
The reference project has a narrow side yard bordered by the house on one side and a wood privacy fence on the other. The drainage route follows that constrained space toward the back of the property.
Establish the actual elevations
Do not assume a trench is going to drain simply because it looks downhill.
A drainage pipe needs a continuous route toward an appropriate outlet. Drainage guidance emphasizes the importance of establishing a suitable grade and avoiding reverse slopes that create places for sediment and water to accumulate. University of Minnesota Extension
For a DIY installation, a laser level can be particularly useful when the route is long or the existing grade is difficult to judge.
For a small project, a STANLEY FATMAX 25-Foot Tape Measure and a quality spirit level can help establish the basic layout, but neither replaces an elevation check when the drainage route is critical.
Call before you excavate
For U.S. projects, contact 811 before digging. The U.S. Department of Transportation and PHMSA specifically recommend contacting the local 811 service before excavation projects, including residential work. U.S. Department of Transportation
Do not assume that a shallow-looking trench is automatically safe.
Also check local requirements for stormwater discharge, property-line drainage, easements, and any connection to public drainage infrastructure.
Choose the Drainage Materials
The visible finished feature is attractive, but the underground materials are what make the drainage concept work.
Perforated drain pipe
The reference clearly shows a perforated corrugated drainage pipe positioned along the bottom of the gravel-filled trench.
The exact diameter and pipe configuration should be selected according to the drainage area, expected water volume, soil conditions, and outlet.
Do not automatically copy a pipe size from a photograph.
Drainage gravel
The pipe is surrounded by clean, free-draining aggregate.
The gravel provides open space for water to move toward the perforations instead of forcing water through compacted soil.
Geotextile fabric
The excavation is lined with black fabric before the drainage aggregate is installed.
The purpose is to separate the soil from the drainage stone and reduce the amount of soil migrating into the aggregate. Geotextile materials are commonly used as drainage envelopes or separation/filter layers, although the appropriate fabric depends on soil and drainage conditions. University of Minnesota Extension
Use a fabric intended for drainage or geotechnical applications rather than assuming that any thin landscape fabric will perform the same function.
Decorative rock
The finished project uses a mixture of rounded river stones and larger natural-looking rocks.
These stones are primarily part of the visible landscape treatment. They should not be confused with the engineered drainage layer beneath them.
Tools You’ll Actually Use
This is a digging-heavy project, so hand tools matter more than fancy woodworking equipment.
A wheelbarrow is especially valuable here because the project requires moving substantial amounts of excavated soil, gravel, and decorative stone.
For a longer trench, renting a compact excavator or trenching machine may save significant labor. For a one-time residential project, rental can make more financial sense than purchasing specialized equipment.
Step 1: Mark the Drainage Route
The first visible construction stage is the excavation layout.
Mark the intended drainage path before removing soil.
Keep the route consistent with the actual yard shown in the reference: it runs along the side of the house rather than cutting randomly across the lawn.
Mark both sides of the proposed trench and identify:
Starting point
Lowest point
Intended outlet
Any crossings
Areas where existing landscaping must remain
Take photographs before digging. They can be useful later if you need to remember where buried components were installed.
Step 2: Excavate the Trench
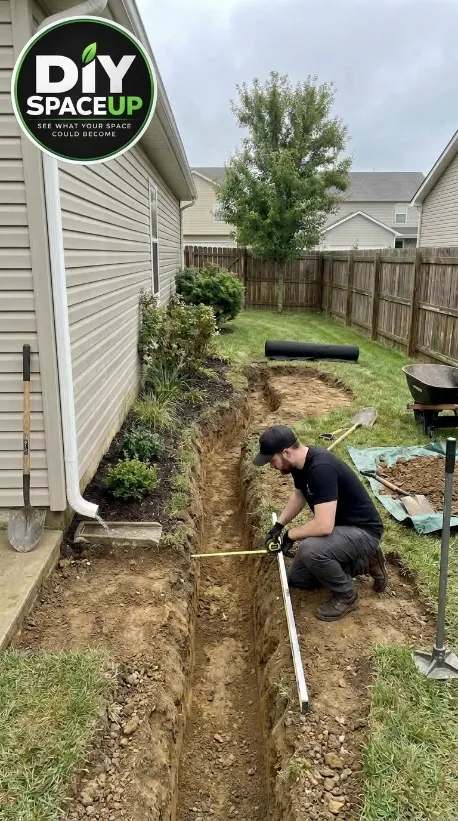
Measure the excavated drainage route before installing fabric, gravel, and perforated pipe.
The second reference shows the trench fully excavated, with the worker checking its dimensions.
This is one of the most labor-intensive parts of the build.
Remove the soil carefully and keep excavated material away from the trench edge so it cannot fall back inside.
The final dimensions should be determined from your drainage design rather than copied from the image.
As a planning example, many small residential drainage trenches are designed several inches to more than a foot below the surrounding finished grade, but the actual depth and width depend on the pipe, gravel envelope, soil, drainage volume, and finished surface.
Do not treat that as a measurement from this project.
Keep the trench stable
Deep or narrow excavations can become hazardous quickly.
Do not enter an excavation that has unstable sides or unsafe depth simply because it is part of a DIY project. Follow applicable excavation-safety requirements and use professional help when the trench becomes beyond the scope of safe homeowner work.
Step 3: Prepare the Fabric
Once the trench has been excavated and the route has been checked, install the geotextile fabric.
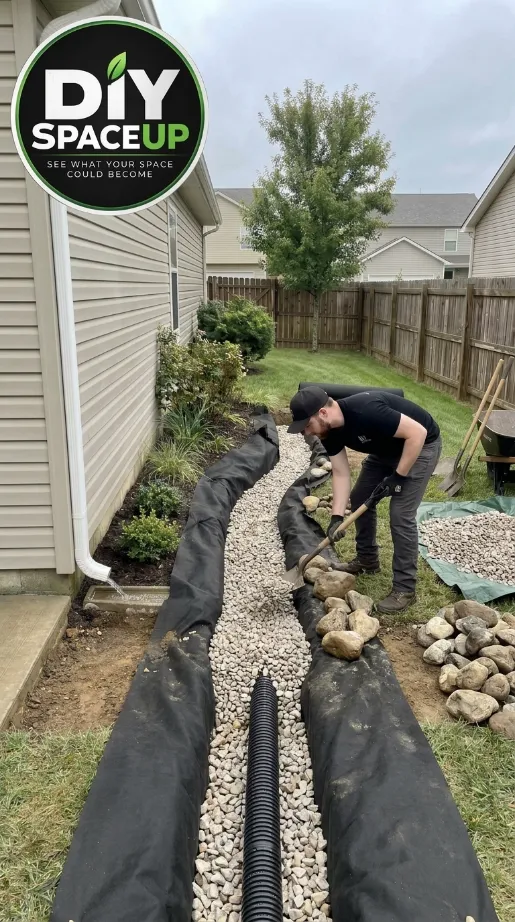
The reference shows black fabric extending along the sides of the trench.
Leave enough material to fold over the drainage aggregate later.
Avoid tearing the fabric against sharp rocks or roots. Geotextile guidance also recommends protecting fabric from puncture and leaving enough material for proper wrapping around aggregate systems. University of Minnesota Extension
A handful of landscape fabric staples can help hold exposed edges in position while the drainage assembly is installed.
Step 4: Add the Drainage Gravel
Place the appropriate clean drainage aggregate into the bottom of the prepared trench.
The goal is to establish a permeable bed for the perforated pipe.
Do not use random excavated soil as a substitute for drainage aggregate. Soil can migrate into the drainage system and reduce its effectiveness.
The reference shows a substantial gravel layer beneath and around the pipe.
Step 5: Position the Perforated Pipe
The perforated drain pipe is positioned over the drainage gravel inside the fabric-lined trench.
Now place the perforated pipe along the prepared route.
This is the technical heart of the project.
The pipe should follow the planned drainage grade rather than simply following the visual shape of the ground.
Check the entire run before covering it.
Make sure:
The pipe follows the intended direction.
Connections are properly assembled.
The perforations are oriented according to the pipe manufacturer’s instructions.
The pipe does not have unintended low spots.
The outlet arrangement is actually appropriate for the property.
A French-drain-type system works because water can enter the permeable zone and reach the pipe, while the pipe provides a controlled route toward an outlet. University of Minnesota Extension
Don’t invent the outlet
This is one of the most important limitations of the photographs.
The supplied references show the trench and pipe installation, but they do not establish the exact downstream drainage destination.
That needs to be verified on the real property.
Depending on local conditions, a drainage system may discharge to an approved daylight location, drainage structure, dry well, or another permitted outlet. Local rules may restrict where stormwater can be discharged.
Never route collected water toward another building, a neighbor’s property, or a location where it can create a new flooding problem.
Step 6: Cover the Pipe With Drainage Aggregate
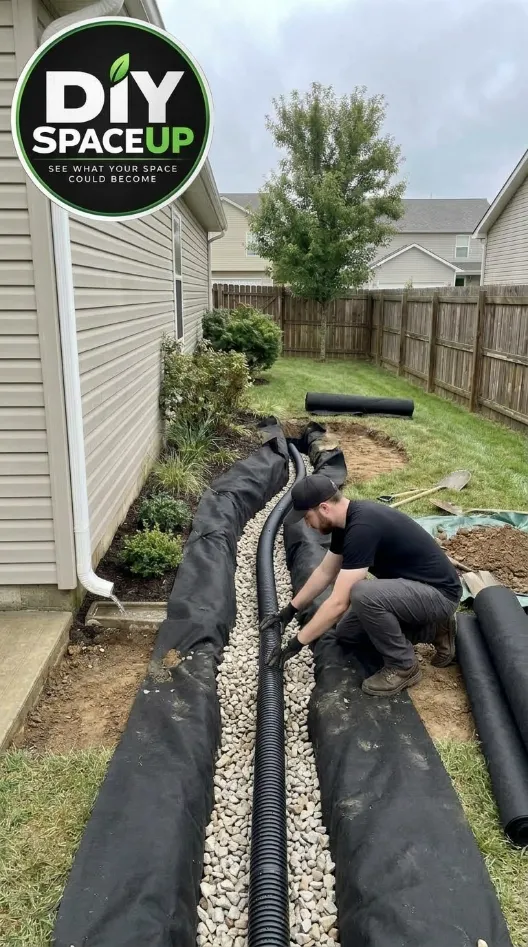
Drainage gravel surrounds the pipe while the first natural rocks begin forming the visible drainage channel.
Once the pipe is correctly positioned, continue adding drainage gravel around and over it.
The gravel should create a continuous permeable envelope rather than leaving the pipe sitting directly against soil.
The reference shows the black pipe becoming progressively surrounded by light-colored stone.
Take time here.
This layer is hidden once the project is finished, so it is easy to rush it. That would be a mistake.
Step 7: Fold the Fabric Over the Drainage Layer
Bring the fabric over the aggregate as the drainage assembly is completed.
The goal is to create separation between the native soil and the drainage stone.
Do not leave large areas of fabric exposed to sunlight permanently. Synthetic geotextiles can degrade with prolonged ultraviolet exposure. University of Minnesota Extension
Trim excess material only after confirming that enough fabric remains to contain the drainage layer properly.
Step 8: Build the Visible Rock Drainage Channel
The finished reference changes the character of the yard dramatically.
Instead of seeing a trench, you see a natural-looking stone drainage channel.
Begin with the larger rocks and establish the general boundaries of the visible water path.
Then add smaller rounded river rock around them.
The objective is not perfect symmetry.
The reference has an irregular, natural arrangement with larger rocks mixed into smaller stones.
That irregularity is part of the finished appearance.
Keep drainage function separate from decoration
The visible river rock is not a substitute for the drainage system underneath.
Do not fill the entire excavation with decorative rock and assume that it will automatically perform like a designed subsurface drainage system.
The underground pipe, aggregate, grade, fabric, and outlet are the functional elements.
Step 9: Add the Large Flat Stepping Stones
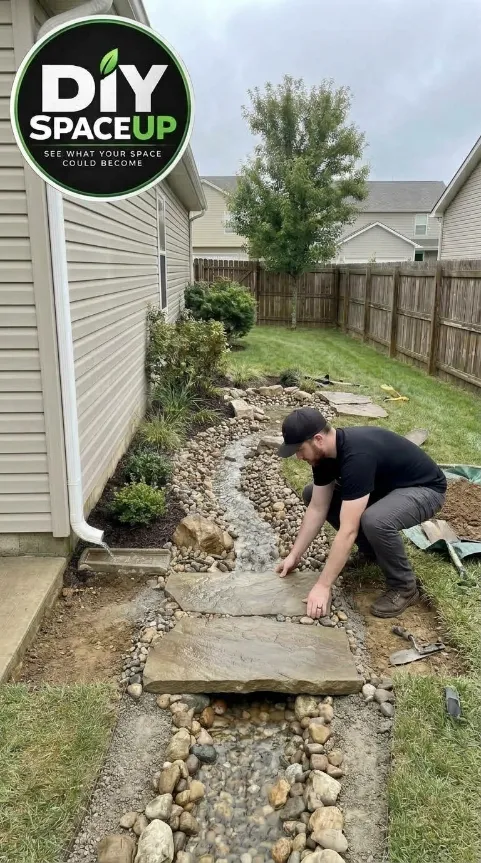
Large flat natural stones are positioned across the drainage channel to create a stable crossing.
The finished project includes large flat natural stones crossing the drainage path.
These create practical places to step across the channel while becoming part of the landscape design.
Set each stone on a stable base appropriate to its size and location.
Do not assume that the surrounding loose river rock will permanently support a large stepping stone.
Check each stone for movement before using it.
If the stones are intended to carry regular foot traffic, their support and stability deserve more attention than if they are purely decorative.
Step 10: Blend the Edges Into the Existing Landscape
The finished drainage feature stays integrated with the existing planting beds and lawn.
Avoid building a perfectly straight artificial channel if the reference design is irregular.
Use the larger rocks to establish visual structure and smaller stones to soften the transition.
Leave existing plants that can safely remain, while making sure their roots do not interfere with the drainage system.
The final reference shows the drainage feature looking like part of the yard rather than an obvious trench repair.
Step 11: Test the System Before Calling It Finished
Do not wait for the next major storm to discover a problem.
Test the drainage route with a controlled amount of water where appropriate.
Watch:
Where water enters the system
Whether water moves consistently in the intended direction
Whether the pipe or channel develops standing-water pockets
Whether water escapes where it should
Whether any soil begins washing into the rock
Whether stepping stones move
Whether the foundation area stays clear
A drainage system should have a known destination for the water it collects.
Structural and Drainage Considerations
Although this is primarily a landscape drainage project, the location beside a house makes the details important.
Issue
What to verify
Foundation
Do not create a drainage path that directs water toward the house
Pipe grade
Confirm continuous drainage toward the intended outlet
Soil
Clay, sand, fill, and mixed soils behave differently
Pipe size
Select according to actual drainage requirements
Fabric
Use a suitable drainage/geotextile product
Aggregate
Use appropriate clean drainage stone
Outlet
Verify where collected water is legally and safely allowed to go
Property line
Do not create a new runoff problem for neighboring property
Utilities
Locate underground utilities before excavation
Existing drainage
Determine whether existing downspouts or drains are already contributing to the problem
Water management around a house deserves particular care. Drainage guidance for homes emphasizes maintaining a free-flowing route and preventing water from being directed toward vulnerable foundation areas. University of Minnesota Extension
Safety Checklist
Before starting, check all of these:
Underground utilities have been located.
The trench route has been planned.
The drainage outlet has been identified.
The excavation will not undermine the house, slab, walkway, fence, or other structure.
Excavated soil will be stored safely away from the trench edge.
Appropriate gloves and eye protection are available.
Heavy stones will be lifted using safe techniques or with help.
The finished stepping stones are stable.
Water will not be discharged toward the foundation.
Local stormwater and drainage requirements have been checked.
In the U.S., 811 is the standard starting point for underground utility locating before excavation. U.S. Department of Transportation
What This Project Does—and Doesn’t—Guarantee
A French drain and rock channel can provide a controlled drainage route, but no single drainage detail guarantees that a yard will never flood again.
Performance depends on:
Rainfall intensity
Soil permeability
Drainage area
Existing site grading
Pipe capacity
Gravel volume
Outlet capacity
Groundwater conditions
Clogging and maintenance
Whether additional water sources are entering the yard
If the property experiences severe recurring flooding, water enters the house, or the drainage route would require major excavation around the foundation, a drainage professional may be appropriate.
Estimated Project Cost
For a small-to-medium residential version of this type of project, a reasonable planning budget is roughly $500–$2,000+, excluding major equipment purchases.
Cost category
Typical planning allowance
Perforated drainage pipe and fittings
$50–$250+
Drainage gravel
$100–$400+
Geotextile fabric and staples
$40–$150
River rock / decorative stone
$100–$500+
Large stepping stones
$100–$500+
Disposal / soil handling
$0–$300+
Equipment rental
$0–$500+
Hand tools and safety equipment
$50–$300+
The actual total can change dramatically with trench length, stone quantities, soil conditions, delivery charges, equipment rental, and the type of outlet required.
Tools, professional engineering, major excavation, and unexpected repairs are not included in those planning figures.
Useful Products for the Build
A few purchases make particular sense for a project like this.
For measuring and layout, STANLEY FATMAX 25-Foot Tape Measure is a practical general-purpose choice.
For locating framing or other household construction features around the work area, a Franklin Sensors ProSensor Stud Findercan be useful, although it does not replace professional utility locating.
For general fastening and project work, DEWALT 20V MAX Drill/Driver Kitis useful equipment to already have in a DIY tool collection.
For a one-time long trench, consider renting a plate compactor or excavation equipment rather than purchasing equipment that will sit unused afterward.
These should be presented as comparable products or styles—not as claims that they are the exact products used in the photographed project.
Common Mistakes and Better Approaches
Mistake
Better approach
Digging before planning the outlet
Establish where water can safely go first
Guessing the trench slope
Measure elevations and verify the continuous grade
Skipping utility locating
Contact the appropriate utility-locate service before digging
Using ordinary soil around the pipe
Use appropriate drainage aggregate
Treating decorative rock as the drainage system
Keep the engineered drainage layer beneath the visible landscape
Installing pipe with random low spots
Check the complete pipe run before covering it
Using too little fabric
Provide enough fabric for proper soil/aggregate separation
Dumping collected water toward a neighbor
Verify the legal and safe discharge location
Making the finished channel too shallow or decorative-only
Preserve the actual drainage function underneath
Adding stepping stones without stable support
Set and test each stone for movement
Covering everything before testing
Test the drainage path before final landscaping
Copying image dimensions
Measure the actual property and label planning dimensions as examples
Maintenance After the Build
The finished project is lower-maintenance than the muddy lawn it replaces, but it is not maintenance-free.
After major storms, inspect the channel for:
Washed-out soil
Displaced river rock
Moving stepping stones
Sediment accumulation
Blocked inlets
Standing water that remains longer than expected
Erosion near the outlet
Keep leaves and organic debris from accumulating where they can block surface drainage.
If the system includes accessible cleanouts or inspection points, use them according to the pipe manufacturer’s recommendations.
The drainage pipe is hidden, so changes in surface behavior are often the first indication that something underneath needs attention.
The Biggest Lesson From This Backyard Transformation
The completed drainage project turns a flood-prone side yard into a functional rock-lined landscape feature.
The most useful part of this project isn’t the final layer of pretty river rock.
It’s the decision to solve the water problem from the ground up.
That sequence is what makes the project reproducible.
If you’re facing the same kind of wet, muddy side yard, don’t start by buying decorative stone. Start by understanding where the water comes from, where it needs to go, what is buried underneath the yard, and what drainage system your actual property can support.
Once those decisions are correct, the rocks and stepping stones become the finishing layer that turns a necessary drainage project into a useful part of the landscape.
[…] those cases, a buried perforated pipe may be needed. Our guide to a French drain and dry creek bed for backyard flooding walks through that version. If downspouts are part of the problem, see our underground downspout […]
We use cookies and similar technologies to help our website function properly, understand how visitors use the site, and improve your experience. You can accept or manage your preferences at any time. Some features may not work as intended if certain cookies are disabled.
Functional
Always active
The technical storage or access is strictly necessary for the legitimate purpose of enabling the use of a specific service explicitly requested by the subscriber or user, or for the sole purpose of carrying out the transmission of a communication over an electronic communications network.
Preferences
The technical storage or access is necessary for the legitimate purpose of storing preferences that are not requested by the subscriber or user.
Statistics
The technical storage or access that is used exclusively for statistical purposes.The technical storage or access that is used exclusively for anonymous statistical purposes. Without a subpoena, voluntary compliance on the part of your Internet Service Provider, or additional records from a third party, information stored or retrieved for this purpose alone cannot usually be used to identify you.
Marketing
The technical storage or access is required to create user profiles to send advertising, or to track the user on a website or across several websites for similar marketing purposes.


[…] those cases, a buried perforated pipe may be needed. Our guide to a French drain and dry creek bed for backyard flooding walks through that version. If downspouts are part of the problem, see our underground downspout […]