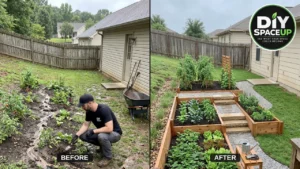

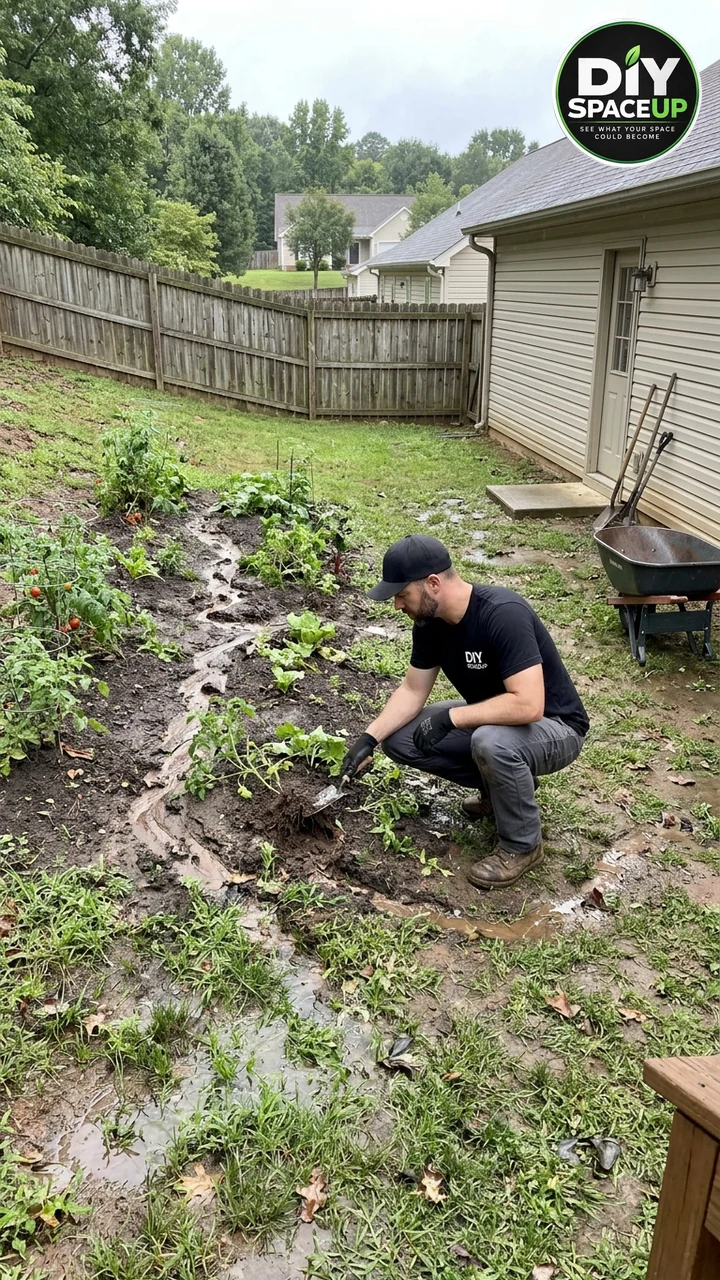
Every heavy rain was doing the same unkind thing to this backyard: it cut channels through the vegetable patch, exposed the roots, and left puddles on the grass between the house and the fence. The slope was not the enemy. The missing plan for the water was. Instead of giving up on growing food in a sloped yard, the same strip can become a three-level cedar harvest garden, with stone steps, a gravel path from the house, a smaller bed along the path, and a way to move runoff around the vegetables instead of through them.
This guide shows how to build that terraced vegetable garden the way a careful backyard project should actually go. The finished look stays the same as the photos: three cedar beds stepping up the slope, a river-rock edge along the left bank, stone slab steps, a light gravel path to the house pad, and a short bed on the right of the steps. What a short social-media clip often skips still has to happen on the ground: call 811 before you dig, intercept the runoff above the top bed, level each terrace, build the boxes with real corner posts and structural screws, set the steps and the path on a compacted base, and keep each downhill face low enough that it stays a raised bed, not an unplanned retaining wall.
This is a planning and construction roadmap, not a site-specific engineering plan. Soil, rainfall, frost, and local rules vary widely. Dimensions below are planning examples, not measurements taken from a photograph. Measure your yard, follow your extension service’s raised-bed guidance, and let your building department have the final word if a wall gets taller than a simple garden box. Costs and times are estimates.
Affiliate Disclosure: As an Amazon Associate I earn from qualifying purchases. Product links in this article may earn a commission at no additional cost to you.
What’s in This Post
- What We’re Building
- The Steps Worth Doing Properly
- Before You Dig: 811, Permits, and HOA Rules
- Materials and Tools
- Step-by-Step Build
- Safety Checklist
- Estimated Project Cost
- Common Mistakes and Better Approaches
- FAQ
What We’re Building
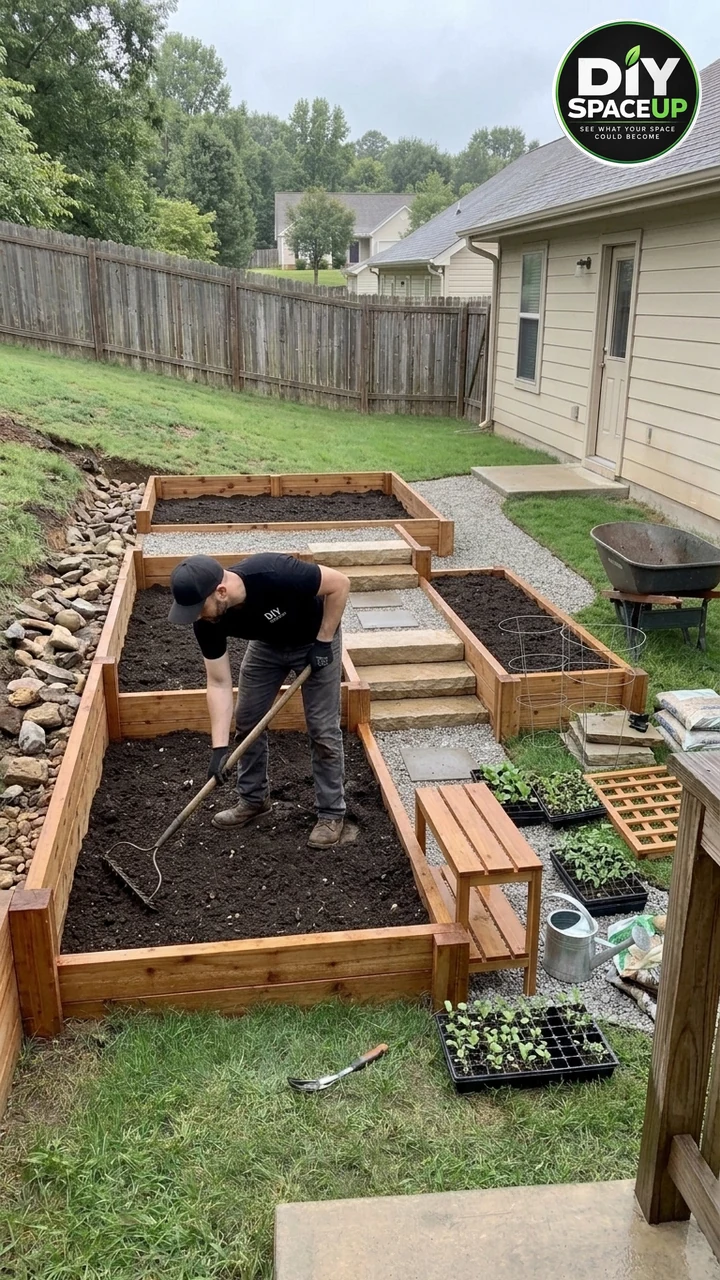
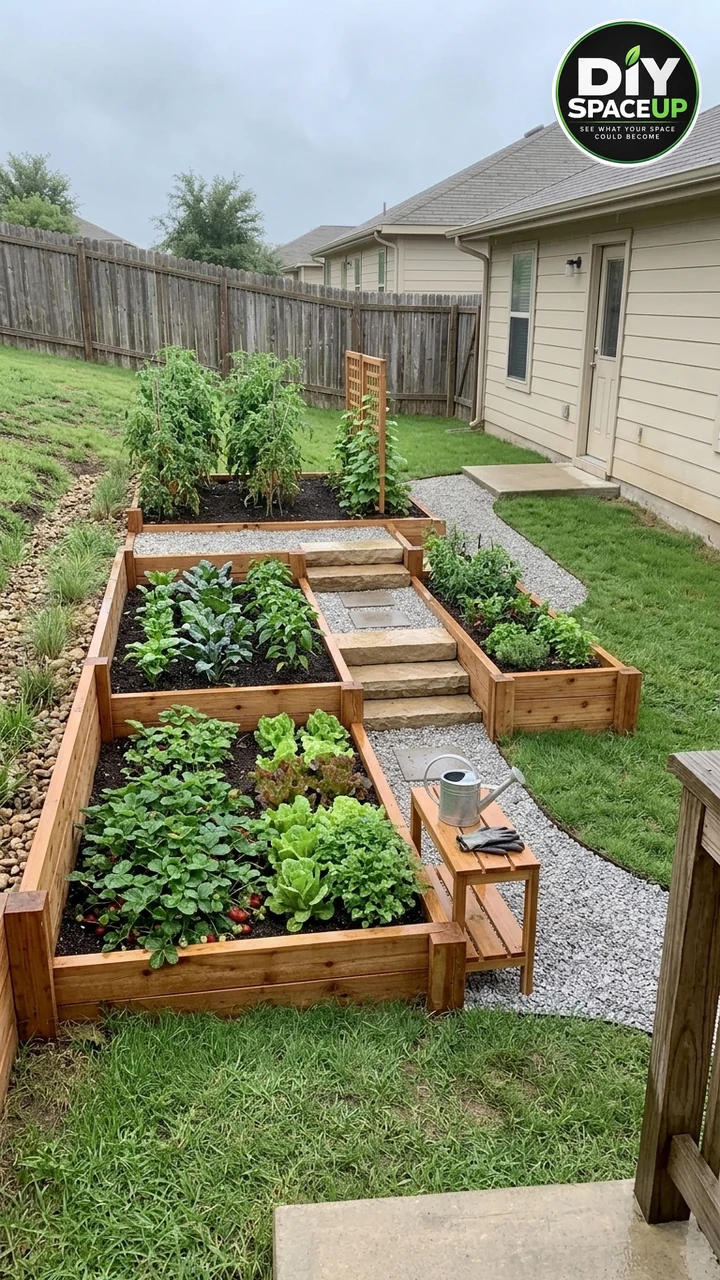
The finished terraced vegetable garden sits in the same backyard strip that used to flood: between the wooden privacy fence on the left and the house on the right, starting just off the deck and running up toward the back fence. Three cedar boxes step up the slope. A smaller fourth bed sits to the right of the stone steps, along the gravel path that leads to the concrete pad at the back door. A river-rock channel follows the left bank. A wooden trellis stands in the top bed, and a small slatted bench sits at the front of the path.
As a planning example, beds about 3 feet wide if you work them from one side, or up to about 4 feet wide if you can reach from both sides, are in the same range as this layout. A path about 30 to 36 inches wide leaves room for a wheelbarrow. Keep the downhill face of each terrace well under about 2 feet; two stacked cedar 2×6 or 2×8 boards is a common, modest height. Do not treat those numbers as sizes measured from a photo. Confirm every dimension against your slope, your reach, and your local rules before you order lumber.
| Component | Function |
|---|---|
| Call 811, permits, and HOA review | Locates buried utilities before any excavation, and confirms whether a taller wall or a drainage change needs approval |
| Upslope diversion (swale or French drain) | Intercepts runoff above the top bed and carries it around the garden to a safe outlet, instead of letting it cut through the soil |
| River-rock channel along the left bank | Armors the slope edge and gives overflow a defined path, kept off the neighbor’s side of the fence |
| Level terraces | Each bed gets a flat growing surface, like shallow steps cut into the slope, so water does not race downhill inside the box |
| Cedar frames with corner posts | Naturally rot-resistant, food-safer boxes. Posts at the corners (and mid-span on long runs) resist the outward push of wet soil |
| Hardware cloth on the bed bottoms | Discourages burrowing pests while leaving the bottom open for drainage. Not a sealed plastic liner |
| Stone slab steps on a compacted base | A stable route from one level to the next, with a modest, consistent rise |
| Gravel path with fabric and a compacted base | A clean, drainable walk from the house pad to the beds, wide enough to work from |
| Side bed along the path | Extra growing space on the house side of the steps, planned from the start rather than added as an afterthought |
| Soil mix, compost, and a soil test | A deep, well-drained growing medium, adjusted after you know the pH and nutrient starting point |
The Steps Worth Doing Properly
Keep the same yard, the same three-level cedar look, and the same path from the house. Change the hidden work so the beds do not rack, the steps do not tip, and the next storm does not wash the new soil away.
- Call 811 and get approvals first. The terraces, the path, the step bases, and any drainage trench all go below grade.
- Divert the water before you build the boxes. A pretty river-rock edge is not enough on its own if runoff still enters at the top of the slope. Add an upslope swale or a French drain that leads around the beds to a safe outlet, and check the downspout on the house so roof water is not feeding the same problem.
- Build real corner posts, not a stack of boards sitting on dirt. The downhill face of each terrace holds soil. Use structural screws into posts at the corners, and add intermediate posts or cross-ties on long runs. Keep each tier low.
- Level each terrace, and give the steps and the path a real base. Excavate, compact a crushed-stone base, and set the slabs and the path gravel on geotextile. Do not lay stepping stones on raw dirt or pour gravel straight on soil.
- Use untreated cedar or another food-safer, naturally durable lumber, and leave the bed bottoms open. Skip old CCA-treated wood. A hardware-cloth floor is useful where burrowing pests are a problem; a sealed liner is not.
Before You Dig: 811, Permits, and HOA Rules
Call 811 at least a few business days before any digging, or submit the request through your state’s 811 center. The Common Ground Alliance 811 page explains the process. Wait until the utilities are marked, and keep terrace cuts, step bases, path excavation, and any drain trench clear of those marks unless a locator or the utility tells you how to proceed. 811 locates public utilities, not always private lines such as a sprinkler main or a landscape-lighting cable, so walk the yard for those too.
Simple, low raised beds often need no permit. A wall that starts to act like a retaining wall is a different story. Many cities set a height at which a retaining wall needs a permit or an engineer’s review — sometimes as low as 2 or 4 feet, measured on the downhill face, and sometimes lower when a slope, a surcharge, or a property line is involved. If you have an HOA, ask about visible hardscape, fence-line setbacks, and drainage changes before you buy a lumber package. Do not send concentrated runoff onto a neighbor’s lot.
Materials and Tools
Buy cedar boards and posts, bulk gravel, river rock, stepping stones, and bagged or bulk soil mix locally. Rent a plate compactor for the path and the step bases; a hand tamper is for edges and tight spots, not for the whole run. The University of Missouri Extension’s raised-bed gardening guide is a solid reference for bed width, hillside terraces, and lumber choices.
| Item | Notes |
|---|---|
| Utility locate (811) | Free in most states when you call 811 before you dig |
| CMI braided nylon mason line, 250 ft | Orange layout line for the terrace edges, path, and drainage run |
| Sandbaggy 18-inch wooden grading stakes, 50-pack | A similar option to the survey stakes used to hold the string lines |
| STABILA Type 70A-2 48-inch level | A 4-foot level for each terrace, the step treads, and the path fall |
| Truper 8-by-8-inch steel hand tamper | For edges and tight spots. Rent a plate compactor for the path and step bases |
| Super Geotextile 4 oz non-woven fabric, 4 by 50 ft | Separation and filtration under the path, the step bases, and along a drain trench. This is a non-woven geotextile, not a woven weed barrier |
| Sandbaggy 6-inch landscape staples, 100-count | Pins the geotextile so it does not creep while you place gravel |
| Untreated cedar boards and 4×4 corner posts | Buy locally. Two stacked 2×6 or 2×8 boards is a common modest wall height. Use naturally durable, food-safer lumber, not leftover CCA-treated wood |
| SPAX 5/16-by-3-inch exterior PowerLag screws, 50-pack | Structural washer-head screws for fastening boards to corner posts. These take a T-40 bit. For a very wet or coastal site, consider a stainless structural screw instead |
| Garden Zone 19-gauge hardware cloth, 36 in by 50 ft | A similar option for a 1/2-inch galvanized mesh floor under the beds. Wear gloves; cut edges are sharp. You can also buy a comparable roll locally |
| Crushed stone, path gravel, river rock, and stepping stones | Buy locally in bulk. Skip bag-by-bag pricing for the main base and the rock channel |
| Raised-bed soil and compost | Buy locally in bulk or by the scoop when you can. Volume adds up quickly |
| Luster Leaf Rapitest soil test kit | A home test for pH and N-P-K before you load the beds with fertilizer. A county extension soil test is even better if one is available |
| Wells Lamont cowhide leather work gloves | For excavation, lumber, hardware cloth, and rock work |
| Plate compactor (rental) | Rent locally for the path and the step bases |
Step-by-Step Build
Step 1: Plan the Terraces, the Path, and the Water Route
Start on paper, not with a shovel. Stand in the yard after a rain if you can, and mark where water actually enters, where it cuts channels, and where it finally ponds. In this layout, runoff comes down the slope along the fence and used to slice through the old in-ground patch. The house downspout near the back door is worth a look too: if that roof water spills toward the garden, add it to the plan.
Sketch three terraces stepping up the slope, a path from the house pad down the right side, and the smaller side bed beside the steps. Plan that side bed now, even if the first string lines only outline the main run. Leave a grass margin at the fence and at the house wall. Keep bed width to a comfortable reach — a planning example is about 3 feet from one side, or about 4 feet if both sides are open — and give the path enough width for a wheelbarrow, around 30 to 36 inches as a starting point.
Plan the water at the same time as the boxes. An interceptor above the top bed — a shallow swale, a gravel trench, or a French drain — should catch the slope runoff and lead it around the garden to a safe outlet. A river-rock channel along the left bank can finish that edge, in the same spirit as a side-yard dry creek bed. Do not aim the outlet at a neighbor, and do not dump it against the house foundation.
Step 2: Call 811, Then Stake the Layout
Once 811 marks are on the ground and any permit or HOA questions are settled, set wooden grading stakes at the corners of each terrace, the path edges, the side bed, and the drainage run. Stretch mason line so you can see the plan in three dimensions. Use a 4-foot level and a tape to set each terrace level from side to side. The beds should read as shallow steps: flat on top, stepped down the slope, not tilted with the hillside.
Mark the drainage route above and around the top bed before you cut the boxes. If the string lines only show the three main beds, add lines for the side bed and the path so those pieces do not get squeezed in later.
Step 3: Divert the Runoff, Then Open the Ground
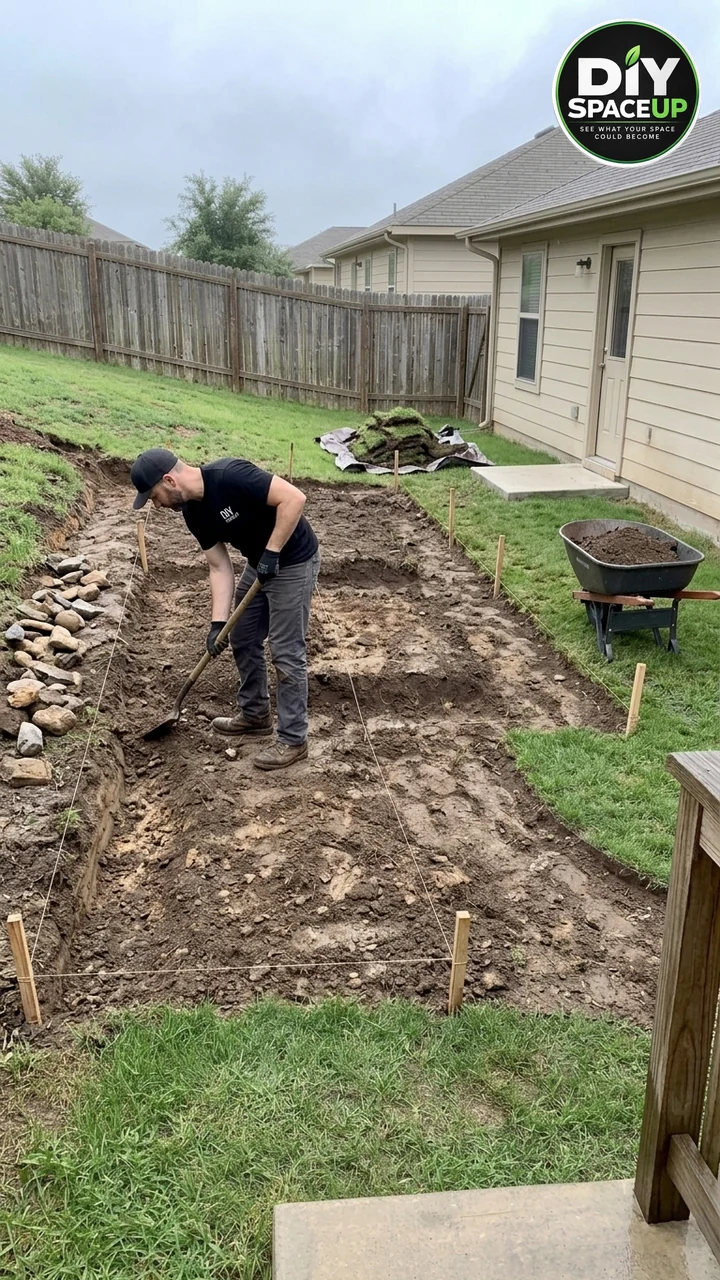
Strip the sod from the bed, path, and step areas and stack it on a tarp, out of the way, if you want to reuse it on bare spots. Dig the interceptor trench or swale first, with a continuous fall around the garden to the outlet you chose. In many yards a perforated pipe in a gravel trench, wrapped in non-woven geotextile, is the cleaner option; a shallow sodded swale can work if the grade already wants to carry water around the beds. There is a full walk-through in our French drain and dry creek bed guide.
Along the left bank, excavate a shallow channel, lay fabric if the soil is silty, and set river rock so the edge is armored rather than bare dirt. This is the rock border already visible once the sod is gone in the photos. It should connect to the interceptor, not sit as decoration while water still enters at the top of the beds. Confirm the outlet stays on your property.
Step 4: Cut and Level Each Terrace
Excavate the footprint of each bed so the bottom of the box will sit on firm, roughly level subgrade, with the downhill wall acting as a short riser. Cut, do not fill, wherever you can: loose fill under a downhill wall is a common reason a terrace leans after the first wet season. Use the 4-foot level often. The growing surface inside each box should be level, even if the lawn around it is not.
Keep the downhill face modest. Two stacked 2x boards is a sensible starting height for a backyard food garden. If the grade would force a downhill face of about 2 feet or more, stop and rethink the number of terraces, or treat that face as a real retaining wall. Our guide to replacing a timber retaining wall with drainable block is the better model once you leave garden-box territory. Do not invent a load rating or a burial depth from a photograph; taller walls belong with local code and, when required, a designer.
Step 5: Build the Cedar Boxes With Corner Posts
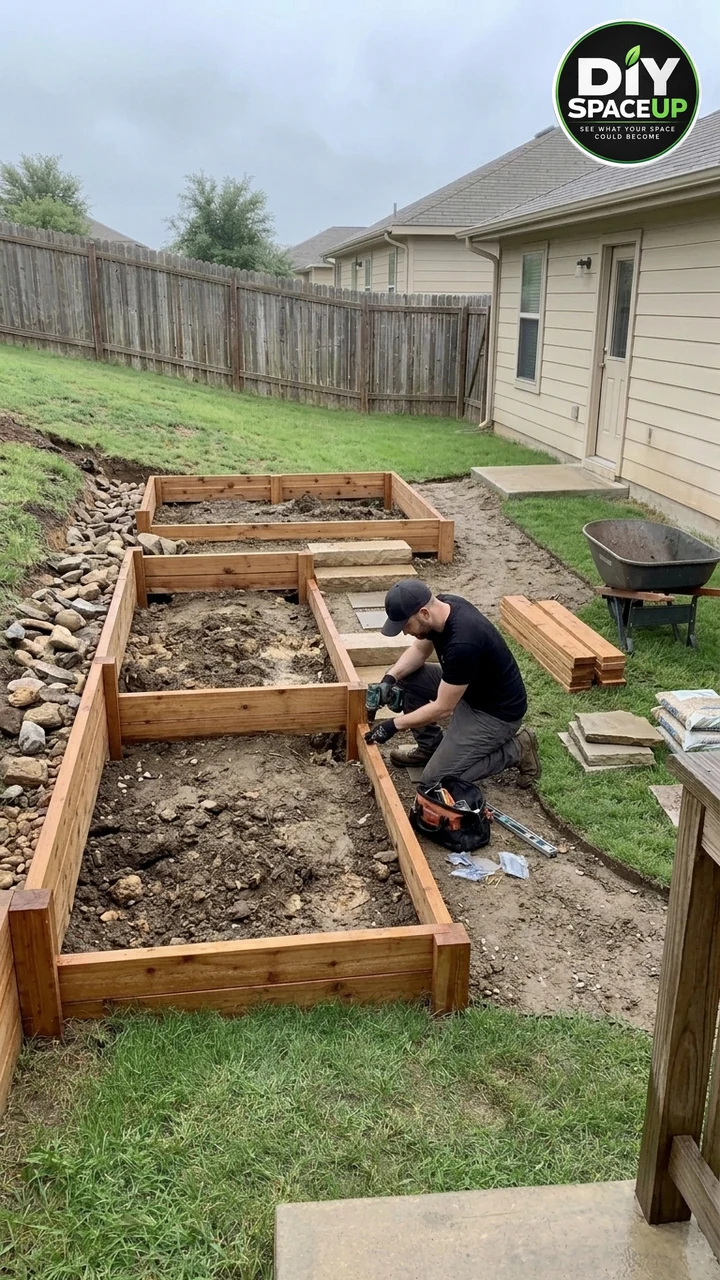
Cut untreated cedar boards and 4×4 posts to your measured lengths. Set a post at each corner, and add a mid-span post on any long wall so the boards cannot bow once the bed is full of wet soil. Seat the posts in the ground — deeper on the downhill face — and keep the first board line level. Fasten each board to the posts with exterior structural screws, such as the SPAX 5/16-by-3-inch PowerLag screws, driven with a T-40 bit. Predrill near the ends if a board wants to split. The photos of this build show a corner post and a drill at that joint; that is the detail to copy, even if a fast clip makes the walls look like they simply stacked themselves.
On a long downhill wall, consider a buried deadman or a cross-tie back into the terrace so the face cannot kick out. This is still a raised bed, not a hillside retaining wall, so the better fix is often another terrace and a lower wall rather than a taller, more clever box.
Before you fill anything, cut hardware cloth to cover the bottom of each bed, with a little overlap up the inside face. Wear gloves; the cut edges are sharp. The mesh discourages voles and similar pests and still lets water and roots pass. Do not staple a solid plastic liner across the bottom. If you want to protect the inside of the boards, a side-only liner with the bottom left open is the approach extension services describe.
Step 6: Set the Stone Steps on a Compacted Base
The slab steps run up the right side of the main beds, with a small landing between the two short flights. Do not set those stones on raw dirt. Excavate a pad for each tread, deep enough for a compacted crushed-stone base plus the thickness of the slab, so the finished step sits at a modest, consistent rise. A planning example is a rise of about 6 to 7 inches, adjusted to your stones and the actual grade change; measure, and keep the rises as even as you can so the flight is comfortable.
Lay geotextile, compact the stone in thin lifts with a plate compactor or, in tight spots, a hand tamper, and set each slab level from side to side, with a hair of pitch so water does not pond on the tread. Check the landing the same way. The path gravel can meet the steps later, but the stones themselves should already be stable.
Step 7: Build the Gravel Path the Same Way
Excavate the path from the house pad, past the side bed, around the steps, and down to the front of the lowest bed. The finished surface should sit slightly above the adjacent grass so water does not drain from the lawn onto a mushy walk, while still shedding along its length. Compact the subgrade, roll out the non-woven geotextile, and pin it with landscape staples.
Add a compacted crushed-stone base in lifts, then the lighter decorative gravel you see in the finished photos. The same base logic we use on a paver patio or walkway applies here, even though the wearing surface is gravel instead of pavers. Skipping the fabric and the base is why a pretty path turns into gravel punched into mud after one season.
Step 8: Fill the Beds, Test the Soil, and Plant
Measure the inside of each box and estimate soil volume before you order. A planning example only: three beds in the range of 8 to 12 feet long, about 3 to 4 feet wide, and about 12 inches of soil, plus a smaller side bed, can run to a few cubic yards. That is not a measurement from the photos. Buy a quality raised-bed blend and compost locally in bulk when you can.
Fill in layers, lightly settle (do not compact like a path), and rake the surface level, a little below the top board so watering does not spill soil over the edge. Run a soil test — a home kit is a starting point, and a county extension test is better — before you add a lot of fertilizer. Then plant to the light you actually have. In the finished garden, the lowest bed holds strawberries and leafy greens, the middle bed is planted in mixed vegetables, the top bed carries tomatoes on a wooden trellis, and the side bed is used for lower greens and herbs. Choose varieties that fit your season and your sun, and leave working room at the edges.
Step 9: Finish the Edges, Water, and Watch the Next Rain
Set the bench, the watering can, and any cages or trellises once the path is firm and the beds are planted. Water the new soil thoroughly so it settles around the roots. Then wait for a real rain, or run a hose at the top of the slope, and watch. Water should move into the interceptor and the rock channel, around the boxes, and out at the planned outlet. It should not cut a new rill through a bed, pond against the house, or spill toward a neighbor. Adjust a low spot or an outlet now, while the fix is still a rake and a few shovels of stone.
If a low corner of the yard still stays wet after the terraces are working, a planted basin farther downslope can help, in the spirit of a rain garden. That is a different project from this food garden: a rain garden is for absorbing runoff, not for vegetables you plan to eat from a flooded pocket.
Safety Checklist
- Call 811 and wait for marks before any digging. Watch for private lines 811 may not flag.
- Do not undermine the fence, the house foundation, or a neighbor’s grade. Keep excavations shallow and stepped on a slope; a vertical cut in wet soil can slump.
- Keep each downhill garden wall low. Once a face starts to act like a retaining wall, stop and get local guidance rather than stacking more boards.
- Use eye, ear, and hand protection with saws, a drill or impact driver, and a plate compactor. Follow the tool manuals.
- Hardware cloth has sharp edges. Wear gloves and fold or cap the cut ends.
- Lift soil, rock, and lumber with a partner or a cart. Bag-by-bag filling adds up fast.
- Do not direct concentrated runoff onto a neighbor’s property or toward the house foundation.
- Choose untreated, naturally durable lumber for food beds. Do not reuse old CCA-treated wood.
- Keep step rises modest and consistent, and keep the path wide enough that a watering can or a full basket is not a trip hazard.
- This article does not claim universal code compliance. Check local rules for walls, drainage, and setbacks.
Estimated Project Cost
Costs vary with lumber prices, soil delivery, and how much drainage work your slope needs. The ranges below are planning estimates in U.S. dollars for a backyard garden in the same family as this one, not a bid.
| Category | Planning range |
|---|---|
| Untreated cedar boards and 4×4 posts | $400–$1,200 |
| Fasteners, hardware cloth, geotextile, staples, and layout tools | $150–$350 |
| Bulk crushed stone, path gravel, and river rock | $200–$600 |
| Stone slabs for the steps | $150–$400 |
| Raised-bed soil and compost | $300–$900 |
| Drainage extras (pipe, extra gravel, outlet) | $150–$500 |
| Plants, trellis, and a simple bench | $50–$250 |
| Plate-compactor rental | $50–$100 per day |
A realistic project total for a garden of this scale is often about $1,200 to $3,500, not counting tools you already own or any hired excavation. Soil and cedar are usually the two lines that move the total the most. A taller wall that needs engineering or a contractor is outside this range. Irrigation, lighting, and premium furniture are not included.
Time is often a long weekend to about a week of work days, plus waiting on 811 marks, soil delivery, and a test rain. The drainage trench and the compacted bases are the steps a short clip hides, and they are the ones that take the extra afternoon.
Common Mistakes and Better Approaches
| Mistake | Better approach |
|---|---|
| Building the pretty boxes first and hoping the water will behave | Watch a rain, plan an interceptor above the top bed, and give the water a safe outlet before you fill the boxes with soil |
| Stacking boards with no corner posts or only a few short screws | Set 4×4 posts at the corners and mid-span, and fasten with exterior structural screws. The downhill face has to resist wet soil |
| Making one tall terrace instead of several low ones | Keep each downhill face well under about 2 feet. If you need more height, add a terrace or build a real retaining wall |
| Laying stepping stones on dirt, or pouring path gravel on bare soil | Excavate, add geotextile, and compact a crushed-stone base under both the steps and the path |
| Sealing the bed bottoms with plastic | Leave the bottoms open. Use hardware cloth if burrowing pests are a problem, and only line the sides if you want to protect the wood |
| Using leftover CCA-treated lumber, or guessing that any green-treated board is fine for food | Choose untreated cedar or another naturally durable, food-safer wood. When in doubt, ask your extension office |
| Sending the outlet toward a neighbor or the house foundation | Keep discharged water on your lot, away from the house, and spread it in rock or a lawful outlet |
| Skipping 811 because “it’s only a garden” | Terraces, path bases, and drain trenches are still excavations. Call 811 |
FAQ
Do I need a permit for a terraced vegetable garden?
Often a set of low raised beds does not need a permit, but that is a local question, not a universal yes or no. Once a downhill face starts to act like a retaining wall, or you change how water leaves the lot, many cities and some HOAs want a review. Ask before you dig, especially if the wall would approach 2 feet or more, or if the work sits near a property line.
How high can the cedar walls be?
Treat anything in the neighborhood of 2 feet or taller, measured on the downhill face, as more than a garden box. A common, comfortable height for a backyard terrace is two stacked 2×6 or 2×8 boards. If your slope wants a taller riser, add another terrace or switch to a designed retaining wall. Do not lean on an invented load number.
Should I use pressure-treated lumber?
For food gardens, untreated cedar or another naturally rot-resistant wood is the cleaner choice. Old CCA-treated lumber should not be used in vegetable beds. Newer copper-based treatments are a more complicated discussion; when you want a conservative approach, stay with untreated durable lumber and ask your local extension office if you are considering something else.
Do I have to put a liner in the beds?
No. The beds should drain into the soil below. A hardware-cloth floor is useful where gophers or voles are active. A plastic liner, if you use one at all, belongs only on the sides and must not seal the bottom.
How wide should a terraced vegetable garden bed be?
Wide enough to grow well, narrow enough to reach the middle without stepping into the soil. A planning example is about 3 feet if you work from one side only, or about 4 feet if both sides are open. Measure your own reach and leave a path you can actually use with a wheelbarrow or a full basket. Those are starting sizes, not measurements taken from the photos.
What if water still runs toward a neighbor?
Stop and change the outlet. The interceptor and the rock channel should keep water on your property and release it in a spread, lawful way — a rock apron, a pop-up emitter farther on your lot, or another approved discharge. Do not solve your garden by creating a problem next door, and do not aim a pipe at the house foundation.
A muddy sloped patch can grow food again, as long as the water gets a path of its own and the boxes are built to hold soil through the next storm. Measure your yard, keep the terraces low and level, and give the runoff a way around the vegetables. That is the difference between a garden that looks finished for a photo and a terraced vegetable garden that still feeds you after a heavy rain.