In this room, toys and books had slowly found their way onto the floor while several inches of perfectly usable space sat underneath the bed doing absolutely nothing.
So we looked closer.
The idea was simple: build one large, low-profile wooden drawer, put it on small casters, give it a furniture-style front, and let the entire thing disappear beneath the bed when playtime is over.
The finished concept looks simple. Building a version that rolls smoothly, clears the bed frame, stays square, handles everyday use, and is appropriate for a child’s room takes a little more planning.
This guide walks through that planning from beginning to end.
Transparency note: This project was developed from an AI-assisted DIY visualization. The images illustrate the concept and intended result; they are not engineering drawings or proof of a completed physical build. Adapt all measurements, materials, hardware, and construction methods to your actual bed, flooring, intended load, and household.
Table of Contents
Project at a Glance
Detail
Planning Range
Project
Rolling under-bed storage drawer
Best for
Toys, books, soft goods and lightweight household storage
Skill level
Beginner to intermediate
Build time
About 3–6 hours, plus finishing/drying time
Main material
1/2-in or 3/4-in plywood depending on design/load
Movement
4–6 low-profile casters
Typical drawer height
Determined by actual under-bed clearance
Difficulty
Accurate measuring and keeping a large box square
Estimated DIY budget
Roughly $75–$185+, depending on plywood, casters and finish
The dimensions above are planning guidance, not a universal cut list. Your bed determines the final dimensions.
Before: A Lot of Storage Hiding in Plain Sight
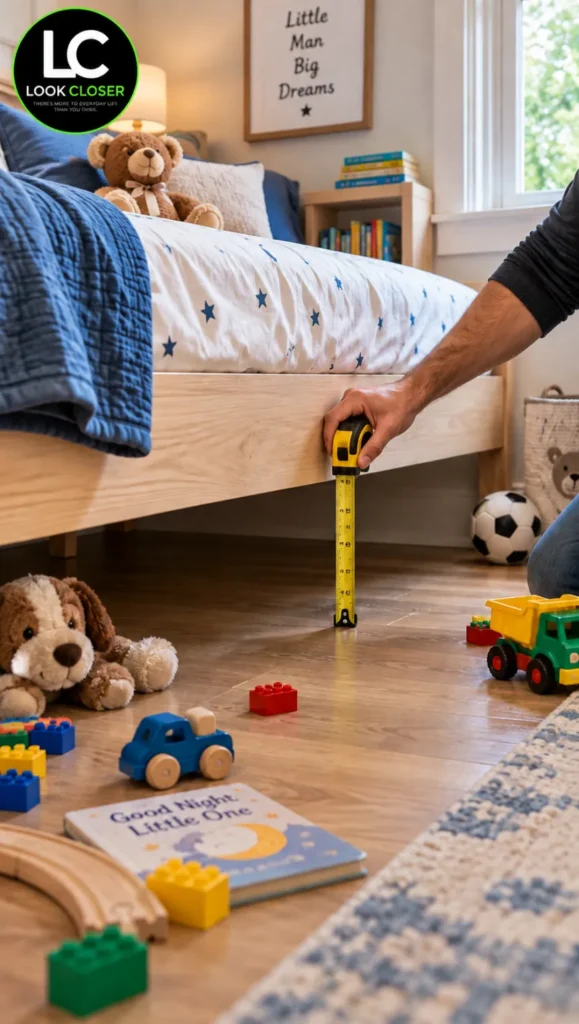
Before designing the drawer, measure from the floor to the lowest part of the bed frame and check the full space underneath.
Caption: Before designing the drawer, measure the usable opening under the bed—not simply the height of the bed frame.
At first glance, the room doesn’t look as though it needs another piece of furniture.
That’s exactly the point.
Instead of adding another cabinet, basket tower or toy chest, this project uses space that already exists.
But don’t start cutting plywood yet.
Measure First — Especially the Height
The most important measurement isn’t the width.
It’s usable vertical clearance.
Measure:
Measurement
Why It Matters
Floor to lowest part of bed
Determines maximum total drawer height
Opening width
Determines drawer width
Usable depth
Determines how far the drawer can extend under the bed
Center support position
May prevent one extra-wide drawer
Support legs
Can divide the usable space
Baseboard/wall clearance
Matters when pulling the drawer out
Floor type
Influences caster choice
Nearby furniture
Determines whether the drawer can fully open
Measure the height in several places.
Beds aren’t always perfectly level, floors aren’t always perfectly flat, and center supports can sit lower than the visible side rail.
SpaceUp Tip
Don’t design the drawer to exactly match the measured opening.
Leave working clearance above the finished drawer so small floor variations, bedding movement or a slightly uneven caster don’t make it bind.
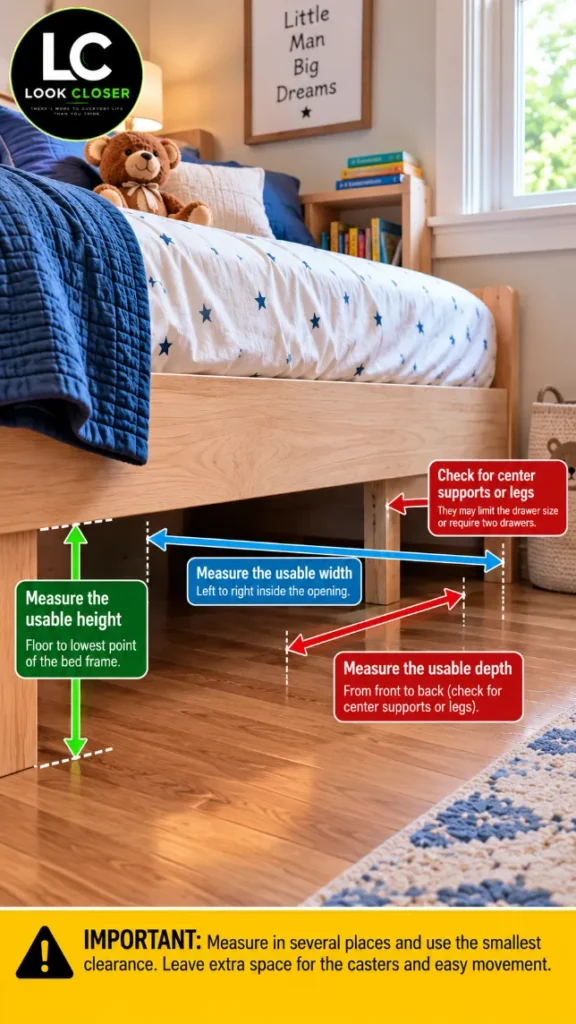
Measure the usable height, width and depth under the bed, and check for center supports or legs before deciding the drawer dimensions.
Show the exact bedroom from the Reel, with subtle measurement indicators for usable height, width, depth and center-support clearance. Look Closer circular logo in one corner.
The Measurement That Prevents the Biggest Mistake
Suppose your lowest measured clearance is 8 inches.
But those numbers are not a cut list. Measure your actual casters before cutting anything.
One Large Drawer or Two Smaller Drawers?
The Reel uses one large rolling drawer, so that’s the version we’re building here.
But inspect underneath your bed first.
A center leg or center beam may make one large drawer impossible. A comparable under-bed project from This Old House specifically warns builders to check for support legs and notes that two drawers may make more sense in that situation.
If a structural bed support occupies the center, do not remove it just to make the drawer fit.
Build around the bed—not the other way around.
Materials
For the Look Closer version, I’d use furniture-grade plywood rather than inexpensive particleboard.
Material
Purpose
What to Look For
1/2-in or 3/4-in plywood
Drawer walls/base depending on design
Flat, stable panels
Solid wood or plywood strips
Reinforcement if needed
Straight material
Wood glue
Reinforces joints
Interior woodworking adhesive
Appropriate wood screws
Mechanical assembly
Correct length for material
4–6 casters
Rolling mechanism
Low profile, non-marking wheels
Drawer pull/knob
Front access
Smooth, child-friendly profile
Paint/primer
White furniture-style front
Durable interior finish
Clear finish
Natural wood
Low-odor interior finish if appropriate
Sandpaper
Edge preparation
Multiple grits
Why plywood?
A large drawer loaded with books and toys can become surprisingly heavy.
Thin decorative panels may look good in an AI visualization but can flex when scaled into a wide real-world drawer. The larger you build it, the more important material thickness, bottom support and joinery become.
Tools You’ll Need
Tool
Purpose
Tape measure
Measure bed and drawer
Pencil
Layout
Combination/speed square
Keep cuts and assembly square
Circular saw + guide or table saw
Break down plywood
Drill/driver
Pilot holes and screws
Countersink bit
Cleaner screw installation
Clamps
Hold assembly square
Orbital sander
Smooth surfaces and edges
Straightedge
Long cuts
Safety glasses + hearing protection
Personal protection
Instead of filling the article with product boxes, I would place only a few contextual recommendations.
Affiliate disclosure: As an Amazon Associate, DIY SpaceUp earns from qualifying purchases. Some links below are affiliate links, which means we may earn a commission at no extra cost to you.
Caption: Assemble the basic drawer box on a flat work surface and repeatedly check that it remains square.
Choosing the Casters
This deserves more attention than it usually gets.
The wheels determine:
final drawer height;
how easily it rolls;
whether it marks the floor;
how much weight the drawer can safely carry;
whether the drawer tracks reasonably straight.
For hardwood or laminate, look for non-marking soft-tread casters.
For carpet, very small wheels may struggle.
Four casters or six?
For a relatively compact drawer, four appropriately rated casters may be sufficient.
For a wide drawer like the Reel concept, adding center support casters may reduce bottom flex and distribute the load more effectively—but the exact number and rating depend on drawer dimensions, construction and intended load.
Never claim a specific load capacity unless you know the rating of the actual caster and the completed structure.
distance required to pull the drawer completely out.
Mark the limiting measurement—not the largest one.
Step 2: Determine the Finished Drawer Height
Place one actual caster on your workbench and measure its installed height.
Subtract:
caster installed height;
desired movement clearance;
from the minimum under-bed clearance.
What’s left is the maximum practical height available for the drawer structure.
Step 3: Create Your Cut List
Don’t copy dimensions from somebody else’s bed.
A simple box requires:
1 bottom;
2 long sides;
1 back;
1 front structural panel;
optional decorative front;
optional reinforcement pieces.
Label every piece before assembly.
Step 4: Cut the Panels
Use a straightedge or saw guide for long plywood cuts.
Large panels that are only slightly out of square can create a drawer that looks fine on the workbench but tracks poorly once the casters are installed.
Step 5: Sand the Cut Edges
This is especially important in a child’s room.
Round or ease exposed edges slightly and remove splinters.
Pay particular attention to:
upper drawer edges;
front corners;
handle area;
plywood edges accessible when the drawer is open.
Step 6: Dry-Fit the Box
Put everything together without final fastening.
Check the diagonals.
If both diagonal measurements are equal, the rectangular box is square.
If they differ, correct the box before adding the bottom and hardware.
Step 7: Drill Pilot Holes
Pilot holes reduce the chance of splitting material and make alignment easier.
Make sure screw length matches your actual material thickness so screw tips cannot emerge through an accessible surface.
Step 8: Assemble the Box
Apply wood glue where appropriate and fasten the sides to the front and back.
Work on a flat surface.
Check for square again before the glue sets.
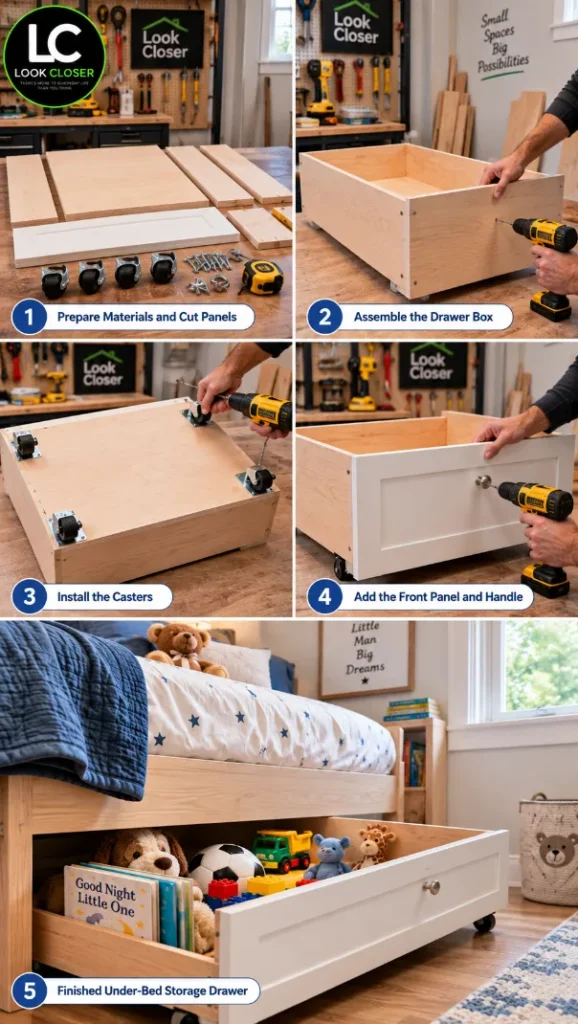
The main build sequence: prepare the panels, assemble the wooden box, install the casters, add the finished front and test the completed drawer under the bed.
Same Look Closer workshop and same drawer as the Reel: panels → square box → bottom → casters → white front → finished drawer. No invented cabinet system.
The Bottom Panel Matters More Than It Looks
The bottom carries everything placed in the drawer.
If you make a very wide box and use an inadequately supported thin bottom, it can sag.
That matters particularly if children fill it with books, because books are much heavier than stuffed animals.
For a large drawer, choose the bottom thickness and reinforcement according to span and expected load rather than purely for appearance.
If you’re unsure about a very wide or heavily loaded design, make two smaller drawers instead.
Step 9: Install the Casters
Turn the empty drawer over on a protected work surface.
If using additional center casters, they need to sit at the same effective height as the corner wheels. Otherwise the drawer can rock or fail to distribute its load properly.
Use fasteners appropriate for your material and caster mounting plate.
Step 10: Test It Empty
Before adding the decorative front or loading anything, put the drawer on the floor.
Roll it:
forward;
backward;
fully beneath the bed;
fully out again.
Watch for wobble, rubbing or caster interference.
Fix those problems now.
Step 11: Add the Furniture-Style Front
The Reel uses a white Shaker-style front over the wooden drawer box.
You can reproduce that look with a properly sized cabinet-style front or make a simple frame-and-panel appearance.
But keep the front low enough that it cannot catch the bed rail.
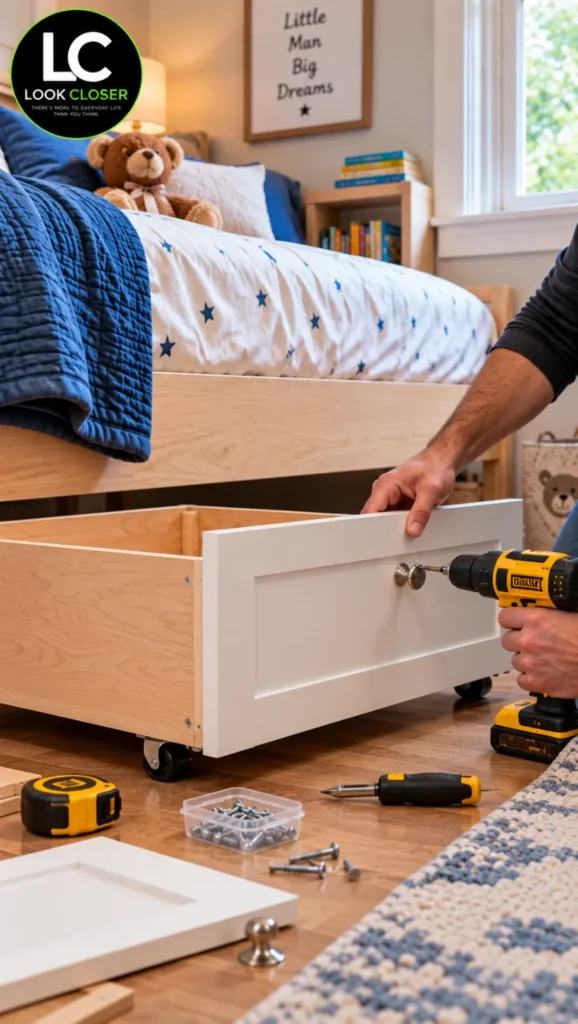
After assembling and testing the rolling drawer box, install the finished front panel and secure the handle before the final fit check.
Caption: Add the finished front only after the rolling drawer has been assembled and tested for clearance.
Step 12: Install the Pull
The knob or pull should be comfortable to use without projecting excessively into the room.
For a child’s room, avoid sharp-edged or easily snagged hardware.
Make sure the hardware is firmly secured before the drawer goes into use.
Step 13: Finish the Wood
Remove hardware as needed.
Sand progressively, clean off dust, then apply your chosen finish according to its manufacturer instructions.
Let coatings fully cure before loading the drawer or putting it into a child’s bedroom.
Step 14: Perform the Final Fit Test
Now test the finished drawer.
This matters because paint, the decorative front and final hardware can change clearances.
Check:
top clearance;
side clearance;
caster movement;
handle clearance;
rug interference;
bed support clearance;
access when fully open.
Step 15: Load It Intelligently
Don’t throw everything in randomly.
Place heavier items low and distribute them across the drawer.
For this children’s-room version:
Good Uses
Use More Caution
Stuffed animals
Very heavy book collections
Building blocks
Dense weights
Lightweight toys
Liquids
Bedding
Fragile glass items
Children’s books in reasonable quantities
Anything hazardous
Seasonal clothes
Items requiring adult-only access
Safety in a Kid’s Room
This section is not optional.
A rolling box looks harmless, but it is still a movable piece of furniture.
1. Protect little fingers
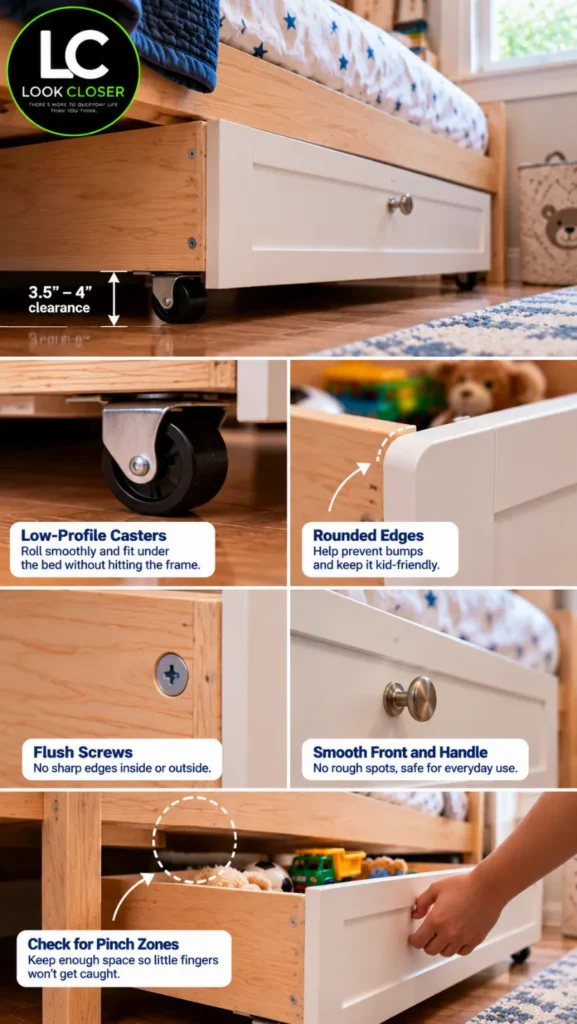
Check potential pinch points around the front, bed frame and wheels.
2. Don’t create a ride-on toy
The drawer is storage, not a cart for children to sit or ride in.
3. Secure the caster hardware
Periodically check screws and wheel mounts.
4. Keep hazardous items elsewhere
Under-bed storage in a child’s room should not contain medicines, chemicals, sharp tools, batteries or other items that need controlled access.
5. Keep the bed structure intact
Never remove a structural bed leg, center beam or support merely to fit the drawer.
6. Consider wheel access
If the design leaves wheels exposed when the drawer is open, make sure children cannot easily put fingers into hazardous pinch areas.
Before using the drawer in a kid’s room, check the casters, exposed edges, fasteners, handle, operating clearance and potential pinch points.
Same bedroom and exact drawer. Show finger clearance, bed-support clearance, caster position, smooth front edges and “storage only—not for riding.” Keep it simple rather than turning it into a technical engineering diagram.
After: Everything Rolls Away
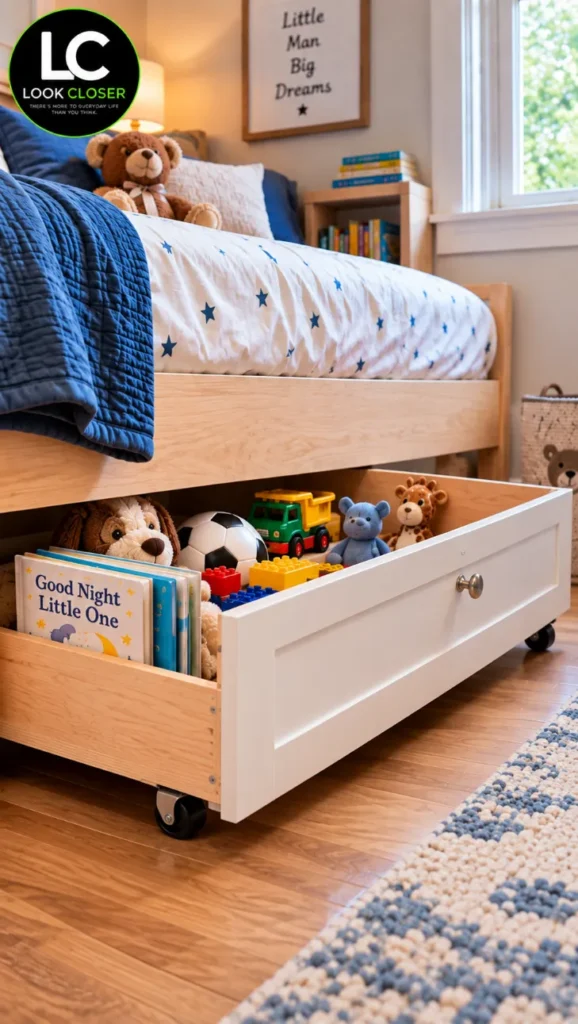
The finished rolling drawer turns unused space beneath the bed into easy-access storage for toys, books, and everyday kid’s room clutter.
Caption: The finished drawer turns previously unused space beneath the bed into easy-access storage while keeping the room visually uncluttered.
This is why the project works.
Nothing dramatic was added to the room.
The bed didn’t move. A giant cabinet didn’t appear. The room didn’t lose usable floor space.
We simply gave an overlooked volume a job.
When playtime ends, books, blocks and stuffed animals go into the drawer—and the whole thing rolls back under the bed.
That’s the transformation people see in fifteen seconds.
The measurements and planning above are what make the real version possible.
Estimated Cost
Prices vary substantially by location, material quality and hardware, so use this as a planning range rather than a quote.
Item
Approximate Planning Range
Plywood/wood
$35–$80
Casters
$15–$35
Screws + glue
$10–$20
Front hardware
$5–$20
Paint/finish
$10–$30
Estimated total
$75–$185+
If you already own finishing products or can use plywood offcuts, the cost can be lower.
Common Mistakes to Avoid
Mistake
Better Approach
Measuring only one spot
Measure several points and use the smallest clearance
Forgetting caster height
Buy/select wheels before finalizing drawer height
Making it exactly fit
Leave operating clearance
Removing a bed support
Modify the drawer design instead
Using a weak bottom on a wide drawer
Increase thickness/reinforcement or build two drawers
Installing decorative front first
Test the rolling box first
Using tiny hard wheels on unsuitable flooring
Match casters to floor and load
Loading it immediately
Test empty, then progressively load
Assuming Reel dimensions are universal
Build from your own measurements
Treating visualization as a construction drawing
Follow the practical guide and hardware specifications
Maintenance
Every few months—or sooner if children use the drawer heavily:
inspect caster screws;
check joints for movement;
tighten the handle;
inspect the bottom for sagging;
clean hair/debris from caster axles;
look for splinters or damaged edges;
confirm the drawer still clears the bed.
A five-minute inspection can catch small problems before they become large ones.
Frequently Asked Questions
How much clearance do I need under the bed?
There isn’t one universal number. Measure the lowest point beneath your specific bed, then account for caster height, drawer construction and additional movement clearance.
Should I use 1/2-inch or 3/4-inch plywood?
It depends on drawer size, span, construction and expected load. A very large drawer carrying books needs more stiffness than a small drawer holding blankets or stuffed animals.
Can I put this on carpet?
Potentially, but wheel selection becomes more important. Small casters that roll easily on hard flooring may perform poorly on thick carpet.
Do I need drawer slides?
Not for the Look Closer version shown here. This design rolls directly on floor-mounted casters. Drawer slides would create a different project.
Can I build one huge drawer under a queen bed?
Possibly, but first inspect the bed’s center supports and legs. A large span also increases structural demands. Two smaller drawers can be a better solution.
Can children sit inside it?
No. Treat it as a storage drawer rather than a ride-on toy or seating surface.
What should I store inside?
Toys, books in reasonable quantities, bedding, seasonal clothes and similar household items are natural uses. Avoid hazardous materials and excessive concentrated loads.
How much will it cost?
For a DIY version like this, roughly $75–$185+ is a reasonable planning range, but actual prices depend heavily on wood, hardware and finish choices.
Final Build Checklist
Before calling the project finished, verify:
drawer clears the lowest part of the bed;
structural bed supports remain untouched;
box is square;
bottom is adequately supported;
casters are securely fastened;
drawer rolls smoothly;
no screw tips are exposed;
accessible edges are smooth;
handle is secure;
no obvious finger traps were introduced;
finish has cured;
drawer has been tested progressively with its intended contents.
A Small Project That Changes How the Room Works
The best storage project isn’t always another piece of furniture.
Sometimes it’s recognizing that a part of the room you’ve walked past hundreds of times is already large enough to solve the problem.
This under-bed drawer doesn’t try to reinvent the bedroom. It simply gives toys, books and everyday clutter somewhere easy to reach—and somewhere equally easy to hide.
We use cookies and similar technologies to help our website function properly, understand how visitors use the site, and improve your experience. You can accept or manage your preferences at any time. Some features may not work as intended if certain cookies are disabled.
Functional
Always active
The technical storage or access is strictly necessary for the legitimate purpose of enabling the use of a specific service explicitly requested by the subscriber or user, or for the sole purpose of carrying out the transmission of a communication over an electronic communications network.
Preferences
The technical storage or access is necessary for the legitimate purpose of storing preferences that are not requested by the subscriber or user.
Statistics
The technical storage or access that is used exclusively for statistical purposes.The technical storage or access that is used exclusively for anonymous statistical purposes. Without a subpoena, voluntary compliance on the part of your Internet Service Provider, or additional records from a third party, information stored or retrieved for this purpose alone cannot usually be used to identify you.
Marketing
The technical storage or access is required to create user profiles to send advertising, or to track the user on a website or across several websites for similar marketing purposes.