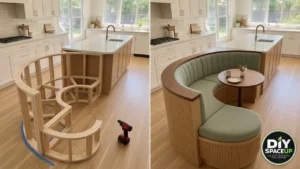

This kitchen island already had a lot going for it. It had a white quartz top, an undermount sink, warm oak cabinet panels and a wall of windows. What it didn’t have was a comfortable place to sit. The open floor at its end was just walking space. That’s the spot a curved breakfast nook kitchen island upgrade can claim.
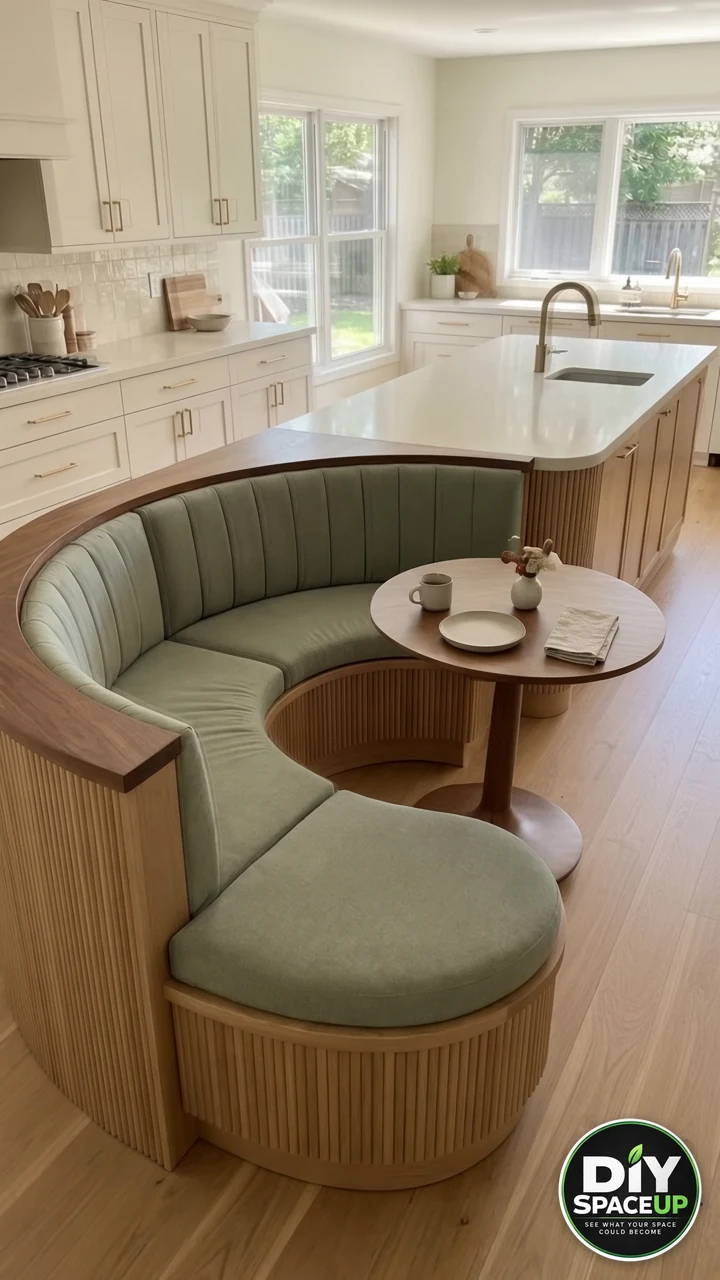
The idea keeps the existing island exactly where it is. Then it wraps a custom curved breakfast nook around the island’s end. Picture a sweeping oak-clad banquette with soft sage-green channel-tufted cushions. A wood cap rail runs along the top of the backrest, and a small round pedestal table tucks into the curve. As a result, a pass-through spot becomes the place where people actually want to gather.
First, one honest note. The inspiration post is an AI-assisted home renovation visualization, not a record of a finished, inspected build. So we’ve turned what it shows into a realistic build order. Real construction requires appropriate structural planning and installation. Every dimension in this guide is a planning example, not a measurement taken from the images. Measure your own kitchen before you cut anything.
Affiliate Disclosure: As an Amazon Associate I earn from qualifying purchases. Product links in this article may earn a commission at no additional cost to you.
In This Guide
- The Curved Breakfast Nook Kitchen Island Plan
- Is This Realistically Buildable?
- Step 1: Measure the Space and Plan Clearances
- Step 2: Make a Full-Size Curve Template
- Step 3: Check What’s Hidden in the Island and Floor
- Step 4: Choose Materials
- Step 5: Build the Curved Stud Frame
- Step 6: Anchor the Frame and Add the Seat Decking
- Step 7: Install the Fluted Oak Cladding
- Step 8: Add the Cap Rail, Sand and Finish
- Step 9: Make and Install the Cushions
- Step 10: Add the Table and Style Lightly
- How Much Weight Can It Hold?
- Tools and Safety Gear
- Safety Checklist
- Estimated Project Cost
- Common Mistakes to Avoid
- Maintenance and Everyday Use
- FAQ
- Why This Transformation Works
The Curved Breakfast Nook Kitchen Island Plan
The concept is a built-in curved banquette. It starts at the island and sweeps outward in a deep C-shape. Then it finishes in a rounded end seat. The front of the seat curves inward, which creates a pocket for a small round table.
| Component | Function |
|---|---|
| Existing island (quartz top, sink, oak cabinet base) | Stays in place; the breakfast nook is built against its end |
| Curved layout template and tape line | Transfers the curve to the floor before any framing |
| Curved 2x stud frame with curved plates | Self-supporting structure for seat and backrest |
| Inner curved seat-front frame | Creates the concave pocket where the table sits |
| Rounded end-seat frame | Finishes the free end of the banquette as a round seat |
| Plywood seat decking | Continuous seat surface and cushion base |
| Closely spaced backrest uprights | Support the tall curved backrest |
| Vertical fluted oak cladding | Finished exterior on the banquette, seat fronts and island end |
| Wood cap rail | Curved top edge of the backrest |
| Sage-green channel-tufted back cushions | Vertical-channel backrest upholstery |
| Sage-green seat cushions | Curved seat cushion plus a round end-seat cushion |
| Small round pedestal table | Coffee and breakfast surface inside the curve |
Notice what’s not in the design: no drawers, storage lids or lighting.
Is This Realistically Buildable?
Yes, but it’s an advanced finish carpentry and upholstery project. Three things make it harder than a straight banquette:
- Curves everywhere. Plates, seat edges, cladding and the cap rail all follow arcs.
- A self-supporting frame. The banquette must carry its own loads to the floor. It can’t hang on the island’s cabinet panels.
- Custom upholstery. Many homeowners build the frame and hire an upholsterer for the curved, channel-tufted cushions.
Do you like the look of our DIY window breakfast bar? Or the built-in seating in our gravel patio and wood bench project? If so, a curved breakfast nook kitchen island build is the next step up in difficulty.
Step 1: Measure the Space and Plan Clearances
Start with the room, not the curved banquette. You need to know how much floor the curve can take without choking the kitchen.
| Measurement | Why It Matters |
|---|---|
| Floor area beyond the island end | Sets the maximum radius of the curve |
| Work aisles around the island | The breakfast nook can’t steal cooking space |
| Island countertop overhang | Affects where the backrest can meet the island |
The NKBA Kitchen Planning Guidelines are a useful reference. They recommend at least 42 inches for a one-cook work aisle and 48 inches for multiple cooks. For a general walkway, they suggest 36 inches. Local codes may differ, so treat these numbers as planning guidance.
A STANLEY FATMAX 25-Foot Tape Measure (33-725) handles the long runs. Meanwhile, a BOSCH GLL50-20G Green-Beam Self-Leveling Cross-Line Laser projects a level reference line around the whole curve.
Planning Example Dimensions
These are typical starting ranges for banquette seating. They are not measurements from the reference.
| Feature | Planning Range |
|---|---|
| Finished seat height (with cushion) | About 17–19 in |
| Seat depth | About 18–22 in |
| Backrest height above the seat | About 14–20 in |
| Table height | About 28–30 in |
| Table edge overlap past the seat front | About 3–4 in |
Measure a banquette or chair you find comfortable. That’s the best starting point.
Step 2: Make a Full-Size Curve Template
The reference starts the right way. It shows a curved plywood template laid on the floor beside the island end. A full-size template lets you see the footprint and test the walkways. It also catches mistakes while they’re still cheap.
Draw three shapes on thin plywood or hardboard. You need the outer arc of the backrest, the inner arc of the seat front and the round end seat.
For true arcs, use a trammel. That’s simply a stick with a pivot screw at one end and a pencil at the other. A tape measure’s hook pivoted from a center point also works. Then cut the template with a DEWALT 20V MAX XR Jig Saw (DCS334B), which is the right tool for tight curves.
Next, lay the template on the floor and mark the curve with painter’s tape. Live with the tape line for a day or two. Open the dishwasher and walk past with a laundry basket. If anything feels tight, adjust the curve now.

Step 3: Check What’s Hidden in the Island and Floor
Before you fasten anything, find out what you’re building against and on top of:
- Plumbing. The kitchen island has a sink. So supply and drain lines run through it, and often through the floor below.
- Electrical. Islands often have outlets or wiring. Don’t bury an outlet behind the banquette. If it has to move, hire a qualified electrician and follow local electrical rules.
- Radiant heat or ducts can sit exactly where you’d drive a screw.
- Floor construction. Fastening a heavy built-in through a floating floor can pin it and cause buckling. Ask your flooring maker how to handle built-ins.
A Franklin Sensors ProSensor M210 Stud Finder can help you find framing in the end of the kitchen island. It can also flag possible live wiring. Still, it doesn’t replace knowing what’s actually there.
Step 4: Choose Materials
Here’s what each part of the curved banquette is made from:
| Material | Use |
|---|---|
| Kiln-dried 2×4 or 2×3 lumber | Studs and uprights |
| 3/4 in plywood (often doubled) | Curved top and bottom plates, seat ribs |
| 3/4 in plywood | Seat decking |
| Flexible tambour or fluted panels, oak veneer | Curved exterior cladding |
| Solid wood or bent lamination | Cap rail |
| High-density upholstery foam | Seat and back cushions |
| Bonded batting | Smooths foam edges under fabric |
| Upholstery fabric | Cushion covers |
Reject twisted or bowed boards. Curves magnify small errors.
Step 5: Build the Curved Stud Frame
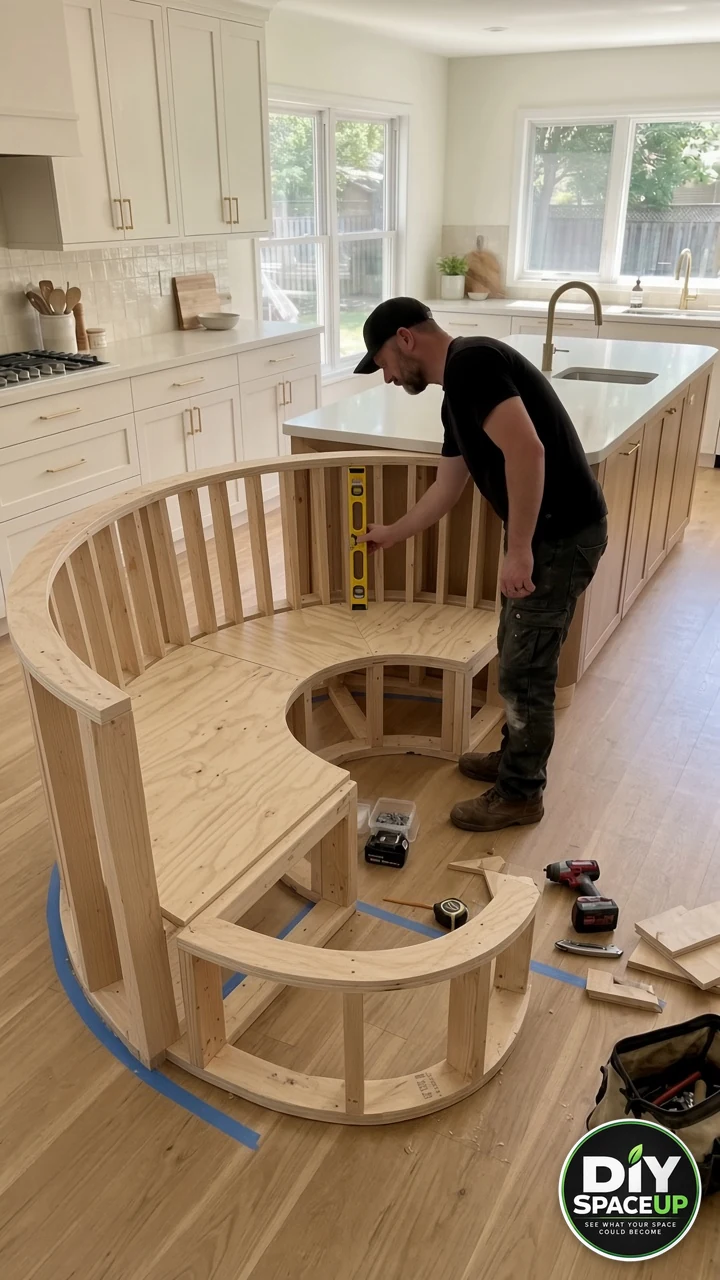
This is the main structural stage, and it matches the reference. You’ll build a curved 2x frame around the island end. Then you’ll add a smaller inner frame for the seat front and the round end seat.
- Cut curved plates. Trace arcs from your template onto 3/4 in plywood and cut them with the jigsaw. Where you need thicker plates, laminate two layers with Titebond III Ultimate Wood Glue.
- Stand the studs. Set vertical studs between the bottom and top plates at close spacing. Tighter curves need closer studs.
- Build the seat platform. Run curved ribs at seat height. Tie them to both the outer backrest wall and the inner seat-front frame.
- Frame the round end seat as its own cylinder-like section, tied into the main frame.
A DEWALT 20V MAX Compact Drill/Driver Kit (DCD771C2) handles pilot holes and assembly. A DEWALT 20V MAX XR Impact Driver (DCF845B) speeds up structural screws. One example is GRK R4 Multi-Purpose Framing Screws (#9 x 2-1/2 in). For hidden joints in the seat ribs and blocking, a Kreg Pocket-Hole Jig 720PRO is handy.
To break down full plywood sheets, use a DEWALT 20V MAX 6-1/2-Inch Circular Saw (DCS565B) with a clamped straightedge guide. Then hold plates and studs with IRWIN QUICK-GRIP One-Handed Mini Bar Clamps (4-Pack). Check the curve against the tape line as you go.

Step 6: Anchor the Frame and Add the Seat Decking
The curved banquette should be rigid and self-supporting. How you secure it to the floor depends on your floor system. Whether you tie it to the kitchen island depends on how the island itself is anchored. Keep in mind that the island’s side panel is decorative, not structural.
Once the frame is plumb, level and secured, add 3/4 in plywood seat decking in curved segments. Glue and screw it to the ribs. Also, keep every seam over framing.
The reference shows closely spaced backrest uprights under a curved top plate. Check each one for plumb with your laser and a level.
Step 7: Install the Fluted Oak Cladding
The finished breakfast nook look comes from vertical fluted oak cladding. It covers the outside of the curved banquette, the curved seat fronts and the island end. Flexible tambour panels have a fabric or canvas backer, so they can bend around curves.
One option to look at is the Flexible White Oak Veneer Tambour Wall Panel (unfinished, 3/4 in slats). Before you order, check the maker’s minimum bend radius against your tightest curve.
Dry-fit each piece first. Then glue it to plywood backing over the studs, never to open framing, and follow the panel maker’s instructions. Remember that cladding is decorative trim. It adds no structural strength.
Step 8: Add the Cap Rail, Sand and Finish
A curved cap rail finishes the top of the backrest. In the reference, it’s a slightly deeper wood tone than the slats. You can make it from glued-up curved segments or a bent lamination. Or have a millwork shop make one from your template.
Sand with a DEWALT 5-Inch Random Orbit Sander Kit (DWE6423K), and round over every edge a hand or knee will touch. Then protect the wood with a water-based clear coat such as Minwax Polycrylic Protective Finish (Clear Satin). It helps keep the light oak color. Let it cure fully, following the label, before any cushions go on.
Step 9: Make and Install the Cushions
The reference shows three cushion types:
- Channel-tufted back cushions with vertical channels that follow the curve
- A continuous curved seat cushion
- A round cushion on the end seat
Cut high-density foam to paper patterns traced from the actual decking, not from the drawing. One foam option is FoamTouch High-Density Upholstery Foam (4 x 24 x 72 in). Bond the layers with 3M Foam Fast 74 Spray Adhesive. Then wrap the foam in Fairfield Poly-Fil Cushion Wrap bonded batting.
Finally, cover each cushion in a durable sage fabric. A similar option close to the reference color is Nexus Sage Performance Twill Velvet Upholstery Fabric. For fabric on plywood back panels, an Arrow T50 Heavy-Duty Staple Gun does the job.
For fire safety, ask your suppliers whether the fabric and foam pass California TB 117-2013. That’s the test behind the U.S. Consumer Product Safety Commission’s upholstered furniture standard. If you buy ready-made cushions, look for this label: “Complies with U.S. CPSC requirements for upholstered furniture flammability.”

Step 10: Add the Table and Style Lightly
Only now does the curved breakfast nook kitchen island start to look like the inspiration image. Slide a small round pedestal table into the curve. A pedestal base leaves no corner legs to bump knees on.
To recreate this look, a similar option is the HiHomely 31.5-Inch Round Walnut Tulip Pedestal Table. Check its height and diameter against your seat before buying. After that, a mug, a small plate and a few stems in a bud vase are all the styling it needs.
How Much Weight Can It Hold?
There’s no responsible universal number, and none can be read from images. Instead, capacity depends on the weakest link:
| Variable | Why It Matters |
|---|---|
| Stud spacing and lumber size | Determines how loads reach the floor |
| Floor anchoring | Keeps the frame from racking or sliding |
| Backrest height | People lean back hard; taller backs create more leverage |
Build the curved banquette like furniture that adults will sit and lean on every day. If you’re unsure, have a contractor review the frame before cladding.
Tools and Safety Gear
A track saw is nice for long, splinter-free plywood cuts. However, for a one-time project, renting one makes more sense. A circular saw with a clamped straightedge also works. The same goes for the laser level if you’ll rarely use it again.
When cutting and sanding, wear DEWALT DPG82 Concealer Anti-Fog Safety Goggles, 3M PELTOR X4A Earmuffs and 3M 8511 N95 Respirators. Wood dust is a real breathing hazard, as OSHA’s wood dust guidance explains.
Ventilate while finishing, too. The EPA’s overview of volatile organic compounds is worth a read before you choose finishes and adhesives.
Safety Checklist
| Check | Requirement |
|---|---|
| Frame | Self-supporting, rigid, no racking when pushed |
| Anchoring | Appropriate for your floor system |
| Island utilities | Plumbing, wiring and outlets located and kept accessible |
| Aisles | Work aisles and walkways still usable |
| Finish | Fully cured before cushions and use |
| Cushions | Fabric and foam flammability checked |
| Spray adhesive | Used with ventilation, away from ignition sources |
Don’t assume your build meets code. Check local building, electrical and fire safety rules. If you’re moving outlets or plumbing, consider a permit consultation.
Estimated Project Cost
These are rough planning ranges for a curved breakfast nook kitchen island, not quotes. Prices vary by region, wood species and fabric.
| Category | Planning Budget |
|---|---|
| Lumber, plywood and fasteners | $300–$700 |
| Fluted/tambour cladding panels | $400–$1,200+ |
| Cap rail (DIY or millwork shop) | $100–$600+ |
| Finish, glue and adhesives | $60–$150 |
| Foam and batting | $200–$500 |
| Upholstery fabric | $300–$900+ |
| Professional upholstery labor (optional) | $800–$2,500+ |
| Small round pedestal table | $150–$600+ |
| Approx. DIY materials (no labor, no table) | $1,360–$4,050+ |
Tools, electrician or plumber work and flooring repairs aren’t included.
Common Mistakes to Avoid
Most problems with a curved breakfast nook kitchen island project start before the first cut. Here’s how to avoid them:
| Mistake | Better Approach |
|---|---|
| Building from the image’s proportions | Make a full-size template from your own measurements |
| Hanging the banquette on the island panels | Build a self-supporting frame tied to proper structure |
| Burying an island outlet | Keep it accessible or relocate it per local code |
| Screwing through a floating floor without checking | Follow the flooring maker’s guidance for built-ins |
| Gluing cladding to open studs | Provide continuous backing first |
| Adding drawers or lights “while you’re at it” | Stick to the planned design or redesign deliberately |
Maintenance and Everyday Use
Use zippered cushion covers so they can come off for cleaning. Vacuum the back-cushion channels regularly. Wipe the oak with a damp cloth, not a soaking one.
After a few months, recheck the frame screws and cap rail. Seasonal humidity can open small gaps in curved woodwork.
FAQ
Can I build this without moving my island?
That’s the whole idea behind a curved breakfast nook kitchen island. Your kitchen island stays in place. The banquette is built as a separate structure against its end, as long as your floor space and aisles allow it.
Do I need a permit?
Moving outlets, wiring or plumbing usually does. Rules vary, so check with your local building department.
Can I make the banquette smaller?
Yes. A tighter curve that seats two or three people may suit a smaller kitchen. Just rebuild the breakfast nook template first.
Why This Transformation Works
Instead of replacing a good island, this breakfast nook gives the empty floor at its end a job. The curve softens a rectangular kitchen. The oak ties back to the island base, and the sage cushions echo the green outside the windows.
The build order is what makes a curved breakfast nook kitchen island doable. First measure, then make the template and check the utilities. Next, frame, anchor and deck. After that, clad, cap and finish. Finally, upholster and add the table.
For more ways to make an existing kitchen work harder, see our DIY kitchen corner shelf. You can also browse the rest of our Indoor Spaces projects.