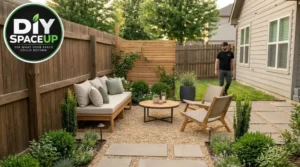
A muddy backyard corner becomes a defined outdoor lounge with gravel, pavers, planting beds, and a wood bench.
How to Turn a Muddy Backyard Corner Into a Gravel Patio With Pavers and a DIY Wood Bench
A muddy backyard corner is transformed into a functional outdoor lounge with a gravel patio, large pavers, a wooden bench, planting beds, seating, and outdoor lighting.
A muddy backyard corner doesn’t always need a complicated hardscape to become useful.
In this project, an underused patch of lawn was transformed into a compact outdoor sitting area with a gravel surface, large rectangular stepping pavers, planted borders, a simple wood bench, and warm outdoor string lighting.
The transformation is especially useful because the finished space doesn’t try to turn the entire yard into a patio. Instead, it creates a defined destination inside an otherwise ordinary backyard.
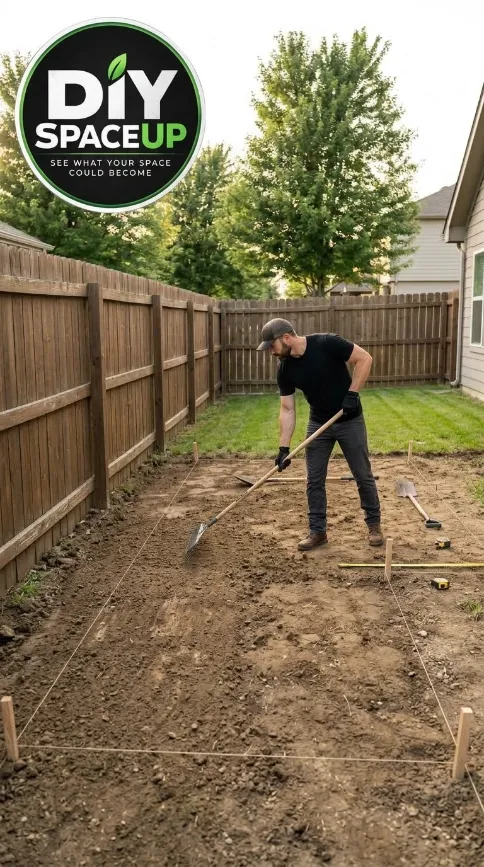
The supplied construction references show the project progressing from bare, muddy ground to a prepared patio area, then to paver installation and finally to the finished garden lounge.
Because the photos do not reveal every hidden layer or exact measurement, dimensions below are planning guidelines, not measurements taken from the photographs.
Affiliate disclosure: As an Amazon Associate, DIY SpaceUp earns from qualifying purchases. Some links below are affiliate links, which means we may earn a commission at no extra cost to you.
Table of Contents
What We’re Building
The finished project combines several relatively simple elements into one small backyard retreat.
Component
Function
Compacted patio base
Creates a stable foundation for the finished surface
Gravel surface
Covers most of the patio area
Large rectangular pavers
Create the walking route through the gravel
Landscape planting beds
Soften the hardscape edges
Wood bench
Provides fixed seating along the fence
Small outdoor furniture
Creates the finished lounge area
Outdoor string lighting
Adds evening ambiance
Landscape edging
Helps define the patio and planting areas
The references show a fairly simple rectangular layout rather than a complicated curved patio, which makes the general concept approachable for a DIY build.
Why This Backyard Transformation Works
The original corner had grass, exposed soil and muddy areas that weren’t functioning as a useful outdoor room.
Instead of filling the entire yard with hardscape, the project creates a smaller defined zone.
The combination of:
gravel underfoot
large pavers for walking
planted borders
a wood bench
movable seating
simple lighting
turns the corner into a destination.
The gravel also gives the project a visually lighter appearance than a fully paved patio.
Don’t calculate material quantities from the photographs.
For example:
Patio area = length × width
Then add the areas of any planting beds or other spaces that will not receive gravel.
Plan the paver pattern early
The finished reference uses large rectangular pavers separated by gravel rather than a continuous paver surface.
When shopping for the pavers, look for Large Rectangular Concrete Patio Pavers with a size, color, thickness, and surface appearance comparable to the finished reference. The exact paver shown in the project cannot be verified from the photographs, so use a comparable style rather than assuming an exact product match.
Lay the intended paver pattern out on paper first.
You want enough room between the pavers to create the visual gravel joints while still making the walking route comfortable.
Check Drainage Before Building
This is one of the most important parts of the project because the original space is visibly muddy.
A beautiful gravel surface will not solve a drainage problem if water continues to collect underneath it.
Before excavation, determine where water currently travels.
Check:
where rainwater collects
whether water comes from the lawn
whether roof runoff reaches the area
whether the ground slopes toward or away from the house
whether irrigation lines cross the project
whether buried utilities are present
For a project near a house, the finished grade should generally direct water away from the building rather than trapping it against the foundation. Paver installation guidance from Lowe’s and Home Depot also emphasizes establishing slope during excavation and base preparation. The Home Depot
Before digging, have underground utilities located according to your local requirements.
Materials
The visible project requires several categories of materials.
For a patio of meaningful size, a plate compactor can make base preparation substantially easier. Home improvement installation guides commonly recommend compacting the base in layers; for a one-off DIY patio, renting a plate compactor can make more financial sense than purchasing one. The Home Depot
Step 1: Mark the Patio Layout
Use stakes and string to establish the outside boundaries.
The supplied construction image shows the area being laid out and graded before the finished materials are installed.
The backyard is cleared and leveled before installing the gravel base and paver pathway.
Take your time here.
This is the easiest stage at which to change:
patio size
paver alignment
bench position
planting-bed width
walking route
Use a 4-Foot Levelor line-level setup to understand the existing grade.
The layout should also account for the finished thickness of the base, leveling layer, gravel and pavers.
Step 2: Remove the Grass and Unstable Surface Material
Remove the grass, roots and unsuitable surface soil from the defined area.
The depth you need depends on:
existing soil
paver thickness
gravel depth
base material
required finished elevation
local freeze/thaw conditions
drainage requirements
Do not use a single internet dimension as a universal excavation depth.
Current patio installation guidance commonly describes a compacted gravel base followed by a leveling layer, but the required depth varies by site and climate. Home Depot, for example, describes a gravel base and leveling sand system, while Lowe’s notes that colder climates can require deeper bases. The Home Depot
Step 3: Establish the Finished Grade
Once the surface is excavated, establish the intended finished elevation.
This is where the project stops being simply a landscaping makeover and becomes a small site-preparation project.
The finished patio should:
drain appropriately
remain reasonably level for furniture
avoid creating a low spot
transition cleanly into the lawn
avoid directing water toward the house
Use stakes and string to maintain a consistent reference.
A line level can help with layout, while a 4-foot level is useful for checking local surface conditions.
Step 4: Compact the Ground
Compact the exposed soil before installing the finished layers.
For a small area, a hand tamper may be practical.
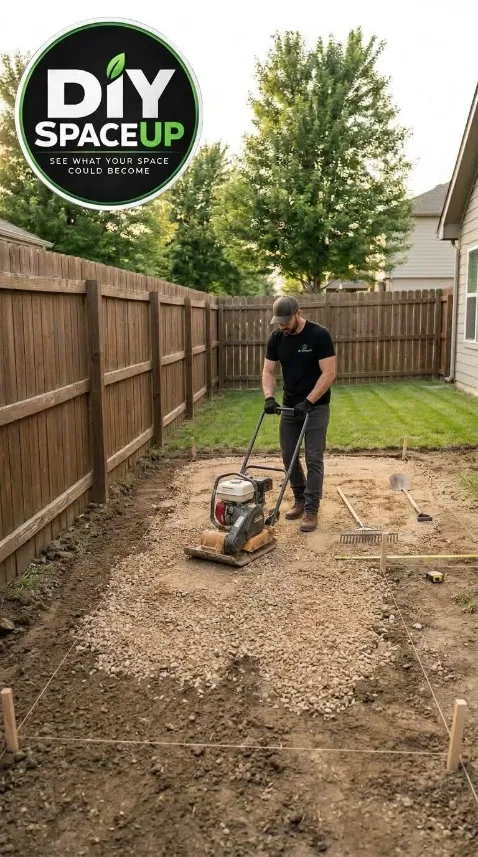
For a larger patio area, a plate compactor can provide more consistent compaction.
The aggregate base is compacted to create a firm foundation for the patio surface.
The important point is not simply to make the surface look flat. The goal is to create a firm, reasonably uniform foundation before adding the next layer.
Don’t skip this step because the finished gravel will hide the ground underneath.
Step 5: Install the Landscape Fabric and Base System
The supplied references show black landscape material being brought into the project area.
If landscape fabric is appropriate for your specific gravel/paver system, install it over the prepared area and secure it according to the manufacturer’s instructions.
Landscape fabric can help separate soil from aggregate and reduce weed growth, but it is not a substitute for a properly prepared structural base.
Then install the specified base material.
For conventional paver construction, published installation guides commonly use compacted aggregate below a leveling layer. Lowe’s describes building the base in compacted lifts, while Home Depot describes a gravel base followed by leveling sand. The Home Depot
The exact base depth for this particular project is not visible in the supplied photographs, so don’t present a guessed depth as if it were the original measurement.
Step 6: Compact the Base in Layers
Spread the base material evenly and compact it progressively.
Avoid dumping one enormous layer and assuming the compactor will consolidate everything equally.
For a larger patio, work in manageable lifts according to the material and equipment manufacturer’s recommendations.
Lightly wetting appropriate granular base material can help with compaction; published patio guides also describe compacting the base repeatedly until it becomes firm and uniform. The Home Depot
A plate compactor may be worth renting
A plate compactor is one of the higher-ticket tools associated with this project.
For a single backyard patio, renting a plate compactoris often more practical than buying a machine that will spend most of its life in storage.
This is exactly the kind of project where renting can make more sense.
Step 7: Prepare the Paver Surface
Once the structural base is ready, prepare the leveling layer required by your chosen paver installation system.
A common paver approach uses a thin, uniform layer of leveling sand over the compacted base. Published guides describe approximately a 1-inch leveling layer in some conventional installations, but the correct thickness should follow the actual system and material instructions. The Home Depot
The important thing is consistency.
You want the pavers to sit on a stable, evenly prepared surface rather than on random piles of loose material.
Step 8: Lay Out the Large Pavers
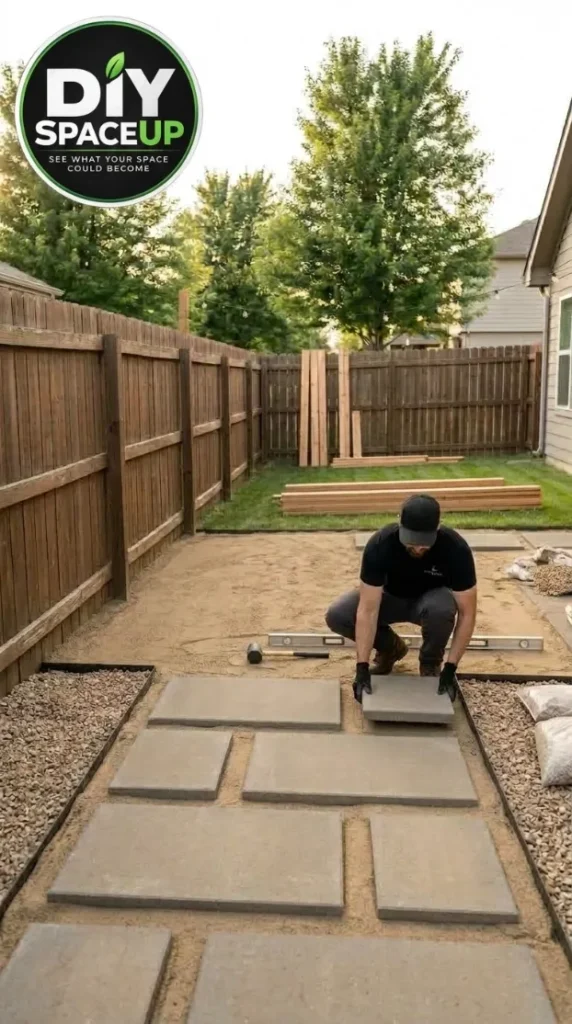
The finished project uses large rectangular pavers separated by gravel.
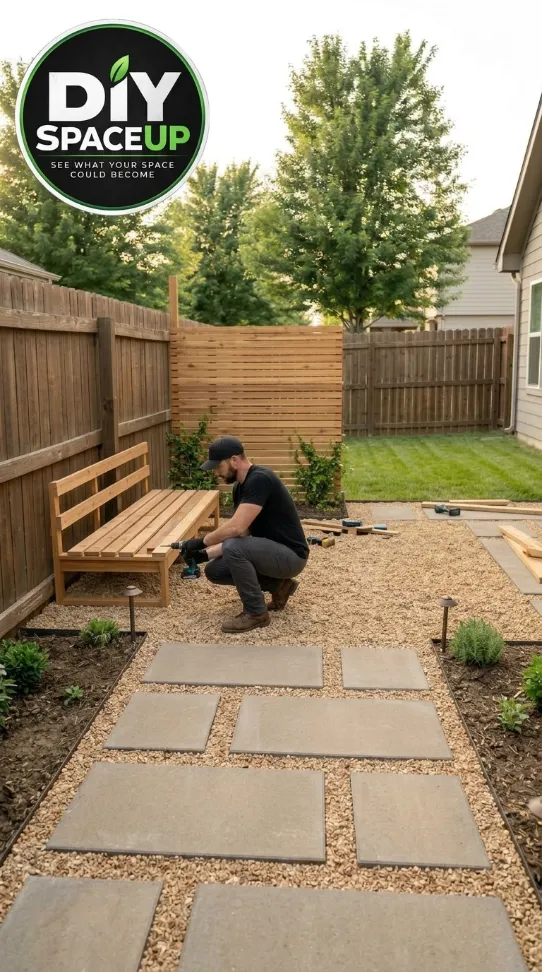
Large rectangular pavers are positioned along the walking route before the surrounding gravel is finished.
Before permanently setting them, lay out the pieces approximately where you want them.
This lets you adjust:
spacing
alignment
walking rhythm
distance from the bench
relationship to the planting beds
The pavers don’t need to form a conventional continuous patio.
In this project, they function more like a walking path embedded in the gravel.
Step 9: Set and Level the Pavers
Place each paver carefully on the prepared surface.
Check it from multiple directions.
Use a rubber mallet when appropriate to make small adjustments without damaging the surface.
The goal is not necessarily to make every stone perfectly identical.
The finished reference has a relaxed garden-path appearance, but the walking surfaces should still feel stable and intentional.
Avoid leaving a paver rocking under normal foot pressure.
Step 10: Build the Wood Bench
The wooden bench is assembled along the fence as the backyard patio takes shape.
The wood bench is assembled separately from the patio preparation.
The supplied construction reference shows the bench being built from multiple wooden members, including a slatted seat/back arrangement and a simple supporting frame.
Build the bench according to the actual dimensions you determine for your space.
The photographs do not reveal every hidden connection, so the exact screw pattern should not be presented as confirmed.
Use exterior-rated fasteners appropriate for the wood and outdoor exposure.
The bench should sit securely on its intended surface.
Do not assume that a visually sturdy bench has a particular load capacity.
Actual capacity depends on:
wood species
dimensions
span
support spacing
joinery
fasteners
ground conditions
If the bench is intended for frequent use by multiple people, evaluate the actual construction rather than relying on a generic DIY weight rating.
Step 11: Finish the Gravel Surface
Once the pavers and bench area are established, spread the finished gravel around the stepping stones.
The supplied AFTER reference shows a light-colored gravel surface surrounding the large rectangular pavers.
Spread the gravel evenly rather than creating deep piles around the stones.
A Landscape Rake is useful for distributing aggregate across a larger area.
For a pea-gravel-style surface, current Lowe’s guidance describes using a compacted base, landscape fabric where appropriate, and a finished gravel layer, with the exact depth depending on the project. Lowe’s
Step 12: Define the Planting Borders
The finished project uses planting beds to frame the gravel patio.
This is an important visual transition.
Instead of allowing the gravel to disappear gradually into the lawn, define the boundary between:
gravel
planting soil
lawn
The exact edging method shown in the photographs is not fully verifiable, so use an edging system appropriate to the actual site.
The planting arrangement should also follow the supplied finished reference rather than adding unrelated plants or structures.
Choose plants according to your local:
sun exposure
hardiness zone
soil
water availability
mature size
Step 13: Add the Outdoor Lighting
The finished reference includes string lighting crossing the backyard area.
Install only an outdoor-rated lighting system designed for the conditions where it will be used.
Follow the manufacturer’s instructions for:
mounting
cable support
electrical connection
weather exposure
maximum string length
spacing
Do not assume the visible string-light support method from the photograph without verifying the actual installation.
If the lighting requires new electrical work, use a qualified electrician where appropriate and follow local electrical requirements.
Step 14: Add the Outdoor Seating
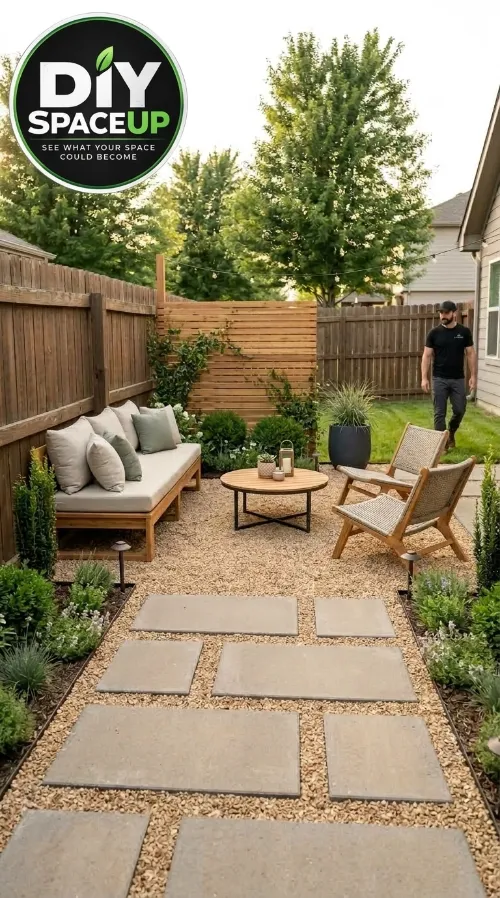
The final transformation includes a wood bench plus additional outdoor seating around a small table.
To recreate the finished look, comparable Outdoor Lounge Chairsand a SmallOutdoor Patio Table can be added after the hardscape is complete. These should be treated as style-matching options rather than claims that they are the exact furniture shown in the reference.
This is where the hardscape becomes an actual outdoor room.
The furniture is not part of the structural patio construction, so wait until the surface is stable and finished before placing it.
For the final look, focus on the same visual balance shown in the reference:
bench along the fence
small central table
two individual lounge chairs
plants around the perimeter
gravel beneath the seating area
Don’t overcrowd the space.
Structural and Drainage Considerations
This project looks simple when finished, but the hidden ground preparation is what determines whether it stays usable.
Issue
What to verify
Soil
Is the exposed soil firm enough to support the build?
Drainage
Where does rainwater go?
Grade
Does the finished surface drain appropriately?
Base
Is the aggregate compacted consistently?
Pavers
Are they stable and properly supported?
Gravel
Is it contained at the edges?
Bench
Are the supports and fasteners appropriate for outdoor use?
Lighting
Is the system rated and installed for outdoor conditions?
Utilities
Are irrigation, electrical and other buried lines located?
If the area has persistent standing water, unstable soil, significant slope, or drainage toward the foundation, address that underlying condition before treating the project as a simple decorative patio.
Safety Checklist
Have underground utilities located before digging.
Wear gloves when handling gravel, pavers and landscape fabric.
Use eye protection when cutting materials.
Use hearing protection around powered compactors and saws.
Lift pavers with appropriate technique or get help with heavy pieces.
Keep the work area clear while operating a plate compactor.
Follow the compactor manufacturer’s operating instructions.
Check the finished grade before covering it with gravel.
Do not install outdoor electrical components without following their ratings and instructions.
Use exterior-rated fasteners for the bench.
Allow exterior finishes to cure according to the manufacturer’s instructions.
Verify local requirements for drainage, electrical work, property setbacks and landscaping.
Estimated Project Cost
For a project of this general character, a planning budget of roughly $1,000–$3,500+ is reasonable, but the actual number can vary dramatically with patio size, paver choice, gravel quantity, plants, bench lumber, lighting and whether equipment is rented.
Category
Planning range
Gravel and aggregate
$150–$500+
Pavers
$150–$600+
Landscape fabric / edging
$50–$200
Base and leveling materials
$150–$500+
Bench lumber and hardware
$150–$500+
Plants / soil / mulch
$150–$600+
Outdoor lighting
$50–$250+
Tool rental
$50–$200+
Outdoor furniture
$200–$1,000+
These are planning ranges rather than prices from the supplied project.
Tools you already own can reduce the cost significantly, while premium pavers, mature plants and higher-end furniture can increase it.
Common Mistakes
Mistake
Better approach
Building directly over muddy soil
Prepare and compact the foundation first
Guessing the excavation depth
Calculate the finished surface and layer thicknesses
Ignoring drainage
Establish the grade before installing the patio
Skipping compaction
Compact the soil and aggregate systematically
Installing pavers on uneven material
Prepare a consistent leveling surface
Making gravel too deep
Use the appropriate depth for the chosen gravel system
Letting gravel spill into planting beds
Define the perimeter
Building the bench before confirming its location
Plan the patio and seating layout first
Using interior screws outdoors
Choose appropriate exterior-rated fasteners
Adding lighting without checking electrical requirements
Use an outdoor-rated system and follow local requirements
Buying a plate compactor for one project
Consider renting
Copying photo dimensions
Measure your own yard
Maintenance After the Build
A gravel patio is not completely maintenance-free.
Expect to occasionally:
rake displaced gravel
remove leaves and debris
pull weeds that appear at the edges
check paver stability
refresh gravel where it becomes thin
inspect the bench
tighten hardware when necessary
inspect outdoor lighting
prune plants away from the walking area
After heavy rain, check whether water is collecting in places where it shouldn’t.
That inspection is especially important because the original space had visible muddy conditions.
The Biggest Lesson From This Backyard Transformation
The finished backyard corner combines gravel, large pavers, a wooden bench, planting beds, seating, and outdoor lighting.
The most useful part of this project isn’t any single decorative element.
It’s the decision to define a small, functional outdoor room instead of trying to renovate the entire backyard.
A prepared gravel surface gives the space structure. Large pavers create a comfortable route through it. The wood bench adds permanent seating. Plants soften the edges, while simple lighting makes the area usable after sunset.
The transformation shown in the references is therefore less about adding expensive features and more about giving an otherwise muddy corner a clear purpose.
[…] you like the look of our DIY window breakfast bar? Or the built-in seating in our gravel patio and wood bench project? If so, a curved breakfast nook kitchen island build is the next step up in […]
We use cookies and similar technologies to help our website function properly, understand how visitors use the site, and improve your experience. You can accept or manage your preferences at any time. Some features may not work as intended if certain cookies are disabled.
Functional
Always active
The technical storage or access is strictly necessary for the legitimate purpose of enabling the use of a specific service explicitly requested by the subscriber or user, or for the sole purpose of carrying out the transmission of a communication over an electronic communications network.
Preferences
The technical storage or access is necessary for the legitimate purpose of storing preferences that are not requested by the subscriber or user.
Statistics
The technical storage or access that is used exclusively for statistical purposes.The technical storage or access that is used exclusively for anonymous statistical purposes. Without a subpoena, voluntary compliance on the part of your Internet Service Provider, or additional records from a third party, information stored or retrieved for this purpose alone cannot usually be used to identify you.
Marketing
The technical storage or access is required to create user profiles to send advertising, or to track the user on a website or across several websites for similar marketing purposes.


[…] you like the look of our DIY window breakfast bar? Or the built-in seating in our gravel patio and wood bench project? If so, a curved breakfast nook kitchen island build is the next step up in […]