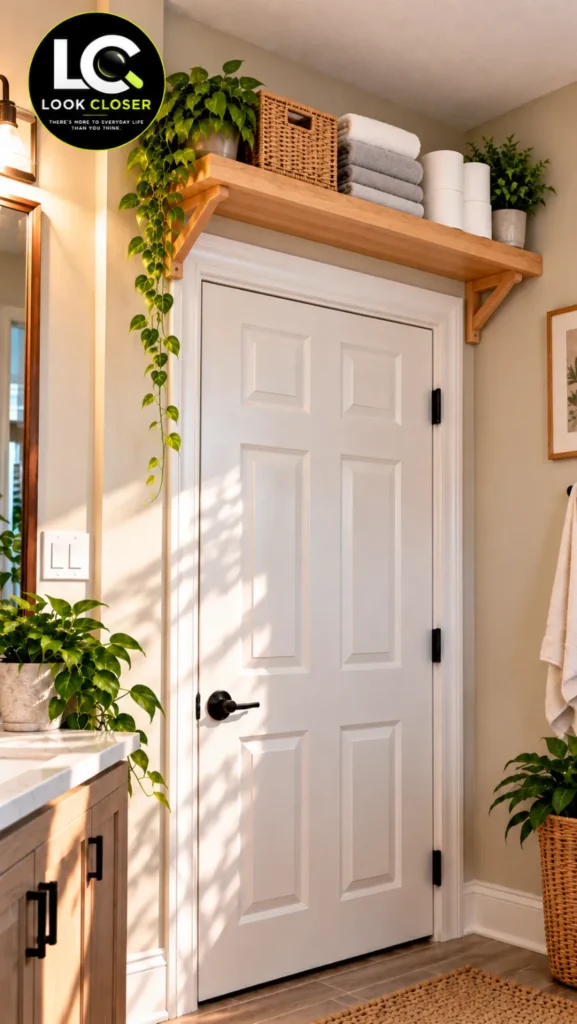
A custom wood shelf transforms unused space above an interior door into practical storage for baskets, towels and lightweight household essentials.
DIY Over-the-Door Storage Shelf: Turn Wasted Wall Space Into Useful Storage
Turn wasted space above an interior door into practical storage with a custom wood shelf. This DIY project covers measurements, structural support, bracket construction, installation, safety and smart organization.
There was nothing obviously wrong with this doorway.
The door worked. The trim looked finished. The room already had cabinets and baskets for storage.
But once we looked upward, there was a surprisingly large strip of empty wall between the top of the door casing and the ceiling.
It wasn’t being used for anything.
Instead of adding another cabinet or taking up valuable floor space, this project turns that overlooked area into a simple over-the-door storage shelf made from wood and supported by triangular brackets.
The finished shelf can hold baskets, folded towels, toilet paper, lightweight household supplies, or decorative items while keeping the floor completely clear.
More importantly, this is the kind of project where the finished result looks simple—but the measurements and attachment method matter much more than they appear to in a short video.
A custom wooden shelf with triangular supports transforms the unused space above an interior door into practical storage for baskets, towels and everyday essentials.
Affiliate disclosure: As an Amazon Associate, DIY SpaceUp earns from qualifying purchases. Some links below are affiliate links, which means we may earn a commission at no extra cost to you.
Table of Contents
Why the Space Above a Door Is Worth Looking At
In a small bathroom, laundry room, hallway, pantry, mudroom, or utility space, storage usually expands outward.
We add another cabinet.
Another basket.
Another piece of furniture.
But sometimes the easiest storage opportunity is already built into the room.
It’s vertical.
The wall above an interior door often remains unused because it isn’t convenient for everyday items. That actually makes it useful for things you don’t need every hour.
In the project shown here, a single wood shelf spans the opening and uses the wall areas beside the door for support.
The result is intentionally simple.
Project Detail
Our Approach
Location
Above an interior door
Shelf style
Solid wood shelf
Supports
Triangular wood brackets
Best use
Lightweight or moderate household storage
Ideal items
Towels, baskets, paper goods, linens
Skill level
Intermediate DIY
Main challenge
Safe structural attachment
Floor space used
None
This isn’t about squeezing the maximum possible weight above a doorway.
It’s about creating useful, sensible storage in an overlooked space.
First: Make Sure Your Doorway Is Suitable
Don’t start by cutting wood.
Start by studying the wall.
The reference project has clear wall space above the casing and enough room on both sides for the shelf supports.
Your doorway may be different.
Look for electrical devices, HVAC registers, sprinkler components, alarm sensors, plumbing-related access, trim details, crown molding, or anything else that could interfere.
Also open the door completely.
The new shelf and supports must not interfere with the door, hinges, casing, or normal movement.
Measure the Space Before Designing the Shelf
This is where the project becomes specific to your house, rather than simply copying dimensions from a video.
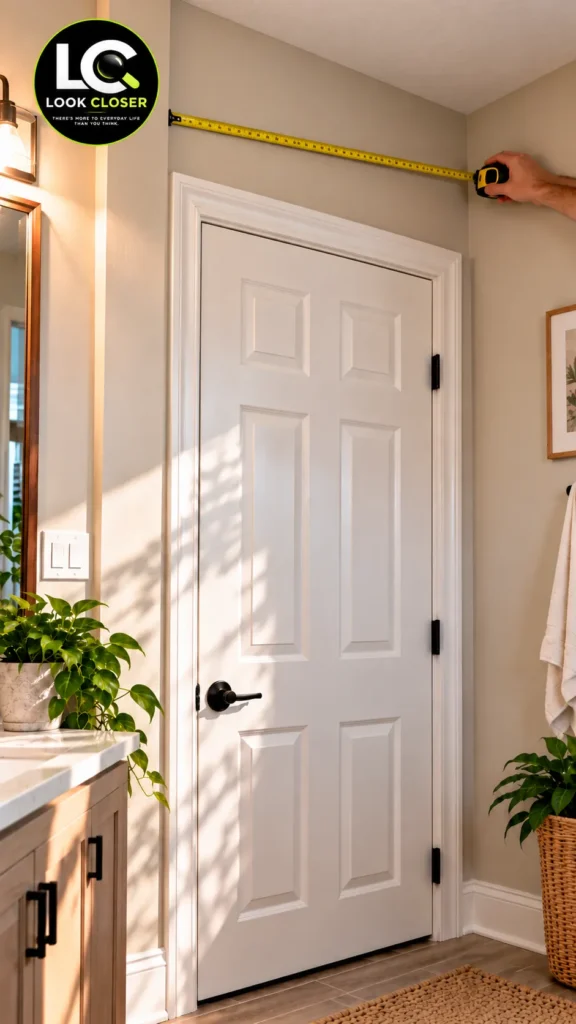
Measure at least these five things:
Measurement
What to Measure
A
Width of the door casing from outside edge to outside edge
B
Available wall width for the complete shelf
C
Distance from top of casing to ceiling
D
Desired shelf depth
E
Space available for each support bracket
Measure the available wall width above the door before deciding the shelf length and support locations.
Measure the width at more than one location. Older walls and trim aren’t always perfectly square.
How wide should the shelf be?
The shelf in our visual project extends beyond the door casing on both sides.
That’s intentional.
The supports are positioned on the wall beside the doorway rather than attached to the decorative casing itself.
Your final width should therefore be determined by:
available wall width + structural attachment locations + desired appearance.
Don’t simply measure the door slab and build a shelf to that number.
How deep should it be?
For this type of project, a shelf around 8–12 inches deep is a useful starting range for many baskets, towels and household supplies.
But don’t treat that as a required dimension.
First measure the actual objects you plan to store.
A 10-inch-deep basket on an 8-inch shelf isn’t a good storage plan.
Likewise, an unnecessarily deep shelf above a narrow doorway adds leverage to the supports without necessarily creating useful storage.
Locate the Wall Structure
This step matters more than the stain color, wood species, or decorative styling.
Before deciding where the brackets will go, use a Franklin Sensors ProSensor stud finderto scan the wall above and beside the doorway and mark the confirmed framing locations. This makes it much easier to establish suitable mounting points before positioning the shelf.
The Home Depot’s current shelving guidance recommends locating studs before installing shelf brackets on drywall and aligning brackets with those structural locations. Where studs aren’t available, the correct anchor must be selected for the wall construction and intended load. The Home Depot
Don’t assume that because there is a door underneath, every point immediately around it provides an appropriate fastening location.
And don’t treat the decorative door casing as structural support.
A Note About Door Headers
There is typically structural framing around a framed doorway, but construction varies considerably by house, wall type, door type and remodeling history.
That means this article should not tell you to drill at a specific distance above every door and promise you’ll hit structural lumber.
Verify what is actually behind your wall.
A stud finder is useful, but when there is uncertainty about wiring, plumbing, unusual framing, or the load you intend to support, investigate further or consult a qualified professional.
Materials for the Project
The shelf shown in our project uses a straightforward wood construction rather than complicated concealed hardware.
Material
Purpose
Solid wood or suitable quality board
Main shelf
Wood stock
Triangular support brackets
Structural fasteners
Attach supports to suitable framing
Wood screws
Assemble/support shelf where appropriate
Wood glue
Reinforce wood-to-wood joints
Sandpaper
Smooth edges and surfaces
Wood finish
Protect and finish the shelf
Optional baskets
Organize stored items
For a natural look similar to our finished project, oak, maple, or another furniture-grade hardwood can work beautifully.
A quality plywood shelf with finished edges can also be practical.
Useful Tools for This Project
Affiliate links should solve a problem in the exact part of the article where readers encounter it—not turn the project into a shopping catalog.
Cordless Drill/Driver
A reliable drill/driver will be used repeatedly throughout this project. A DEWALT cordless drill/driver kitis useful for drilling pilot holes, assembling the triangular wood brackets and driving the fasteners during final installation.
48-Inch Level
Because the shelf runs directly above the horizontal door casing, even a small leveling error can be surprisingly noticeable. Use a 48-inch carpenter’s level when marking the installation line and again after positioning the supports to make sure everything remains level before final fastening.
Quality Wood Glue
When assembling the wood-to-wood joints of the triangular supports, a quality adhesive such as Titebond wood glue can be applied before fastening the pieces together. Follow the adhesive manufacturer’s instructions for application, clamping and curing time.
Structural Wood Screws
Once the wall structure and bracket thickness have been confirmed, choose structural wood screws that are appropriate for the framing, bracket design and intended load. Don’t select a fastener based on length alone—the screw, bracket and supporting wall structure need to work together as a complete system.
Build the Shelf Before Installing It
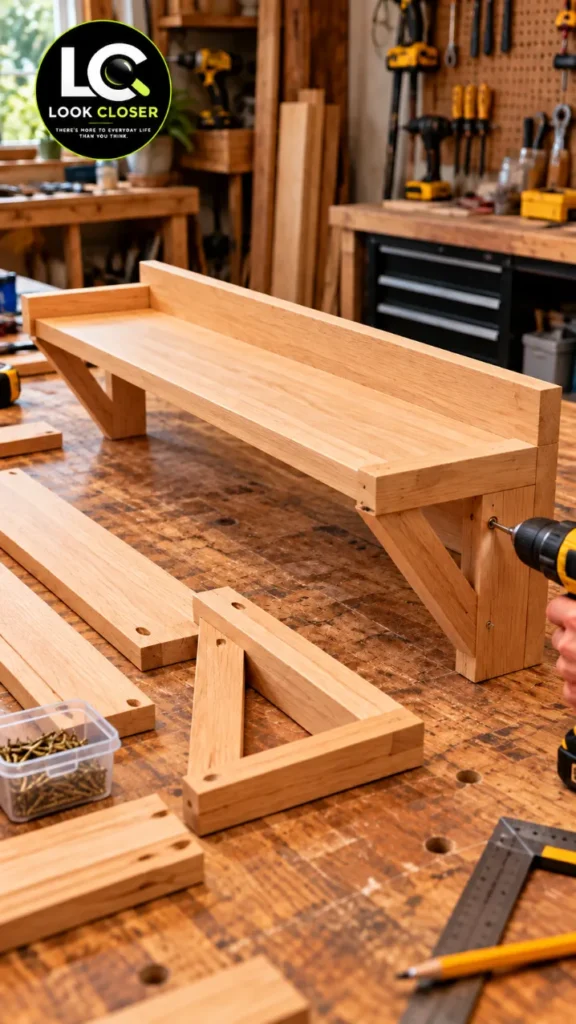
Our construction image shows the shelf being assembled in a workshop rather than piece-by-piece above the door.
That’s the better approach.
Working on a bench gives you much better control over squareness, pilot holes, sanding and bracket construction.
Assemble the shelf and triangular wood supports on a workbench before moving to the final installation above the door.
The shelf itself is a long rectangular board with a raised rear edge in the reference build. The supports are triangular wooden braces.
Do not invent complicated concealed brackets or metal mechanisms if you’re trying to reproduce this specific project.
The visible triangular supports are part of the design.
Step 1: Cut the Main Shelf
Cut the shelf to the dimensions determined from your doorway and confirmed support locations.
Check the cut for square.
Then dry-position the board—or have another person safely hold it in position—before continuing.
You’re checking proportion at this stage.
Does it extend too far?
Is it too deep?
Will stored objects have enough clearance from the ceiling?
Does it look centered relative to the doorway?
It’s easier to change the board now than after finishing it.
Step 2: Build the Triangular Supports
The reference project uses wooden triangular braces beneath the shelf.
A simple support consists of a vertical member against the wall, a horizontal member supporting the shelf, and a diagonal brace connecting them.
The diagonal is important because it transfers load back toward the wall instead of leaving the shelf acting like an unsupported lever.
Commercial shelving guidance follows the same basic principle: for heavier loads, brackets with diagonal reinforcement provide greater support, and bracket spacing should be based on shelf length and load. The Home Depot
For this custom wood version, don’t claim a specific weight rating unless the complete bracket, joinery, fasteners and wall attachment have actually been engineered or tested for that load.
Step 3: Dry Assemble Everything
Before applying finish, assemble the shelf and brackets on the workbench.
Check:
shelf width;
bracket position;
bracket squareness;
diagonal fit;
screw clearance;
wall-fastener locations;
front and rear alignment.
This is also the moment to confirm that your wall-fastening screws won’t collide with the screws used to assemble the brackets themselves.
Step 4: Drill Pilot Holes
Pilot holes reduce the risk of splitting wood and make screw placement more predictable.
The correct pilot-hole size depends on the screw and wood species you’re using.
Don’t drill blindly through the finished assembly while it’s already over your head.
Plan those holes at the bench.
Shelving installation guidance also recommends marking bracket locations and drilling pilot holes before final fastening. The Home Depot
Step 5: Sand and Finish the Wood
Once everything fits, disassemble components as necessary and sand them.
A typical sequence might progress from a coarser grit for milling marks to finer grits for the final surface, but follow the recommendations for your wood and chosen finish.
Break sharp edges slightly.
Then apply your selected stain, clear finish, hardwax oil, or other appropriate wood treatment.
Allow it to cure according to the manufacturer’s instructions before loading the shelf.
The warm natural wood finish in our project works particularly well against the light neutral wall and white door.
Step 6: Transfer the Bracket Locations to the Wall
Return to the doorway with your confirmed stud/framing marks.
Use a level to establish one horizontal reference line.
Don’t use the top of the door casing as your only leveling reference. Trim can be slightly out of level.
The Home Depot’s installation guidance similarly recommends establishing bracket positions with a level before drilling. The Home Depot
Mark every mounting hole clearly.
Then stop and check everything again.
This is the last easy opportunity to correct the position.
Step 7: Install the Supports
Attach the triangular brackets to the confirmed appropriate wall structure using fasteners suitable for the bracket design and wall construction.
Do not overtighten fasteners to the point of crushing material or stripping threads.
Manufacturer guidance for shelving hardware commonly emphasizes following the specified fastening method and avoiding overtightening. The Home Depot
After installing the first support, check it for plumb.
After installing the second, place a level across both.
They need to support the shelf on the same plane.
Step 8: Install and Secure the Shelf
Place the finished shelf onto the supports.
Don’t simply rest it there.
The shelf should be positively secured to its supports using the attachment method appropriate for your bracket design.
General shelf-installation guidance recommends securing wood shelves to the bracket arms rather than leaving them loose, which helps prevent sliding or tipping. The Home Depot
Check level again after fastening.
Then open and close the door several times.
Nothing should move, rub, vibrate, or interfere.
How Many Brackets Do You Need?
This depends on shelf length, material, depth, load and bracket capacity.
For conventional light-to-medium bracket shelving, Home Depot recommends bracket spacing of no more than approximately 24 inches, with larger/more closely spaced supports for heavier loads. The Home Depot
That is useful context—not a universal engineering rule for our custom wooden bracket.
For a long over-door shelf, don’t automatically assume that two decorative end supports can carry whatever you put on it.
Longer spans can sag.
If your span or intended load requires additional support, redesign the system rather than loading it beyond what you’ve verified.
What Can You Safely Store Above a Door?
This is one place where restraint makes the project better.
Good candidates include:
Better Choices
Items to Reconsider
Folded towels
Heavy stacks of books
Lightweight baskets
Large glass objects
Extra toilet paper
Heavy appliances
Light linens
Dense tool boxes
Seasonal textiles
Unsecured breakables
Lightweight décor
Anything dangerous if it falls
Our finished image shows baskets, towels, paper goods and plants.
That’s intentional.
An overhead shelf is not where I’d try to prove how much weight a DIY bracket can hold.
Prevent Items From Falling
Because the shelf sits above a doorway, think beyond simple vertical load capacity.
Doors create movement.
People walk underneath.
Items can be bumped while being retrieved.
The reference shelf includes a raised rear edge, but that does not make every stored object safe automatically.
Use baskets for loose items. Avoid precarious stacks. Keep heavier items low and stable.
If your application requires a front retaining lip or another restraint, incorporate one into the design rather than relying on friction.
Can You Use Drywall Anchors Instead?
For ordinary shelving, appropriate anchors can sometimes be used when studs aren’t available; manufacturer and retailer installation guides describe anchors as an alternative in certain installations. The Home Depot
But this project is over a doorway where people pass underneath.
I would prioritize verified structural attachment rather than design the project around the minimum possible drywall connection.
If your wall doesn’t provide suitable attachment locations for the intended design, modify the design or get professional guidance.
How High Should the Shelf Sit Above the Door?
There isn’t one universal measurement.
Instead, balance four constraints:
enough room above the casing for the supports;
enough vertical storage space above the shelf;
enough clearance for the objects you plan to store;
suitable structural fastening locations.
Don’t push the shelf against the ceiling just to maximize storage.
You still need practical access and enough room to place and remove baskets safely.
What About Electrical Wiring?
Never assume an apparently empty wall is actually empty.
Electrical cables, switches and other services may be present around doorways.
Our reference scene even has switches near the doorway, which is a good reminder that you should understand the wall before drilling long fasteners into it.
If you’re uncertain about concealed utilities, don’t guess.
Estimated DIY Cost
Exact prices change by wood species, shelf length, finish and tools you already own, so a realistic budget is better than promising a fixed “$30 shelf.”
Component
Typical Cost Impact
Shelf board
Medium
Wood for brackets
Low–Medium
Structural fasteners
Low
Wood glue
Low
Sandpaper
Low
Finish/stain
Low–Medium
Baskets
Optional
Stud finder
Tool purchase if needed
Drill/level
Usually reusable tools
A hardwood version like the visual reference will generally cost more than construction lumber, but the finished shelf also becomes a visible piece of the room.
Common Mistakes to Avoid
Mistake
Better Approach
Copying dimensions from a Reel
Measure your actual doorway
Screwing into door trim
Locate suitable structural attachment
Assuming framing location
Verify it
Installing before checking level
Mark a level reference first
Making shelf unnecessarily deep
Size it for actual storage
Ignoring shelf sag
Match span/supports to load
Loading it with heavy objects immediately
Begin light and verify stability
Leaving shelf loose on brackets
Secure shelf to supports
Stacking breakables overhead
Use safer lightweight storage
Ignoring wiring/plumbing
Investigate before drilling
Maintenance and Safety Check
This isn’t a project to install and forget forever.
Periodically check:
wall fasteners;
bracket joints;
shelf-to-bracket screws;
wood cracks or movement;
sagging;
loose baskets;
signs that the shelf is being overloaded.
If anything moves, stop loading the shelf until the cause is corrected.
Frequently Asked Questions
Can I build this over any interior door?
Not automatically. You need adequate physical clearance, suitable wall construction and a safe way to support the shelf.
Should I attach it to the door casing?
The project should be supported by suitable wall structure, not rely on decorative casing as its primary structural attachment.
Can I make the shelf deeper?
Possibly, but increasing depth increases leverage on the brackets and wall connections. The supports and fastening system need to be designed accordingly.
Can I use metal shelf brackets instead?
Yes, a properly rated bracket system can be an alternative. If using commercial brackets, follow the manufacturer’s required fasteners, spacing and load rating. For example, commercially sold shelf brackets have widely varying ratings—from around 25 lb to 95 lb per bracket in examples currently listed by Home Depot—showing why appearance alone doesn’t tell you capacity. The Home Depot
How much weight will this exact wooden shelf hold?
There is no responsible universal number for this custom build.
Capacity depends on wood species and dimensions, bracket geometry, joinery, fasteners, wall construction, attachment locations, shelf span and how the load is distributed.
That’s why the project should be built for the actual intended storage rather than given an invented load rating.
Is this a beginner project?
A confident beginner can handle the woodworking portion, but safely identifying the wall structure and installing an overhead load requires more care than building a freestanding shelf.
Final Checklist Before Loading the Shelf
Check
Done
Door opens fully
☐
Wall structure investigated
☐
Concealed utilities considered
☐
Shelf dimensions verified
☐
Brackets assembled securely
☐
Appropriate fasteners selected
☐
Supports attached to suitable structure
☐
Shelf is level
☐
Shelf secured to brackets
☐
No visible movement or sag
☐
Storage items are appropriate for overhead use
☐
Loose items contained in baskets
☐
The Storage Was Already There
The best part of this project isn’t really the shelf.
It’s the change in how you look at the room.
Before, the space above the door was simply empty wall.
Afterward, the footprint of the room hasn’t changed by a single inch. The door still works exactly as before. No new cabinet occupies the floor.
But towels, baskets and household essentials suddenly have somewhere to go.
That’s why overlooked-space projects can be so satisfying.
Sometimes creating more storage doesn’t require making the room bigger.
We use cookies and similar technologies to help our website function properly, understand how visitors use the site, and improve your experience. You can accept or manage your preferences at any time. Some features may not work as intended if certain cookies are disabled.
Functional
Always active
The technical storage or access is strictly necessary for the legitimate purpose of enabling the use of a specific service explicitly requested by the subscriber or user, or for the sole purpose of carrying out the transmission of a communication over an electronic communications network.
Preferences
The technical storage or access is necessary for the legitimate purpose of storing preferences that are not requested by the subscriber or user.
Statistics
The technical storage or access that is used exclusively for statistical purposes.The technical storage or access that is used exclusively for anonymous statistical purposes. Without a subpoena, voluntary compliance on the part of your Internet Service Provider, or additional records from a third party, information stored or retrieved for this purpose alone cannot usually be used to identify you.
Marketing
The technical storage or access is required to create user profiles to send advertising, or to track the user on a website or across several websites for similar marketing purposes.