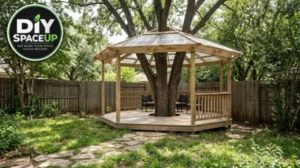
A custom wooden pavilion wraps around a mature backyard tree to create a sheltered outdoor retreat.
How to Build a DIY Tree Pavilion Around a Mature Tree
Build a unique backyard retreat around an existing mature tree with this DIY wooden pavilion project, featuring a raised deck, open framing, translucent roof, and stepping-stone path.
There is something special about building an outdoor space around a tree instead of trying to remove it or work around it from a distance. In this backyard, a large mature multi-trunk tree became the natural centerpiece of a custom wooden pavilion, creating a sheltered outdoor room without losing the character of the existing landscape.
The finished project combines a low-profile polygonal wood platform, vertical posts, a pitched translucent roof, and a simple stepping-stone path leading into the pavilion. The result is a backyard retreat that feels integrated into the landscape rather than simply placed on top of it.
The important part is not just how the finished pavilion looks. The construction sequence matters too—especially when an existing mature tree, ground preparation, a platform, structural framing, and roofing all have to work together.
Affiliate disclosure: As an Amazon Associate, DIY SpaceUp earns from qualifying purchases. Some links below are affiliate links, which means we may earn a commission at no extra cost to you.
Table of Contents
What We’re Building
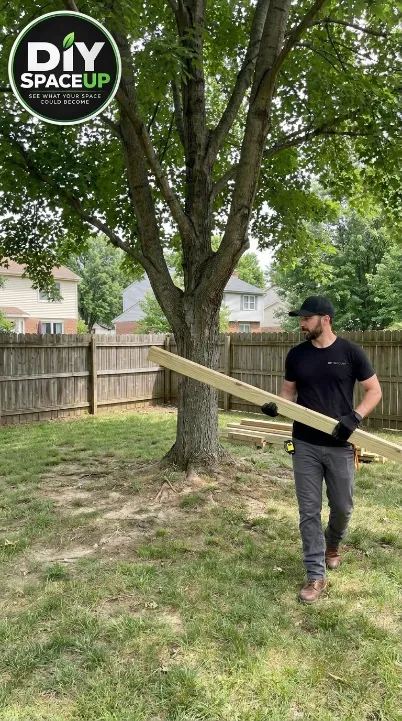
The project is a custom backyard pavilion built around an existing mature multi-trunk tree.
The backyard before construction begins, with the mature tree remaining at the center of the planned pavilion.
Component
Purpose
Prepared ground area
Creates the construction footprint around the tree
Low-profile wood platform
Provides the finished floor and defines the pavilion footprint
Central tree opening
Allows the mature tree to remain the centerpiece
Vertical wood posts
Support the pavilion roof structure
Pitched roof framing
Creates the pavilion’s overhead structure
Translucent corrugated roof panels
Provide weather protection while allowing daylight through
Stepping-stone path
Creates access from the lawn to the pavilion
Outdoor chairs and small table
Turn the finished structure into a usable seating area
The supplied references do not establish every hidden structural detail, such as exact footing dimensions, buried anchors, lumber species, fastener schedules, or connection ratings. Those details need to be determined from the actual site, local requirements, and the structural system selected for the build.
Plan the Pavilion Around the Tree
The tree should be treated as an existing site feature, not as something that can simply be incorporated after the pavilion is designed.
Start by measuring the actual tree, the available yard, the fence clearances, and the intended pavilion footprint. Record the position of the major trunks and consider how the tree may continue to grow.
The finished project uses a polygonal footprint rather than a conventional rectangular gazebo. That geometry allows the structure to wrap around the tree while maintaining an open central area.
The future stepping-stone path should also be planned at this stage. Establish where the path will approach the pavilion and how its finished elevation will meet the entrance. The final stone installation does not need to happen before the heavier pavilion construction, but its route should be established before the build begins.
Do not copy dimensions from a photograph. Use the proportions shown in the reference project as a visual guide, then measure your actual tree and yard before purchasing materials.
A practical planning checklist
Measure the available construction area.
Locate the mature tree and its major trunks.
Identify the approximate pavilion footprint.
Check clearances from fences and other property features.
Plan the entrance and stepping-stone path.
Decide where construction materials can be staged.
Check for underground utilities before digging or driving stakes.
Verify local requirements for a freestanding outdoor structure.
Determine the actual support and footing system appropriate for your site.
Choose Materials for Outdoor Exposure
The finished pavilion is predominantly natural wood with translucent corrugated roof panels.
For the structural portions, use exterior-rated lumber appropriate for your climate and the structural requirements of the project. The exact species and dimensions should be selected according to the spans, connections, exposure, and local requirements rather than copied from an image.
For the finished deck surface, choose boards suitable for outdoor exposure and capable of maintaining a consistent appearance around the tree opening.
The roof in the reference project uses translucent corrugated panels. Select roofing panels and compatible fasteners according to the manufacturer’s installation instructions, including the required overlap, support spacing, washers, and weather sealing.
Materials
Exterior-rated structural lumber
Exterior-rated decking boards
Compatible structural fasteners
Exterior screws appropriate for the selected wood
Wood stakes and layout string
Landscape fabric where appropriate for the prepared ground
Translucent corrugated roofing panels
Manufacturer-approved roofing fasteners and accessories
Exterior wood finish or sealer if desired
Stepping stones for the access path
Appropriate base and leveling material for the path
For a one-time build, don’t automatically buy every specialized tool. A compact plate compactor, for example, may be more economical to rent if the project requires one only briefly.
Tools You’ll Need
The exact tool list depends on the support system and materials you select, but the reference project calls for the kind of tools normally used for layout, framing, decking, and outdoor construction.
For long framing members and the roof structure, use a stable work surface and proper cutting support rather than balancing lumber during cuts.
Prepare the Work Area
The professional approach is to prepare the entire work zone before beginning the main pavilion structure.
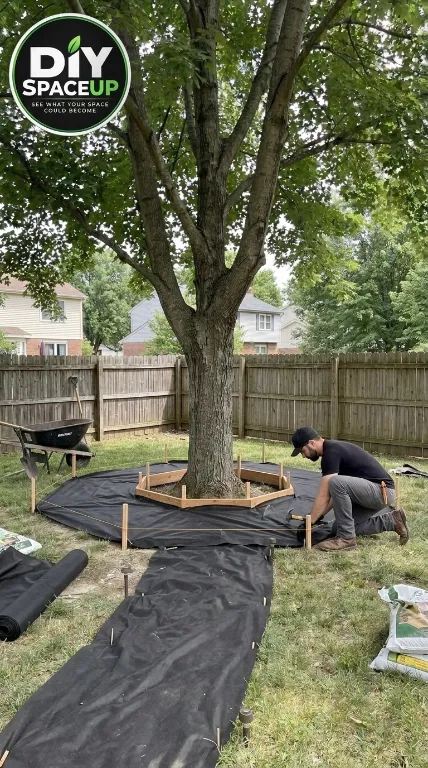
The pavilion footprint and future access path are prepared with landscape fabric before the wooden structure is built.
Start by marking the pavilion footprint and the route of the access path. Remove only the vegetation and soil that actually interfere with the planned construction.
The future path should be prepared at this stage, but the final stepping stones do not need to be installed yet. Establishing the route now prevents the pavilion entrance from becoming disconnected from the rest of the yard.
Around the tree, take care not to excavate aggressively into major roots. A mature tree’s root zone can extend well beyond the visible trunk, and the safe approach depends on the species, soil, existing roots, and local conditions.
The reference sequence shows landscape fabric being used during site preparation. If you use landscape fabric, install it according to the purpose of the area and keep the tree’s immediate root zone appropriately protected.
Protect the prepared path area from unnecessary traffic as the project progresses.
Establish the Pavilion Support System
Before building the visible wood platform, establish the support system required for your actual site.
This is one of the areas where photographs cannot tell the whole story. The references show the finished low-profile platform, but they do not prove the exact footing depth, pier system, buried anchors, soil bearing capacity, or connection details underneath it.
Do not assume that the same support system will work on every property.
Verify:
Soil conditions
Frost depth where applicable
Drainage
Required elevation
Local building requirements
Structural spans
Support spacing
Hardware and connection requirements
The platform should ultimately provide a stable, level base while maintaining the planned opening around the tree.
Build the Wood Platform Around the Tree
Once the support system is ready, begin assembling the platform framing.
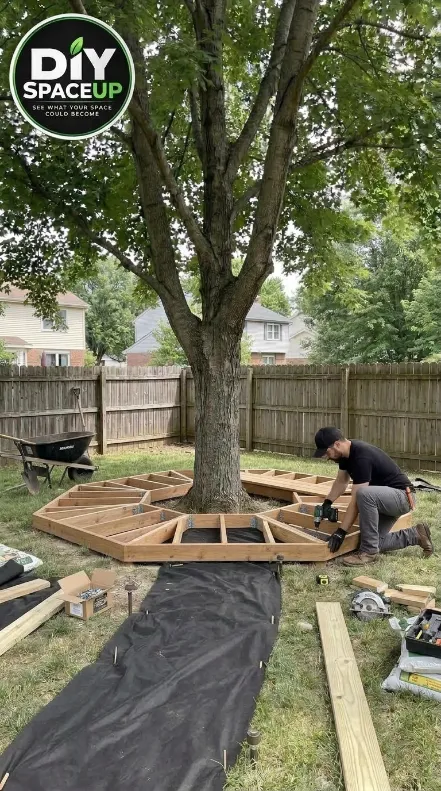
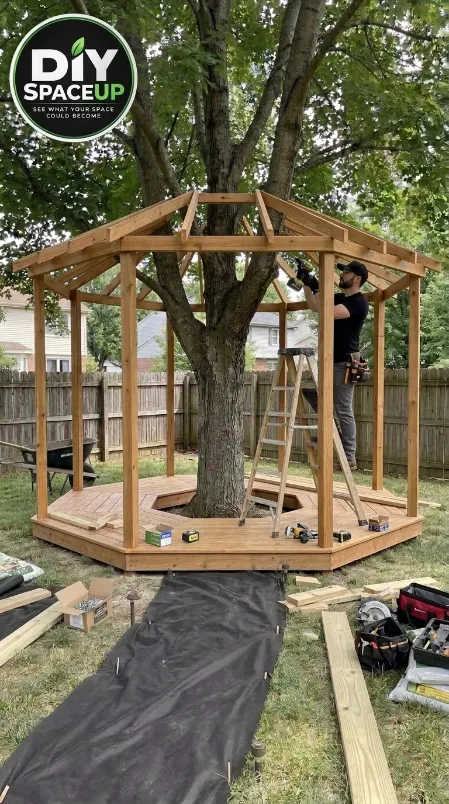
The wooden platform begins to take shape around the mature tree while the prepared access path remains unfinished.
The key is to establish the polygonal geometry first and maintain a consistent opening around the tree.
Dry-fit the framing where possible before permanently fastening it. Check the overall shape, corner positions, levels, and relationship to the tree.
The tree should remain independent from the structure unless a professionally designed system specifically calls for a connection. Do not use the trunk as a structural support simply because it is conveniently located.
As the frame takes shape, repeatedly check:
Overall level
Diagonal measurements
Platform geometry
Tree clearance
Alignment with the planned entrance
Stability of each supported section
Once the frame is verified, install the exterior decking boards.
Install the Deck Boards and Tree Opening
With the platform framing established, install the decking in the same general directional pattern shown in the finished project.
The boards should create a clean polygonal floor while maintaining the opening around the mature tree.
Do not force decking against the trunk. The tree will continue to move and grow, and the appropriate clearance depends on the actual tree and construction details.
Make careful cuts around the opening rather than trying to make the deck boards follow irregular bark contours too tightly.
After installation, check the entire walking surface for:
Raised edges
Sharp corners
Protruding fasteners
Uneven transitions
Splintering
Areas where water could collect
Sand or ease exposed edges where appropriate for a comfortable outdoor walking surface.
Install the Vertical Pavilion Posts
Once the platform provides a stable base, install the vertical wood posts that define the pavilion.
The finished reference shows multiple posts arranged around the polygonal perimeter, creating the framework for the pitched roof.
The vertical wood posts and pitched roof framing take shape above the platform surrounding the mature tree.
Set each post according to the planned geometry and verify it is plumb before permanently completing the connection.
Do not assume that the deck boards themselves provide sufficient structural attachment. The actual post-to-platform connection must be appropriate for the framing system and loads involved.
At this stage, the project should look like an open timber pavilion rather than a finished gazebo. Resist the temptation to add furniture or decorative elements while the structural framing is still being assembled.
Build the Roof Framing
With the posts secured, build the pitched roof framing.
The roof geometry shown in the finished project is an important part of its appearance, so establish the ridge, slopes, and perimeter framing carefully before installing the roofing panels.
Because the tree occupies the center of the pavilion, the roof framing must also maintain the visual relationship between the tree and the structure.
The roof should not be designed by simply guessing angles from the photograph. Determine the actual geometry from your pavilion dimensions and the roofing manufacturer’s requirements.
Before covering the roof, inspect:
Post alignment
Roof framing alignment
Connections
Roof slope
Panel support locations
Clearance from branches
Potential water drainage paths
For work at height, use a properly positioned ladder or appropriate access equipment rather than standing on unfinished framing.
Install the Translucent Roof Panels
Once the roof framing is complete and verified, install the translucent corrugated roofing panels.
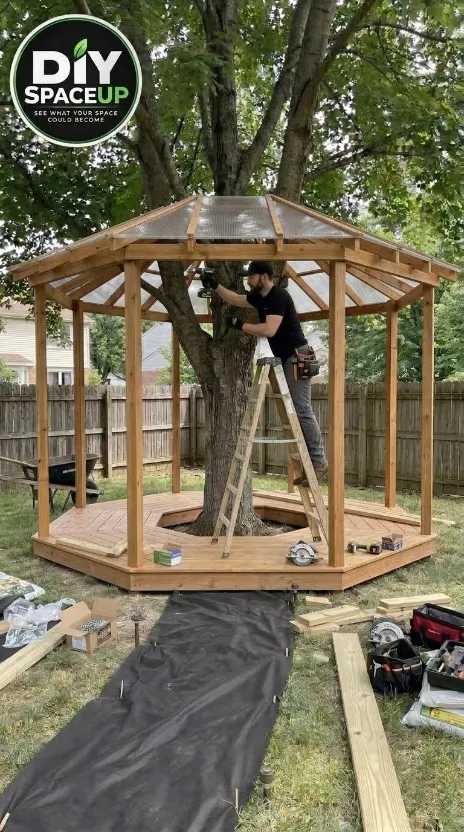
Translucent corrugated roof panels are installed over the wooden pavilion framing around the mature tree.
Follow the roofing manufacturer’s instructions for:
Panel orientation
Overlap
Fastener placement
Support spacing
Washers and sealing
Edge treatment
Expansion considerations
The translucent panels are one of the defining visual elements of the finished pavilion because they provide overhead protection while preserving daylight beneath the tree canopy.
Do not substitute a different roofing material simply because it is easier to source if the goal is to reproduce the reference project.
Complete the Stepping-Stone Path
Now return to the access path.
Because the route was planned and prepared before the pavilion construction, the final path can be completed after the heavier structural work is finished.
This sequence has a practical advantage: lumber, ladders, tools, and other construction activity are less likely to disturb freshly installed stepping stones.
Prepare the final walking surface according to the selected stone system and local ground conditions. Set each stone so it provides a stable, comfortable walking transition from the lawn to the pavilion.
Check the finished path for:
Stable stones
Consistent walking transitions
Trip hazards
Unwanted rocking
Water accumulation
Loose surrounding soil
The finished stepping stones should visually connect the pavilion to the surrounding yard without competing with the tree or structure.
Finish the Wood
Once the major construction is complete, inspect the wood carefully.
Ease sharp exposed edges and address splinters or rough areas before applying any finish.
If you choose to stain or seal the wood, use an exterior-rated product appropriate for the wood species and exposure. Follow the manufacturer’s preparation, application, drying, and recoat instructions.
The natural wood appearance is an important part of the supplied finished reference, so avoid adding unnecessary decorative treatments that change the character of the project.
Add the Outdoor Furniture
The final reference shows a simple seating arrangement inside the pavilion: two outdoor chairs and a small table.
Keep the furniture placement practical and avoid blocking the central tree opening or the main entrance.
This is also where you can personalize the finished space without changing the structure itself.
For a similar look, consider natural-toned outdoor lounge chairs and a compact side table rather than oversized furniture that overwhelms the pavilion.
Structural Considerations You Should Not Skip
A tree-centered pavilion is not simply a decorative garden project. The structure has to deal with its own weight, wind, snow where applicable, roof loads, connections, and the conditions of the site.
The photographs do not establish a universal load capacity for this pavilion.
Structural performance depends on:
Factor
Why it matters
Lumber size and grade
Determines framing strength
Span
Affects bending and deflection
Connections
Transfer forces between members
Footings/supports
Transfer loads to the ground
Roof material
Adds dead load and wind exposure
Local climate
Snow and wind can change requirements
Soil
Affects support and settlement
Tree growth
Changes the clearance relationship over time
For a permanent structure, especially in areas with significant snow, wind, frost, or challenging soil conditions, have the structural system reviewed by an appropriately qualified professional and verify local permit requirements.
Never attach the pavilion to the living tree unless the system has been specifically designed for that purpose.
Safety Checklist
Before and during construction:
Wear eye protection when cutting or fastening.
Use hearing protection around loud power tools.
Wear appropriate work gloves.
Use stable ladder positioning.
Never work beneath an unsecured roof panel or framing member.
Keep cutting tools away from the tree and exposed roots.
Check for underground utilities before excavation or staking.
Keep children and pets away from the construction zone.
Use exterior-rated fasteners appropriate to the materials.
Inspect the completed structure before allowing regular use.
Verify local requirements before construction.
Pay particular attention to the tree. Avoid unnecessary root damage, trunk damage, or soil compaction around the root zone.
Estimated Project Cost
The actual cost can vary dramatically depending on pavilion size, lumber species, roofing choice, support system, local material prices, and whether tools are already owned.
A reasonable planning framework is:
Category
Planning range
Structural lumber
$600–$1,500+
Decking
$400–$1,200+
Roofing
$250–$800+
Fasteners and hardware
$150–$400+
Ground/path materials
$200–$700+
Exterior finish
$75–$250+
Miscellaneous supplies
$100–$300+
Planning total: roughly $1,775–$5,150+, excluding major tool purchases, professional engineering, permits, labor, premium furniture, or unusually difficult site conditions.
Treat these figures as a planning range rather than a quote. Local pricing and the actual structural design will determine the final budget.
Common Mistakes and Better Approaches
Common mistake
Better approach
Designing the pavilion without measuring the tree
Measure the actual tree and site first
Treating the tree as a structural support
Keep the tree independent unless a designed system says otherwise
Guessing dimensions from the photograph
Measure the real installation area
Installing the finished path too early
Prepare the route early and complete the stones after heavy construction
Ignoring drainage
Consider finished elevations and water movement before construction
Assuming hidden framing from a photo
Verify the actual support system on site
Building the roof before checking post alignment
Confirm the entire frame is plumb and square first
Working directly around major roots
Minimize excavation and protect the root zone
Adding furniture before construction is complete
Keep the work area clear until the structure is finished
Choosing roofing without checking its installation requirements
Follow the specific manufacturer’s instructions
Maintaining the Tree Pavilion
The tree will continue to grow while the pavilion remains in place, so the central opening deserves regular inspection.
At least periodically, check the clearance between the tree and the surrounding structure. Look for branches, bark, roots, or trunk growth beginning to interfere with the platform or roof.
Also inspect:
Deck boards
Structural connections
Posts
Roof panels
Roofing fasteners
Water drainage
Stepping stones
Wood finish
Areas where soil contacts wood
After severe wind, heavy snow, or other unusual weather, inspect the structure before using it normally.
The goal is not simply to maintain the pavilion. It is to maintain a healthy relationship between the growing tree and the permanent structure surrounding it.
The Finished Backyard Retreat
The finished pavilion transforms an ordinary section of lawn into a defined outdoor room while keeping the mature tree at the center of the design.
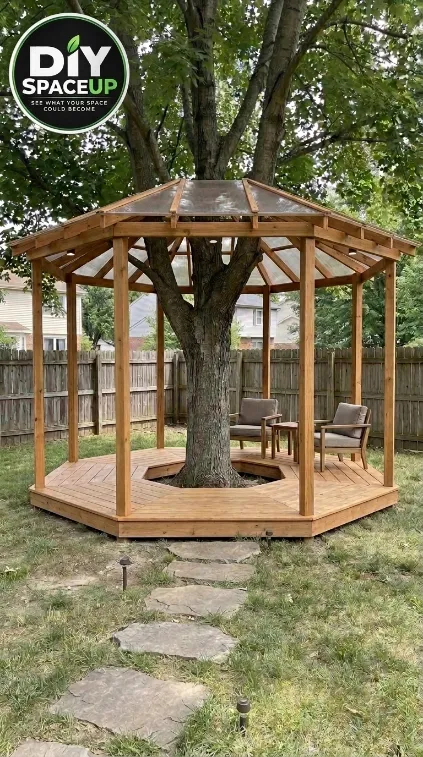
The completed tree pavilion creates a sheltered backyard retreat with a finished stepping-stone path leading to the structure.
The polygonal wood platform creates the foundation, the vertical posts establish the pavilion’s shape, and the pitched translucent roof provides shelter without hiding the tree canopy.
The stepping-stone path completes the connection between the lawn and the pavilion, while the simple chairs and table make the space immediately usable.
The most important lesson from this project is that the tree is not an obstacle to the design. It is the reason the design becomes distinctive.
With careful planning, appropriate structural support, attention to the root zone, and a construction sequence based on real prerequisites, a mature backyard tree can become the centerpiece of a completely new outdoor space.
We use cookies and similar technologies to help our website function properly, understand how visitors use the site, and improve your experience. You can accept or manage your preferences at any time. Some features may not work as intended if certain cookies are disabled.
Functional
Always active
The technical storage or access is strictly necessary for the legitimate purpose of enabling the use of a specific service explicitly requested by the subscriber or user, or for the sole purpose of carrying out the transmission of a communication over an electronic communications network.
Preferences
The technical storage or access is necessary for the legitimate purpose of storing preferences that are not requested by the subscriber or user.
Statistics
The technical storage or access that is used exclusively for statistical purposes.The technical storage or access that is used exclusively for anonymous statistical purposes. Without a subpoena, voluntary compliance on the part of your Internet Service Provider, or additional records from a third party, information stored or retrieved for this purpose alone cannot usually be used to identify you.
Marketing
The technical storage or access is required to create user profiles to send advertising, or to track the user on a website or across several websites for similar marketing purposes.