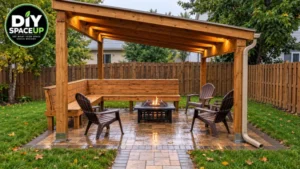
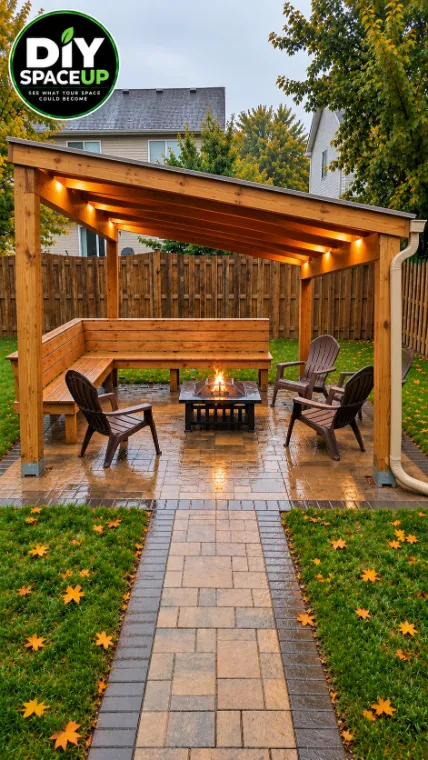
A freestanding shed-style patio roof adds rain protection to an existing paver seating area while keeping the original bench, fire pit and walkway.
DIY Covered Patio Roof: How to Add Rain Protection to an Existing Backyard Seating Area
A four-post shed-style roof transforms an exposed backyard patio into a more weather-protected outdoor seating area without rebuilding the existing pavers, bench or walkway.
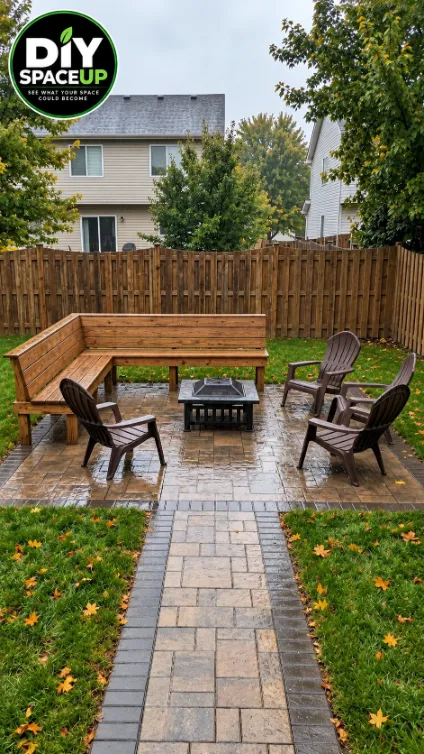
The paver patio was finished. The walkway led naturally into it. The built-in L-shaped wood bench made good use of the back corner, and the fire pit created a comfortable place to sit with friends.
Then fall rain arrived.
The problem wasn’t the patio itself. It was that everything became wet at once.
Instead of tearing out a perfectly usable space and starting over, this project takes a much more practical approach: keep the existing patio, bench and seating area, then add a four-post wood roof structure around the existing space. Whether a real version should be freestanding or structurally attached to the house depends on the property, approved design, structural loads and local requirements.
The result is essentially the same backyard retreat—just much more useful when the weather changes.
Affiliate disclosure: As an Amazon Associate, DIY SpaceUp earns from qualifying purchases. Some links below are affiliate links, which means we may earn a commission at no extra cost to you.
Table of Contents
What This Project Actually Adds
The visualization shows a four-post rectangular wood roof structure positioned around the existing patio. Whether a real version should be freestanding or attached to the house must be determined from the actual property, structural design and local requirements.
Nothing underneath needs to be redesigned.
Existing Feature
What Happens to It
Paver patio
Remains
Central walkway
Remains unobstructed
L-shaped wood bench
Remains
Fire pit
Existing location shown; must be evaluated before covered use*
Patio chairs
Remain
Grass around patio
Mostly unchanged
New posts
Installed outside/at corners of seating zone
New roof
Covers existing patio
Gutter + downspout
Added to low roof edge
*The presence of the fire pit deserves a separate safety check, which we’ll cover below.
The original paver patio already had a built-in bench, fire pit and seating—the main problem was exposure to fall rain.
Before Building: Measure the Existing Patio, Not Just the Roof
The easiest mistake would be designing the roof first and trying to make it fit afterward.
Start with what already exists.
Measure the patio’s full width and depth, then locate the bench, walkway and fire pit relative to the edges.
Next, establish where four posts could physically stand without narrowing the walkway or interfering with the seating.
Record:
Measurement
Why It Matters
Patio width
Establishes overall roof span
Patio depth
Determines roof projection
Walkway width/location
Must remain accessible
Bench footprint
Prevents post conflicts
Fire-pit position
Needed for clearance evaluation
Proposed post centers
Defines structural footprint
Desired clear headroom
Helps establish beam elevation
High/low roof elevations
Determines roof pitch
Roof overhang
Controls rain coverage
Downspout location
Determines where runoff goes
Do not derive structural lumber sizes from these photos alone.
The required beam, post, rafter, footing and connection sizes depend on the actual span and local design loads.
Step 1: Check Permits, Loads and Underground Conditions
A roof changes this project substantially compared with a decorative pergola.
Once the structure carries a solid roof, it must deal with permanent roof weight plus wind, rain and potentially snow loads.
Before construction, check your local building department for applicable permits, setbacks, property-line requirements and structural criteria.
Also identify underground utilities before digging.
The American Wood Council’s residential deck guidance is a useful reference for understanding wood framing, connections and load paths, but the actual patio-cover design should comply with the requirements adopted where the project is located. American Wood Council
Every part needs somewhere reliable to transfer its load.
The existing pavers are not automatically structural footings.
That distinction is critical.
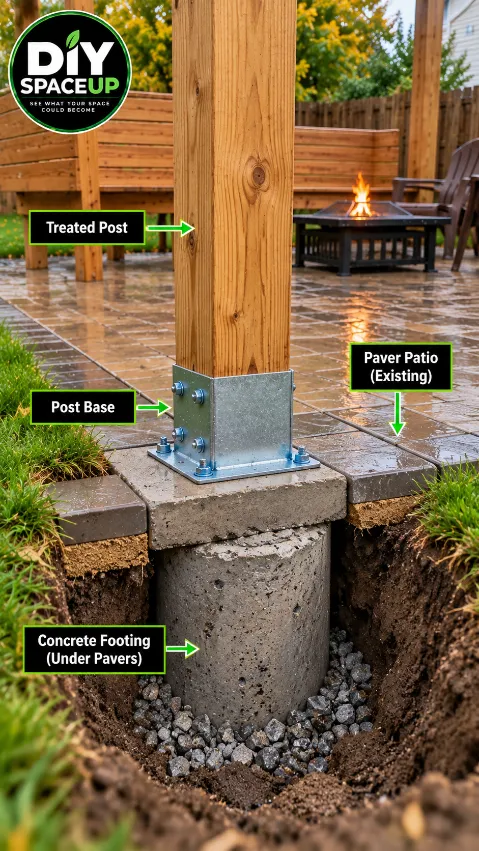
The finished photos show metal bases at the bottom of the posts, but they do not show us the hidden foundations underneath. We therefore should not invent a footing design from the photograph.
Footing diameter, depth and reinforcement depend on loads, soil conditions, frost depth and local requirements.
Outdoor post bases must also be selected for the intended structural application. Simpson Strong-Tie, for example, specifically identifies post-base products for decks and patio covers and offers corrosion-resistant versions for treated wood/outdoor exposure. Simpson Strong-Tie
Step 3: Lay Out the Four Posts
The reference build uses four main posts, one near each corner of the covered zone.
Before digging anything, mark all four centers.
Then check the diagonals.
For a rectangular layout, equal diagonals are a useful indication that the footprint is square.
Also stand back and visually check the relationship with the existing walkway.
The entrance should still feel centered and open after the posts are installed.
Step 4: Build the Foundations and Install the Post Bases
The roof posts need a proper structural load path to the ground; the existing patio pavers should not be assumed to function as structural footings.
This is one area where shortcuts can undermine the entire project.
The posts should transfer roof loads into properly designed foundations rather than simply sitting on loose patio pavers.
Depending on the approved design, that may involve concrete footings/piers and structural post bases.
Keep wood appropriately separated from standing water and soil.
For compatible applications, a Simpson Strong-Tie ZMAX Post Base provides additional corrosion resistance for outdoor or treated-wood applications, but the exact connector must be selected for the post size, foundation and engineered/design requirements. Simpson notes that connector and fastener corrosion resistance needs to suit both the environment and materials involved. Simpson Strong-Tie
Step 5: Set and Brace the Four Posts
Install the posts into their approved bases.
Each post needs to be:
plumb in both directions;
temporarily braced;
correctly positioned relative to the other three;
set to the required elevation.
Do not remove temporary bracing simply because a post appears stable.
The frame only begins behaving as a complete structure after the beams, rafters and required permanent lateral-resistance details are installed.
Step 6: Install the Perimeter Beams
Now the rectangular overhead frame begins to appear.
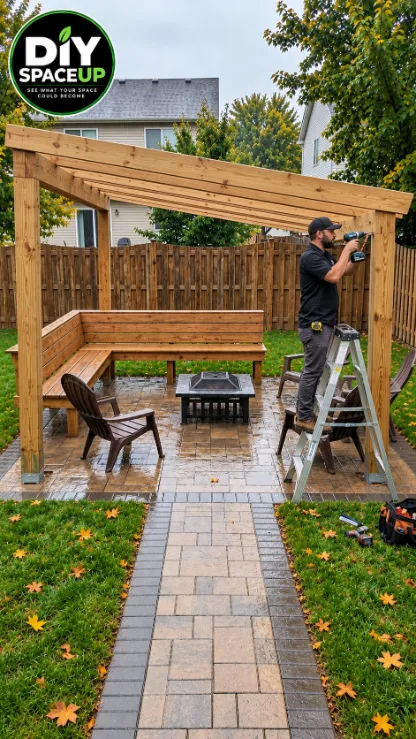
The photos show substantial wood beams running along the perimeter above the posts.
The important principle here is bearing and connection, not simply driving several screws through whatever pieces overlap.
American Wood Council guidance explains that gravity-load-supporting beams require proper bearing at posts and restraint against lateral movement; manufactured connectors or properly designed bearing details may be used depending on the design. American Wood Council
For structural connections specified for compatible applications, products such as GRK RSS Structural Screws can be useful, but never substitute a generic screw for the connector or fastener specified by the structural design.
The four-post timber frame takes shape as the perimeter beams and sloped roof rafters are installed above the existing patio.
Step 7: Establish the Shed-Roof Slope
The roof shown in the final project is a single-slope, or shed-style, roof.
One side is higher and the opposite side becomes the drainage edge.
Before cutting repetitive rafters, calculate the actual pitch:
Pitch = vertical rise ÷ horizontal run
For example, a 24-inch drop across a 96-inch horizontal run equals:
24 ÷ 96 = 0.25 → 3:12 pitch
That’s only an example—not a recommendation for every patio.
Roofing material determines how low the slope may be.
GAF states that asphalt shingles generally require at least a 2:12 slope, with special roof-deck protection requirements from 2:12 up to—but not including—4:12. Roofs below 2:12 require a low-slope roofing system rather than ordinary shingles. GAF
For example, GAF’s LIBERTY membrane is designed for low-slope areas such as porches and is listed for applications from ½:12 to 3:12, subject to its installation requirements. GAF
Choose the roofing system from the measured pitch—not from appearance alone.
Step 8: Install the Rafters
The MIDDLE photo shows repeated rafters spanning across the structure to create the roof slope.
Install the first correctly positioned rafter, confirm the geometry, then use the approved layout for the remaining rafters.
Rafter size and spacing depend on:
span;
lumber species and grade;
roof dead load;
snow load;
wind requirements;
roofing system;
local code/design.
This is another measurement that should not be guessed from an AI visualization.
Step 9: Sheath and Weatherproof the Roof
Once the structural frame is complete and inspected as required, install the roof deck/sheathing specified for the roofing system.
Then install the appropriate underlayment or membrane and final roof covering according to manufacturer instructions.
Do not rely on roofing alone at the edges.
If the approved design attaches the patio roof to the house, the structural attachment and wall or roof flashing must be designed and installed for that specific building. Do not assume that vinyl siding, exterior cladding or trim can support the roof or provide a watertight structural connection.
For a low-slope patio cover, a purpose-designed membrane may be more appropriate than trying to force shingles onto an unsuitable pitch. GAF
Step 10: Install the Gutter and Downspout
This feature is clearly visible in the AFTER image and is an important part of the project—not decoration.
The gutter runs along the low edge of the shed roof.
The downspout then carries collected water down the right-side post.
But the job doesn’t end there.
The discharge needs to send water somewhere appropriate rather than dumping it onto the patio, against a footing or into the walking path.
During the first significant rain, observe the system.
Look for:
overflowing gutter;
water running behind the gutter;
leaks at roof edges;
pooling around post foundations;
downspout discharge returning toward the patio.
Correct drainage problems early.
Step 11: Preserve the Existing Patio Layout
One reason this project works visually is that it doesn’t try to redesign everything.
The L-shaped bench remains where it was.
The visualization keeps the fire pit centered, but its final real-world location must depend on the appliance’s required clearances, ventilation needs and covered-use requirements.
The existing chairs remain around the seating area.
And the walkway still leads directly into the seating area.
The roof simply creates a protected envelope around an already functional space.
That is often a better renovation strategy than replacing good work simply because one problem remains.
The completed shed-style roof protects the existing paver patio while preserving the original bench, seating area and central walkway.
Important: The Fire Pit Needs Special Attention
This is the biggest safety issue visible in the concept.
The BEFORE patio contains a fire pit, and the AFTER visualization places a solid roof above that same seating area.
Do not assume an existing outdoor fire pit can safely continue operating beneath a new roof.
Its suitability depends on the exact appliance, fuel, required overhead/side clearances, ventilation, combustible materials and manufacturer instructions. A wood-burning fire pit that was acceptable in an open patio may not be acceptable beneath a roof.
Before using it after construction, identify the exact fire-pit model and follow its installation/clearance requirements. If those requirements cannot be met, relocate it outside the covered area or use an appropriate alternative.
The roof should never be treated as permission to ignore the fire appliance’s instructions.
GRK RSS Structural Screws — useful only where their specifications match the required structural connection; they are not a universal replacement for bolts, connector screws or engineered hardware.
Simpson Strong-Tie ZMAX Post Bases — useful where the selected model matches the structural design, post size, foundation and environment.
Affiliate disclosure: As an Amazon Associate, DIY SpaceUp earns from qualifying purchases. Some links below are affiliate links, which means we may earn a commission at no extra cost to you.
How Much Could a Covered Patio Like This Cost?
A fixed price would be misleading because the roof structure is highly dependent on size and local requirements.
A more useful budget is:
Cost Area
Relative Impact
Structural lumber
High
Concrete/foundations
Medium
Structural connectors/fasteners
Medium
Roof sheathing
Medium
Roofing system
Medium–High
Gutter/downspout
Low–Medium
Permit/engineering if required
Variable
Tools
Low if already owned; high if buying new
Professional labor
Potentially high
The biggest savings in this particular project come from keeping the existing paver patio, walkway, bench and seating area rather than rebuilding them.
Common Mistakes to Avoid
Mistake
Better Approach
Treating pavers as structural foundations
Design proper foundations for roof loads
Choosing lumber size by appearance
Size members for actual spans and loads
Installing posts before checking diagonals
Square the complete layout first
Using ordinary screws for structural joints
Use specified structural connectors/fasteners
Choosing roofing before measuring slope
Match roofing system to actual pitch
Ignoring wind uplift
Design the complete load path
Letting the downspout dump beside a post
Route runoff to a suitable discharge point
Removing temporary bracing too early
Keep framing stable throughout construction
Assuming the existing fire pit is safe under a roof
Verify manufacturer clearances before use
Rebuilding the entire patio unnecessarily
Preserve functional existing features
Final Safety and Quality Check
Before considering the project complete, verify that all four posts are securely supported, beams and rafters have their required bearing and connections, specified structural fasteners are installed, the roof covering matches the actual slope, the gutter drains correctly, the walkway remains unobstructed, and no post foundation is collecting standing water.
Also inspect outdoor metal connectors periodically. Simpson notes that environmental exposure, treated lumber and other conditions can contribute to connector and fastener corrosion, so hardware needs to be selected for the environment and maintained accordingly. Simpson Strong-Tie
And most importantly, do not operate the existing fire pit under the completed roof until its required clearances and covered-use conditions have been verified.
Same Patio, Better Weather Protection
The best part of this transformation isn’t that the backyard looks completely different.
It doesn’t.
The same walkway still leads to the same paver patio. The same L-shaped bench defines the corner. The same seating arrangement creates the gathering space.
The difference is overhead.
Four properly supported posts, a structural frame, sloped roof and controlled rain drainage can turn an exposed seating area into a backyard space that is far more useful during wet fall weather.
Sometimes the smartest backyard upgrade isn’t starting over.
We use cookies and similar technologies to help our website function properly, understand how visitors use the site, and improve your experience. You can accept or manage your preferences at any time. Some features may not work as intended if certain cookies are disabled.
Functional
Always active
The technical storage or access is strictly necessary for the legitimate purpose of enabling the use of a specific service explicitly requested by the subscriber or user, or for the sole purpose of carrying out the transmission of a communication over an electronic communications network.
Preferences
The technical storage or access is necessary for the legitimate purpose of storing preferences that are not requested by the subscriber or user.
Statistics
The technical storage or access that is used exclusively for statistical purposes.The technical storage or access that is used exclusively for anonymous statistical purposes. Without a subpoena, voluntary compliance on the part of your Internet Service Provider, or additional records from a third party, information stored or retrieved for this purpose alone cannot usually be used to identify you.
Marketing
The technical storage or access is required to create user profiles to send advertising, or to track the user on a website or across several websites for similar marketing purposes.