DIY Narrow Vertical Book Rack: Turn a Tiny Wall Gap Into Floor-Free Storage
See how a narrow unused wall gap can become useful vertical book storage with a custom wood-and-dowel rack designed to organize books without adding another bulky bookcase.
The problem was everything that didn’t fit inside it.
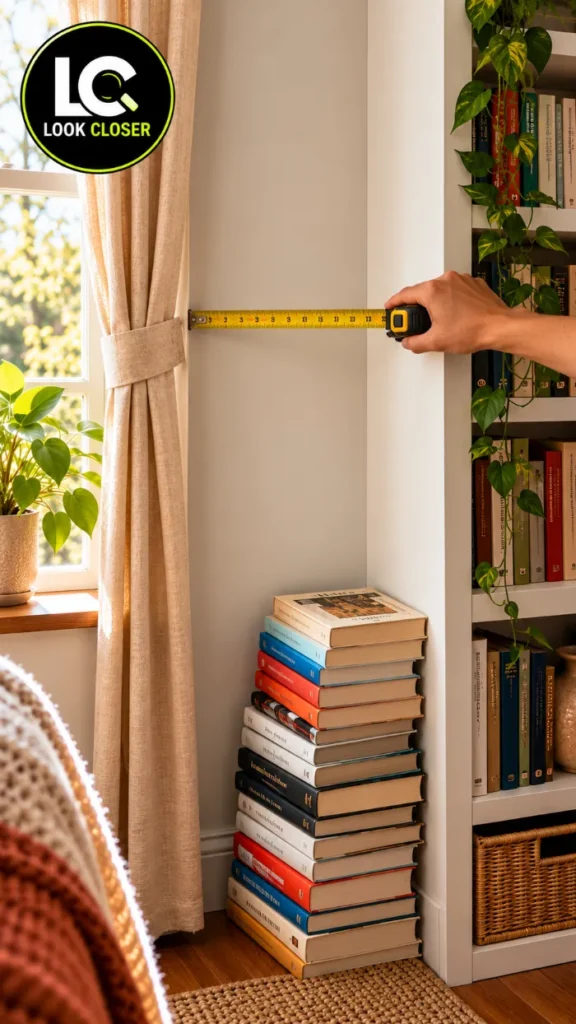
A growing stack of books had ended up on the floor beside the window, while a narrow strip of wall between the curtain and bookcase sat completely unused.
At first glance, that wall looked too small to matter.
But once we measured it, the solution became obvious: instead of adding another bulky bookcase, we could build up.
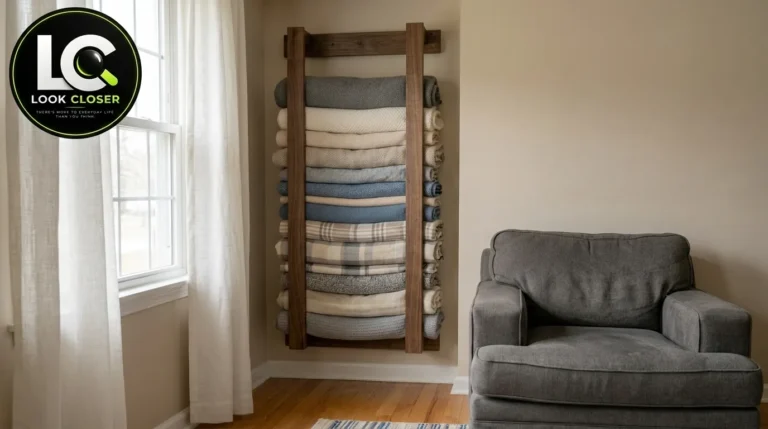
This DIY narrow vertical book rack uses two slim wooden rails with evenly spaced hardwood dowels to create a tall storage system for books while preserving the floor space below.
It’s a relatively simple woodworking project, but because books become surprisingly heavy when stacked together, dimensions, joinery and wall attachment matter much more than they might appear to in the finished photo.
Affiliate disclosure: As an Amazon Associate, DIY SpaceUp earns from qualifying purchases. Some links below are affiliate links, which means we may earn a commission at no extra cost to you.
Table of Contents
What We’re Building
The finished project shown here is intentionally simple.
It consists of:
Component
Function
2 vertical wood rails
Main structure
Hardwood dowels
Individual book supports
3 horizontal cross dowels
Help connect/stabilize the structure
Wall mounting points
Transfer the load to the wall
Natural wood finish
Protects the wood while preserving its appearance
There are no shelves, cabinet sides, doors or floor supports in this design.
The books themselves visually hide much of the structure once the rack is loaded.
No-drill mounting option: The rack shown in this project can also be designed to hang from heavy-duty adhesive wall hooks rather than being screwed directly into the wall. This can be useful in rentals or anywhere drilling is undesirable, but the mounting system must be selected according to the combined weight of the wooden rack and the books. Always follow the hook manufacturer’s surface preparation, installation, curing, orientation, and load-rating instructions.
Step 1: Measure the Actual Wall Gap
This project starts exactly where our BEFORE photo starts: with a tape measure.
Measure the narrow wall gap before building the rack, including the available width, height, curtain clearance and nearby bookcase.
Measure:
Measurement
What to Check
Available width
Curtain to bookcase/wall edge
Available height
Baseboard to desired top
Baseboard projection
Prevents interference
Curtain movement
Fabric must remain usable
Book depth
Books shouldn’t project awkwardly
Book width
Determines useful support spacing
Nearby furniture
Maintain normal access
The reference shows a particularly narrow installation, so measure your own space rather than copying dimensions from the photo.
A STANLEY FATMAX 25-Foot Tape Measure works well for both the wall and lumber layout.
Step 2: Measure the Books Too
This is the step that’s easy to skip.
The rack should be designed around the books that will actually live on it.
Take several examples from your collection—small paperbacks, average hardcovers and your larger books—and measure their width, depth and thickness.
The dowels need enough usable projection to support the books without unnecessarily extending into the room.
Also remember that the combined weight matters far more than the weight of one book.
A tall column can become heavy quickly.
Step 3: Choose Straight, Strong Material
The reference uses warm natural wood with round wooden dowels.
For a similar appearance, straight hardwood stock such as oak or maple is a good choice for the rails, with matching hardwood dowels.
Avoid visibly warped stock.
The two vertical rails need to remain parallel or the repeating dowel pattern will immediately look crooked.
For layout, an IRWIN 12-Inch Combination Square is useful for transferring consistent perpendicular marks across both rails.
Step 4: Determine the Dowel Layout
Before drilling anything, place both rails side by side on the workbench.
Mark all hole positions simultaneously.
That keeps corresponding supports aligned.
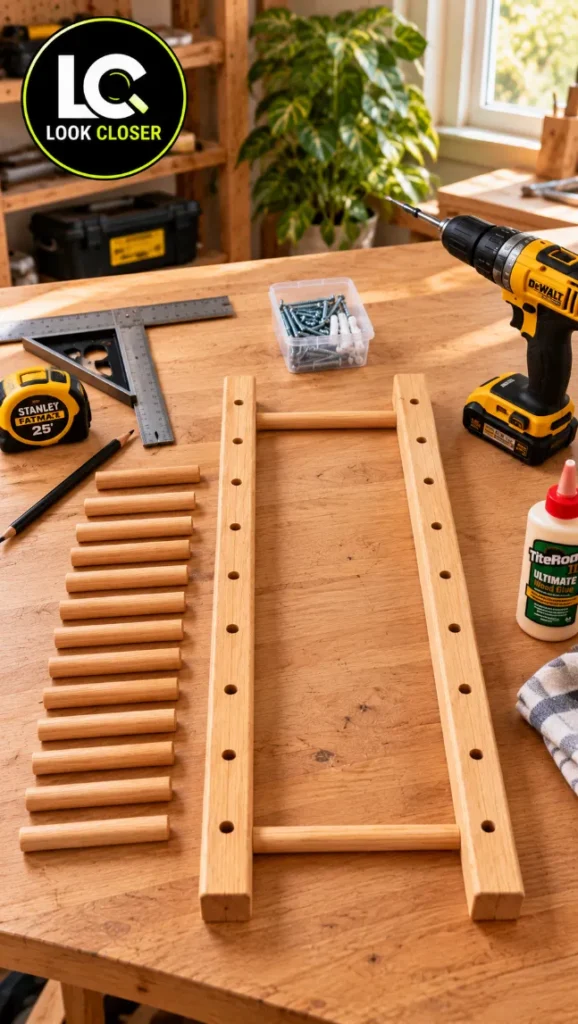
The photos show a repeating series of dowels extending inward from both vertical rails, plus horizontal members joining the two sides at approximately the top, middle/lower area and bottom.
Lay out both vertical rails together and mark the dowel positions consistently before assembly to keep the supports straight and evenly spaced.
This image is particularly useful because followers can understand the construction before assembly.
Don’t guess the spacing.
Test the layout with several actual books before committing to every hole.
Step 5: Drill Straight, Consistent Dowel Holes
Each dowel needs a clean-fitting socket.
The hole diameter must match the actual dowel diameter.
More importantly, the holes need to enter the rails squarely.
Even a small drilling angle becomes obvious once a long dowel is inserted.
For repeatability, use a drilling guide, doweling jig or drill press where available.
A Milescraft DowelJigKit can help guide perpendicular dowel holes when working with a handheld drill.
For general drilling and installation, the DEWALT 20V MAX Drill/Driver Kit is a practical choice.
Dry-fit several dowels before proceeding.
They should enter firmly without splitting the rail.
Step 6: Dry-Fit the Rack Before Glue
This is where the project begins to resemble the finished structure.
Insert the horizontal connecting dowels and several book-support dowels without permanently gluing everything.
Stand the assembly on a flat workbench and verify:
rails remain parallel;
supports point in the intended direction;
horizontal members sit square;
overall width matches the measured wall;
dowels are consistent;
nothing twists under light handling.
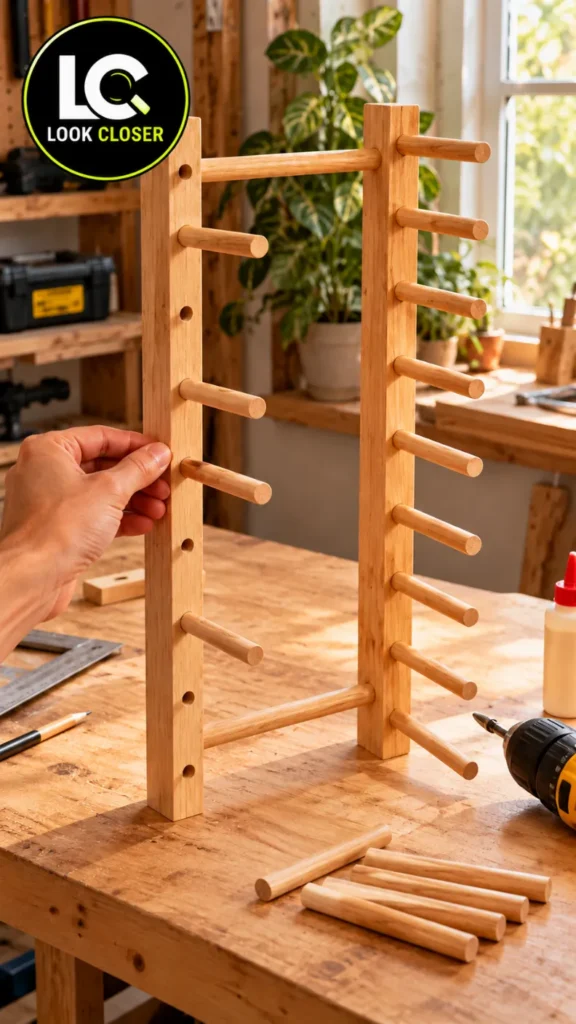
Dry-fit the rails and dowels before gluing to confirm that the supports align correctly and the structure stays square.
Use the supplied workshop photo showing the rack standing upright while one rail is being positioned, with loose dowels and the drill nearby.
This is a valuable checkpoint.
Fix alignment problems before adhesive turns them into permanent problems.
Step 7: Glue and Assemble the Wood Structure
Once the dry fit works, disassemble only as much as necessary.
Apply a suitable woodworking adhesive inside the dowel joints and reassemble systematically.
A product such as Titebond III Ultimate Wood Glue is useful for strong wood-to-wood joints when used according to the manufacturer’s instructions.
Don’t flood the holes with glue.
Excess adhesive can squeeze onto the visible wood.
Keep a damp cloth nearby and clean squeeze-out promptly according to the adhesive instructions.
Use IRWIN QUICK-GRIP Bar Clamps where useful to keep the rails properly positioned while the joints cure.
Then leave the assembly undisturbed for the adhesive’s specified cure time.
Step 8: Sand and Finish Before Installation
The reference keeps the natural wood visible.
Start by smoothing cut ends, rail edges and dowels.
Pay particular attention to the ends of the book-support dowels because users will frequently reach around them.
There should be no splinters or sharp edges.
A clear protective finish can make the rack easier to clean while preserving the natural appearance.
Allow the finish to cure completely before books touch the surface.
Step 9: Choose and Install the Wall Mounting System
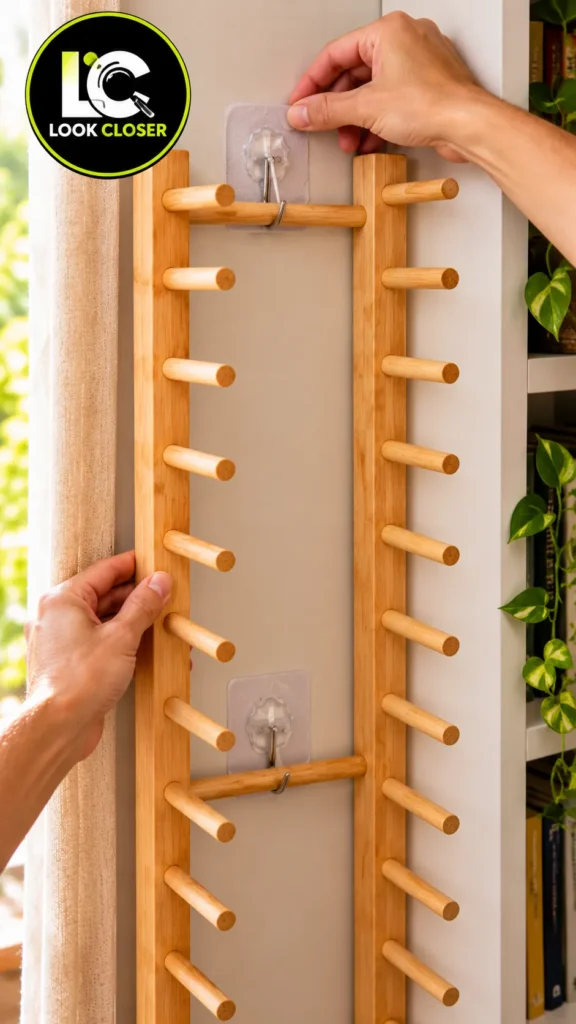
This version of the rack can use a no-drill hanging system. Instead of driving screws through the wooden structure, horizontal cross dowels on the back of the rack rest securely on heavy-duty adhesive wall hooks.
For a removable installation, Command Heavyweight Wall Hooks are a practical product to investigate because they provide a no-drill hanging option. Check the exact model’s published weight rating and approved surfaces before purchasing, since different Command products have different capacities and installation requirements.
The rack’s horizontal crosspieces rest inside wall hooks, creating a no-drill mounting option when the selected hardware and wall surface are suitable for the expected load.
Before choosing this method, weigh the empty rack and estimate the total weight of the books you plan to store. The mounting system must be specifically rated by its manufacturer for the wall surface, installation orientation, and expected load.
For this project, 3M CLAW or Command Heavyweight Wall Hooks can be considered where the manufacturer’s specifications confirm compatibility with your wall surface, load, and installation configuration. Choose the exact product based on its published rating rather than appearance alone.
Use multiple mounting points distributed vertically instead of relying on a single hook at the top. The upper attachment carries a significant portion of the load, while additional attachment points help stabilize the rack and reduce movement away from the wall.
Before installation:
Clean and prepare the wall exactly as required by the hook manufacturer.
Confirm that the wall surface is compatible with adhesive mounting.
Weigh the empty rack.
Estimate or weigh the intended books.
Verify the individual and combined rated capacity of the mounting system.
Check that the hooks properly capture the horizontal wooden crosspieces.
Follow the manufacturer’s required waiting or curing time before applying any load.
Do not assume that adding several adhesive hooks automatically multiplies the safe load capacity. Load distribution may not be perfectly equal between mounting points.
For heavier book collections, questionable wall surfaces, or permanent installations, mechanically fastening the rack into suitable structural support is the safer alternative.
Step 10: Mount and Test the Empty Rack First
Install all wall hooks according to the manufacturer’s instructions and allow any required adhesive setting time to pass before hanging the rack.
Hang the empty rack by placing its horizontal rear crosspieces securely into the corresponding hooks. Make sure each mounting point is fully engaged rather than allowing one hook to carry most of the structure.
Check the rack from the front and side. It should remain vertical, sit close to the wall, and resist gentle movement without lifting out of the hooks.
Do not load books immediately if the adhesive manufacturer specifies a waiting period.
Step 11: Load the Books Gradually
Never fill the entire rack at once.
Start with a few lighter books near the lower portion of the rack. Check every mounting point for movement, adhesive lifting, wall-surface damage, or changes in the rack’s position.
Add books gradually while keeping track of the approximate total weight.
Stop immediately if a hook begins separating from the wall, the rack tilts forward, a crosspiece starts lifting from its hook, or the wall finish shows signs of failure.
For a no-drill installation, staying comfortably below the manufacturer’s stated mounting-system limit provides more margin than designing the rack around the maximum published rating.
The finished vertical rack turns a narrow unused wall gap into practical book storage while keeping the floor underneath clear.
The important detail is that the floor underneath is now free.
How Much Weight Can It Hold?
There is no universal safe load rating for this DIY rack.
The maximum usable load is determined by the weakest part of the complete system, which can include the adhesive hooks, wall surface, horizontal mounting crosspieces, wooden rails, dowel joints, and the rack itself.
Books become surprisingly heavy when stacked together, so do not calculate capacity from the wood alone.
For a no-drill installation, weigh the empty rack first and then add the expected book weight. Compare that combined load with the manufacturer’s specifications for the exact mounting products being used.
Multiple hooks may improve stability and distribute the load, but their individual ratings should not simply be added together unless the manufacturer specifically permits that calculation for the installation configuration.
If the intended collection approaches the mounting system’s limits, reduce the number of books or switch to an appropriate mechanically fastened installation.
Suggested Starting Dimensions
These are planning examples, not dimensions taken from the image.
Part
Practical Starting Range
Overall height
60–72 in
Overall width
10–14 in
Rail thickness
About 1–1½ in
Support dowel diameter
About ¾–1 in
Dowel projection
Based on actual books
Vertical spacing
Based on book thickness/layout
Your available wall and book collection should determine the final measurements.
That distinction is important because this project is valuable precisely because it can be customized to an unusually narrow space.
Safety Checklist
Before loading the rack, verify all of these:
Safety Check
What to Verify
Wall surface
Approved for the selected adhesive mounting product
Mounting hooks
Correct product and rated for the intended application
Total weight
Rack + books remain within the mounting system’s specifications
Hook placement
Multiple mounting points are properly aligned and engaged
Adhesive preparation
Wall cleaned and prepared exactly as instructed
Waiting time
Manufacturer’s required setting time completed before loading
Cross dowels
Fully seated in the hooks and unable to slip out easily
Wood joints
Fully cured and structurally sound
Support dowels
Secure, undamaged and properly seated
Loading
Books added gradually while monitoring the installation
Curtain clearance
Curtain still opens and closes freely
Child safety
Rack is never treated as a ladder or climbing structure
The last point matters: projecting dowels can look climbable to a child. This is a storage rack, not climbing equipment.
Estimated Project Cost
Exact prices vary by wood species, hardware and what you already own.
Expense
Typical Relative Cost
Hardwood rails
Low–Medium
Hardwood dowels
Low–Medium
Wood glue
Low
Clear finish
Low
Mounting hardware
Low–Medium
Tools already owned
$0 additional
Overall project
Budget to moderate
Using premium hardwood increases the price, but this remains a relatively material-efficient project because there are no full shelves or cabinet panels.
If you want to avoid drilling into the wall, Command Heavyweight Wall Hookscan provide a removable mounting option when the exact model, wall surface, installation method, and rated capacity are appropriate for the combined rack-and-book load.
Affiliate Disclosure: As an Amazon Associate I earn from qualifying purchases. Product links in this article may earn a commission at no additional cost to you.
Common Mistakes to Avoid
Common Mistake
Better Approach
Assuming any adhesive hook can hold books
Use only a mounting product whose manufacturer specifications match the surface and expected load
Adding hook ratings together automatically
Treat the complete mounting system conservatively unless the manufacturer provides guidance for multiple-hook installations
Loading the rack immediately
Follow the manufacturer’s required adhesive setting time
Filling the rack all at once
Add books gradually and inspect every mounting point
Mounting on damaged or unsuitable paint
Confirm that the wall surface is compatible before installation
Designing around the maximum rating
Keep a practical safety margin below the mounting system’s stated limit
Why This Small-Space Idea Works
The transformation isn’t really about building more furniture.
It’s about noticing an area that traditional furniture can’t use efficiently.
Before the project, the books occupied floor space while the narrow wall above them did nothing.
Afterward, that same collection moves vertically. The existing bookcase stays exactly where it was, the window and curtain remain part of the room, and the rack occupies only the slim wall strip that was already available.
That’s the idea behind this build:
don’t automatically look for more floor space—look closer at the space you already have.
We use cookies and similar technologies to help our website function properly, understand how visitors use the site, and improve your experience. You can accept or manage your preferences at any time. Some features may not work as intended if certain cookies are disabled.
Functional
Always active
The technical storage or access is strictly necessary for the legitimate purpose of enabling the use of a specific service explicitly requested by the subscriber or user, or for the sole purpose of carrying out the transmission of a communication over an electronic communications network.
Preferences
The technical storage or access is necessary for the legitimate purpose of storing preferences that are not requested by the subscriber or user.
Statistics
The technical storage or access that is used exclusively for statistical purposes.The technical storage or access that is used exclusively for anonymous statistical purposes. Without a subpoena, voluntary compliance on the part of your Internet Service Provider, or additional records from a third party, information stored or retrieved for this purpose alone cannot usually be used to identify you.
Marketing
The technical storage or access is required to create user profiles to send advertising, or to track the user on a website or across several websites for similar marketing purposes.