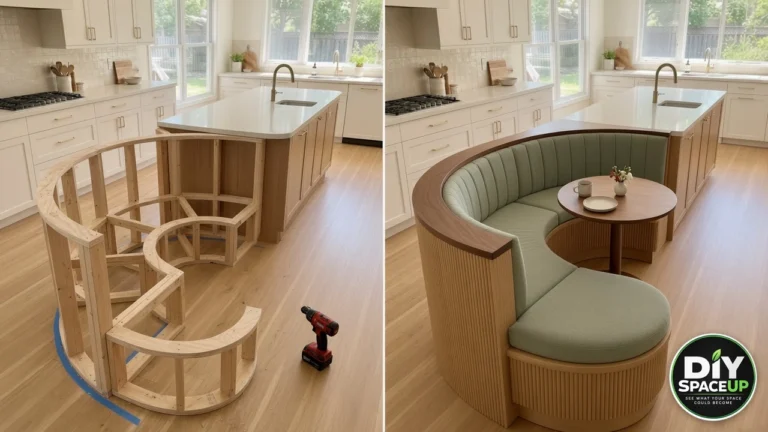
There was nothing obviously wrong with this kitchen.
The refrigerator fit. The walkway was clear. The pantry had storage.
But beside the refrigerator was one of those awkward strips of unused space that most of us stop noticing after a while.
Too narrow for a cabinet. Too visible to ignore. And somehow, while that space sat empty, spice jars, bottles, and everyday kitchen essentials were competing for room somewhere else.
That was the idea behind this project: could that overlooked gap become useful storage without interfering with the refrigerator?
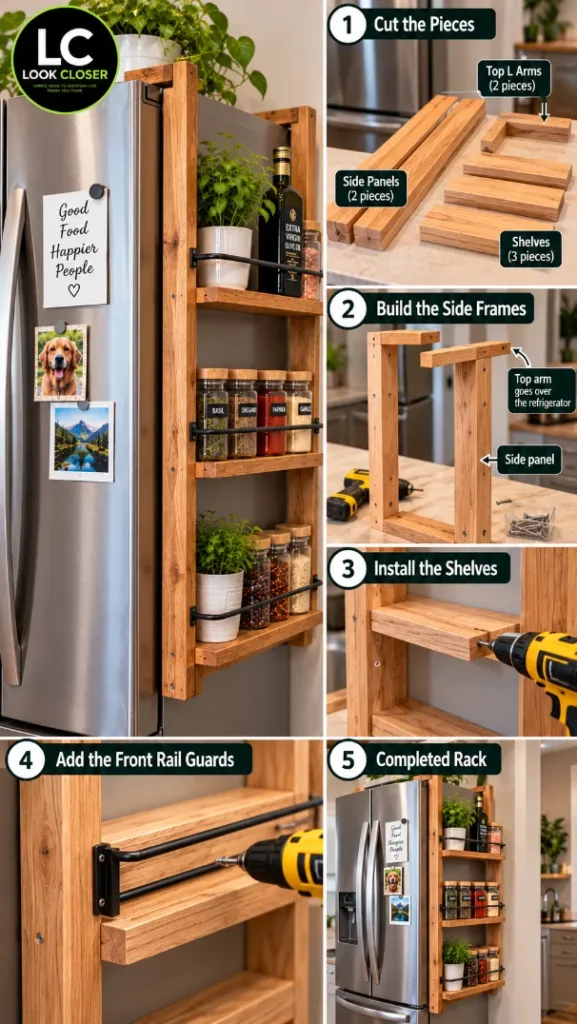
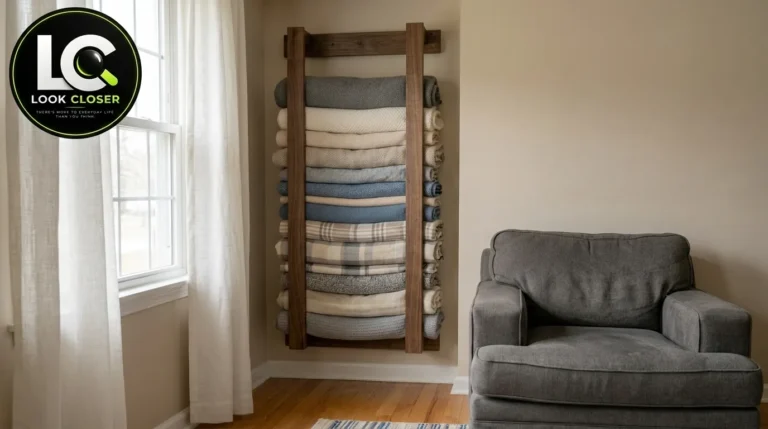
The concept is surprisingly simple: two tall wooden side supports, three shallow shelves, front retaining rails, and two distinctive L-shaped top arms that extend over the top edge of the refrigerator. In the visualization, those upper arms create the appearance of a suspended rack and are an important part of the original design.
But translating that visual concept into a real DIY project requires more than simply copying what appears on screen. The finished rack still needs a safe, structurally independent installation strategy that does not rely on the refrigerator itself as the sole load-bearing support.
The important part, therefore, isn’t just building something that fits.
It is making sure the rack leaves the refrigerator’s required ventilation space intact, doesn’t interfere with the door or service access, is securely supported, and is sized for what you actually plan to store.
This guide walks through that process from the first measurement to the final shelf.
DIY SpaceUp transparency note: This project was developed from an AI-assisted design visualization. The images illustrate the concept and intended result; they are not engineering drawings or proof of a completed physical installation. The guide below translates that concept into practical planning and construction considerations for a real-world DIY version.
Project at a Glance
Project Detail
Practical Starting Point
Project type
Narrow kitchen storage rack
Best location
Unused wall space beside a refrigerator
Skill level
Beginner to intermediate
Estimated build time
About 4–8 hours, excluding finish drying time
Typical shelf count
3
Primary material
1x lumber and/or 3/4-in plywood
Main tools
Tape measure, level, saw, drill/driver, stud finder
Installation
L-shaped top-arm concept shown in the visualization; a real build requires an independently secure installation appropriate to the wall, rack design and refrigerator clearances
Best for
Spices, lightweight bottles, small containers and kitchen essentials
Approximate DIY budget
Roughly $60–$180+, depending on lumber, hardware, finish and tools already owned
Important: Those dimensions, costs and times are planning estimates—not specifications. Your refrigerator, wall construction, materials and local prices may be different.
Before: The Space Most People Walk Past
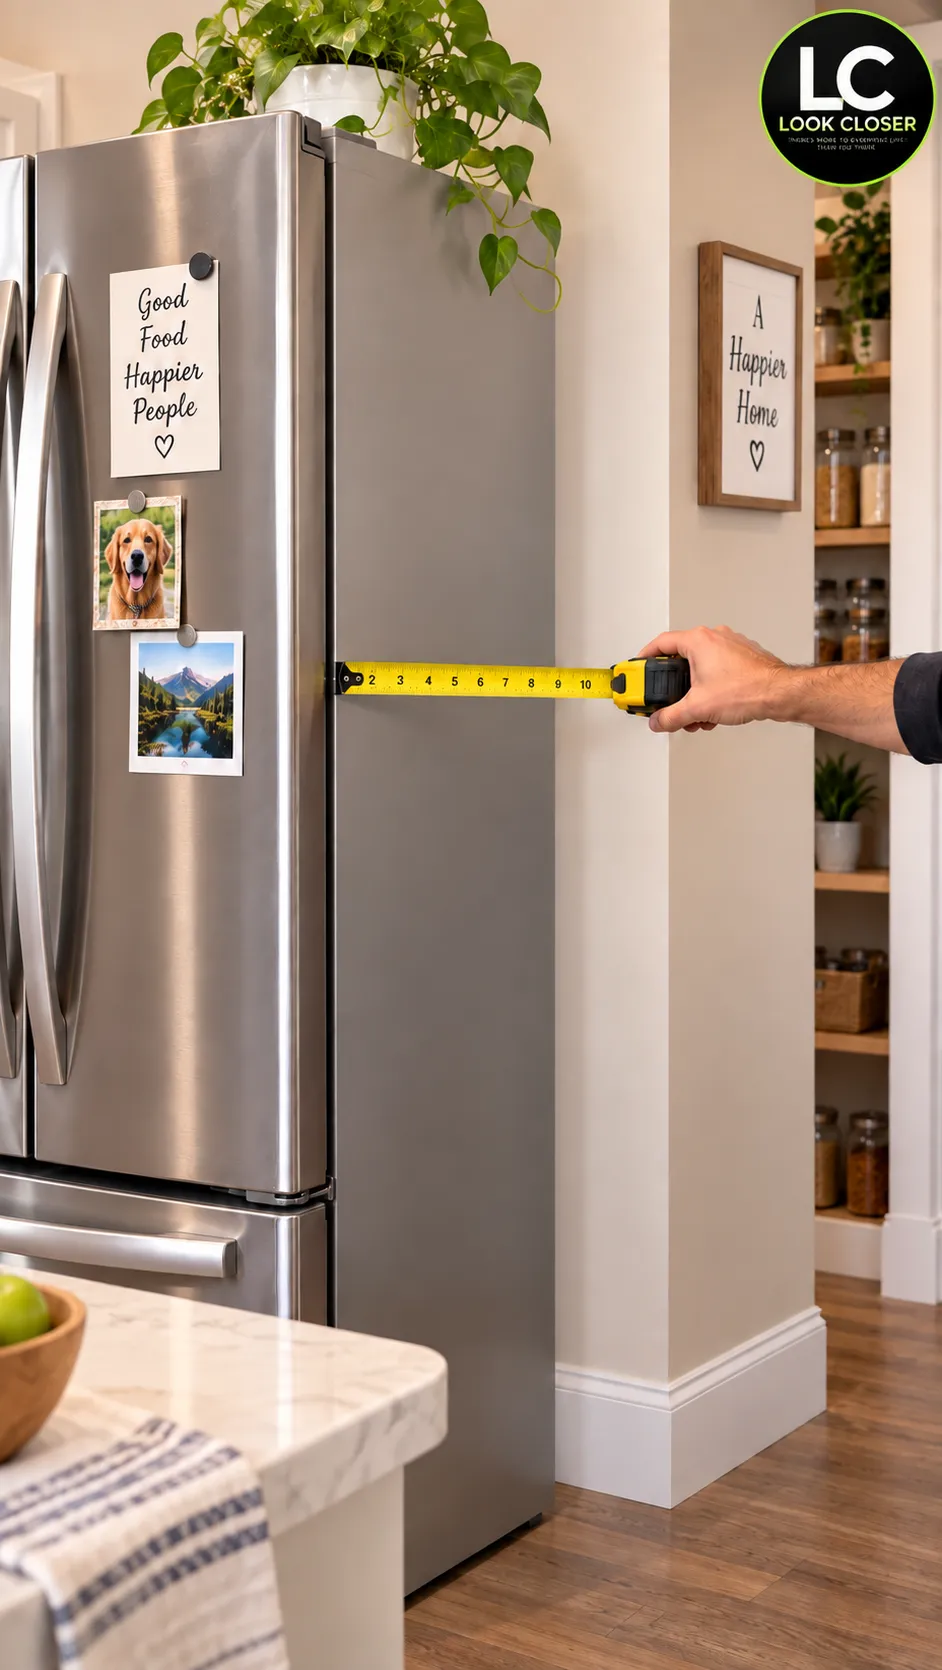
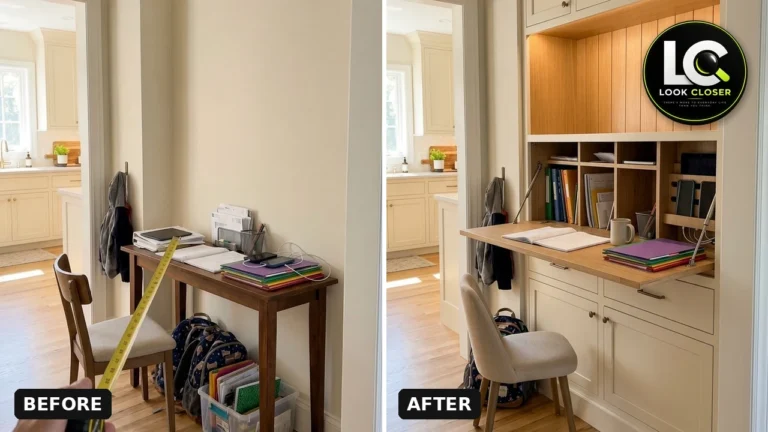
Before building anything, measure the available gap and check the refrigerator manufacturer’s required clearances.
At first glance, the empty strip beside the refrigerator looks perfect for storage.
That’s exactly why this is the point where you should not start cutting wood yet.
The measurement visible at one height is only part of the story.
A usable gap has to satisfy several conditions simultaneously:
the rack physically fits;
the refrigerator retains its required ventilation;
the refrigerator door can open properly;
handles and hinges don’t collide with the rack;
water lines, electrical connections and service access remain usable;
baseboards don’t unexpectedly reduce the available width;
and the wall can safely support the finished rack and its contents.
The refrigerator gets priority
Do not design the rack first and then squeeze the refrigerator around it.
Find the model number of your refrigerator and check its installation manual first.
Manufacturer requirements vary. As one example, Whirlpool documentation for some models calls for 1/2 inch at the sides and top and 2 inches behind the refrigerator, while another Whirlpool guidance page specifies 1/4 inch at the sides/top and additional clearance beside a fixed wall for door swing. That’s precisely why copying a clearance from another kitchen—or even from this article—is a bad idea.
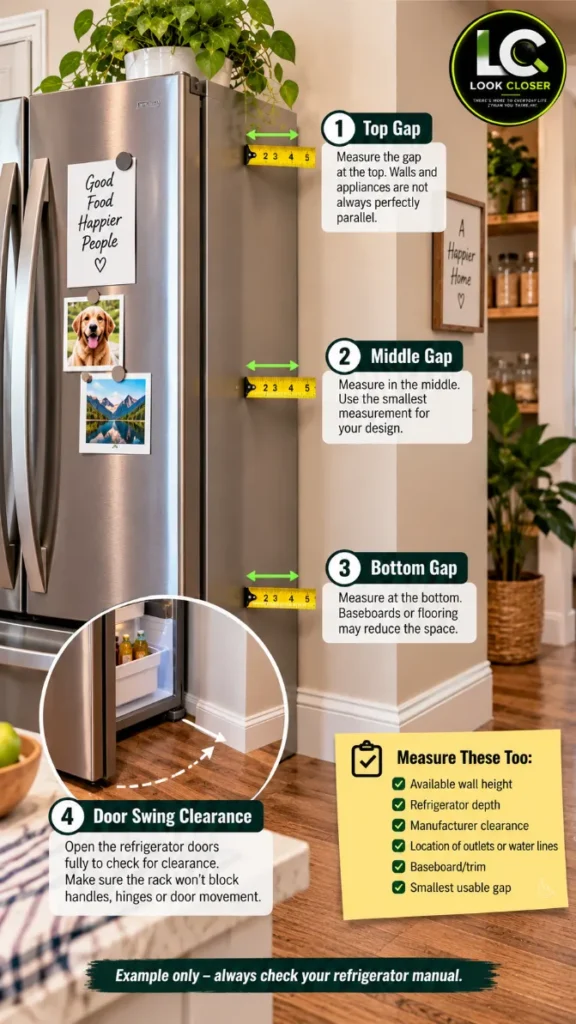
Measure these seven things
Measurement
Why It Matters
Gap at floor level
Baseboards or trim may make this narrower
Gap at mid-height
Walls and appliances aren’t always perfectly parallel
Gap near the top
Confirms the rack can remain vertical
Available wall height
Determines overall rack height
Refrigerator depth
Helps establish a practical maximum shelf depth
Door/handle swing
Prevents collisions
Manufacturer-required clearance
Protects ventilation and appliance operation
SpaceUp Tip: Measure the gap at the top, middle and bottom. Design around the smallest usable measurement, not the largest.
First Decision: Should You Build This in Your Kitchen?
This idea works best when the refrigerator sits beside a real wall with enough independent space to mount a shallow rack.
It is not automatically suitable for every refrigerator installation.
the wall provides an appropriate attachment point;
and the rack doesn’t block an outlet, water connection, vent or service point.
Stop and Reconsider If…
Don’t force this project into the space if:
the available gap is actually required ventilation clearance;
the refrigerator door/hinge needs that space;
the rack would block the refrigerator’s base grille;
the refrigerator cannot be pulled out for servicing;
plumbing or electrical components are in the way;
you cannot create a secure mounting system;
or the finished rack would project dangerously into a walkway.
Whirlpool specifically advises against blocking a refrigerator’s base grille and tells owners to consult their model-specific installation instructions for spacing requirements.
Planning the Rack
The original Look Closer visualization uses two tall wooden side supports, three shallow shelves, dark front retaining rails, and two L-shaped wooden arms that extend over the top of the refrigerator. Those upper arms are one of the defining visual features of the project and help create the suspended appearance seen in the Reel.
That visual detail should not automatically be interpreted as a tested mounting method. The Reel is an AI-assisted design visualization, not a structural demonstration showing how loads are transferred in a completed physical installation.
If you build a real version, the L-shaped arms can remain part of the design, but the rack should also have an independently secure installation strategy appropriate to your wall construction and intended loads. Do not drill into the refrigerator, permanently fasten the rack to the appliance, block required ventilation, or assume the refrigerator cabinet is designed to carry the loaded rack.
In other words: keep the look of the original concept, but engineer the real installation independently of the appliance.
Example Dimensions — Not a Cut List
Here’s an example of how a relatively narrow version might be planned.
Component
Example Range
What Determines Final Size
Overall height
48–60 in
Available wall space and reach
Overall width
6–10 in
Actual usable gap after refrigerator clearance
Shelf depth
4–7 in
Items stored + refrigerator geometry
Shelf thickness
3/4 in
Material/design
Shelf spacing
10–16 in
Container heights
Front retaining rail
About 1–2 in above shelf surface
Items being stored
These are illustrative dimensions only.
For example, if your measured physical gap is 10 inches but the refrigerator manufacturer requires some of that space for ventilation or door operation, you do not have a 10-inch storage space.
Your usable rack width is what remains after all required clearances and operating space have been preserved.
Measure the gap at the top, middle and bottom, then check door swing and appliance clearance before designing the storage rack.
Visual:How to Measure the Gap Correctly
Create a clean vertical instructional image using the same refrigerator, same warm American kitchen, same wood flooring and same visual identity as your supplied Before/After photographs.
Show four subtle measurement indicators:
A — Top gap B — Middle gap C — Bottom gap D — Door swing / clearance
No invented building-code claims. Small footer:
“Example only — check your refrigerator manual.”
This image would add genuine information rather than repeating your existing measuring photo.
Materials
The exact quantity depends on the dimensions you calculate.
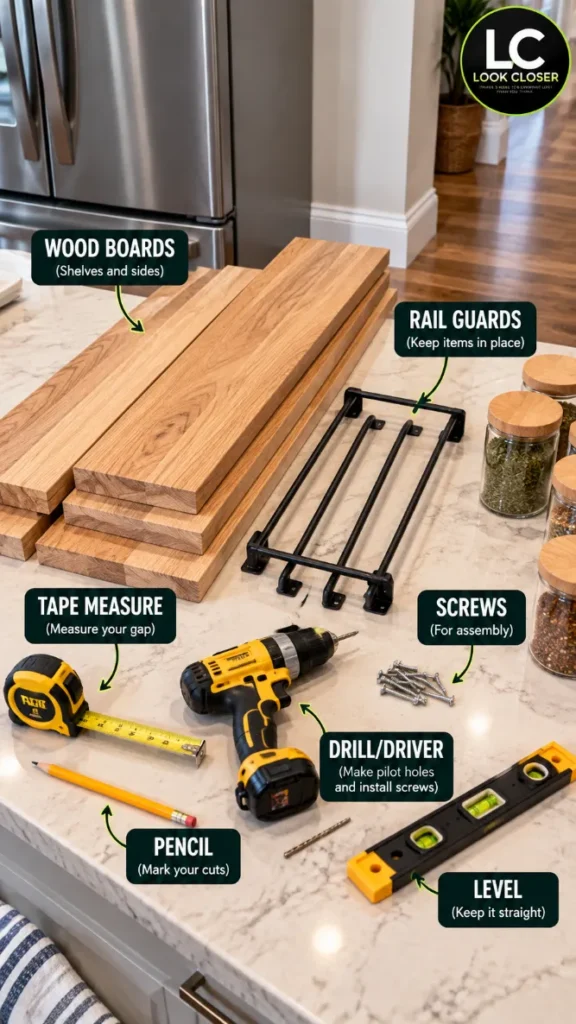
For a simple three-shelf version, this is a practical starting list.
Material
Purpose
Buying Note
Straight 1×3 or 1×4 lumber
Vertical frame/supports
Select straight, dry boards
3/4-in plywood or solid wood
Shelves
Useful for shallow shelves
Wood screws
Assembly
Match length to material thickness
Structural/cabinet screws
Wall attachment where appropriate
Hardware must suit substrate
Wood glue
Wood-to-wood joints
Optional depending on joinery
Metal retaining rails or wood lips
Keeps containers from sliding forward
Match to shelf design
Wall-mount hardware
Secures rack
Must match actual wall construction
Sandpaper
Surface preparation
Use progressively finer grits
Paint, stain or clear finish
Protection/appearance
Choose a finish appropriate for indoor cabinetry
Don’t buy wall anchors blindly
Drywall, wood studs, masonry, tile and other substrates require different fastening methods.
If you’re unsure what is behind the wall, identify the wall construction before choosing the fastener.
For a tall, narrow storage piece, I would favor a secure connection to suitable structural framing whenever the installation allows it rather than treating the drywall itself as the structure.
Tools You’ll Need
You don’t need a professional workshop, but accurate measuring and straight assembly matter here.
Tool
Required?
What It Does
Tape measure
Yes
Measures gap and components
Pencil
Yes
Layout
Level
Yes
Keeps rack plumb/shelves level
Drill/driver
Yes
Assembly and installation
Appropriate drill bits
Yes
Pilot holes and mounting
Stud finder
Recommended
Helps locate framing
Circular saw or miter saw
Usually
Cuts lumber
Speed square
Recommended
Straight/square layout
Clamps
Recommended
Holds components during assembly
Eye protection
Yes
Cutting/drilling protection
Hearing protection
For power saw use
Hearing protection
Useful tools for this project
Rather than putting Amazon links everywhere, I would use one small shopping box here.
Affiliate disclosure: As an Amazon Associate, DIY SpaceUp earns from qualifying purchases. Some links below are affiliate links, which means we may earn a commission at no extra cost to you.
Step-by-Step: How to Build the Refrigerator Side Storage Rack
Step 1: Check the Refrigerator Manual Before Designing Anything
Find your refrigerator’s model number.
Then find its installation or owner’s manual and identify:
side clearance;
top clearance;
rear clearance;
door swing requirements;
ventilation locations;
water-line requirements, if applicable;
and any manufacturer restrictions.
Do this before determining the rack width.
Don’t use our visualization as a clearance specification.
Step 2: Measure the Real Usable Space
A practical overview of the basic materials and tools used to plan and assemble a narrow refrigerator-side storage rack.
Measure from the wall toward the refrigerator at three heights.
Then check depth.
Finally, slowly open the refrigerator and freezer doors while watching the handle, hinge and door edge.
Write down your measurements
Check
Your Measurement
Bottom gap
______ in
Middle gap
______ in
Top gap
______ in
Available height
______ in
Maximum safe rack depth
______ in
Required appliance clearance
______ in
Final usable rack width
______ in
That last number—not the raw gap—is the important one.
Step 3: Decide What You Actually Want to Store
This sounds minor. It isn’t.
A spice rack and a bottle rack shouldn’t automatically have identical dimensions.
Place several of the actual objects you want to store on a table and measure the tallest and deepest ones.
For example:
Upper shelf: lightweight bottles or frequently used items Middle shelf: spices and seasonings Lower shelf: additional lightweight pantry containers
Avoid designing the rack around one attractive photograph and discovering afterward that your everyday containers don’t fit.
And keep heavier items lower.
Step 4: Make the Cut Plan
Once the dimensions are confirmed, prepare a cut list before touching the saw.
A basic rack may consist of:
two vertical rails;
three shelf panels;
upper/bottom crosspieces or mounting members as required by the design;
and three front retaining rails/lips.
Check every measurement again.
Measure twice. Cut once. Dry-fit before fastening.
Step 5: Cut the Vertical Supports
Cut both vertical members to identical length.
Place them next to each other on a flat surface.
Mark shelf locations across both pieces simultaneously so the shelf positions match.
Before assembly, check the boards for obvious bowing or twisting.
Step 6: Cut the Shelves
Cut each shelf to the same finished width unless your particular installation requires otherwise.
Test the shelf depth using your actual containers.
Then sand the cut edges.
For shallow shelves carrying relatively light kitchen items, 3/4-inch material is a practical starting point, but shelf capacity depends on material, span, joint design, mounting and load—not thickness alone.
Wood shelving tests demonstrate how substantially support configuration and loading can change shelf deflection, which is another reason not to publish an arbitrary weight rating for this custom build.
We therefore do not give this DIY rack a certified load capacity.
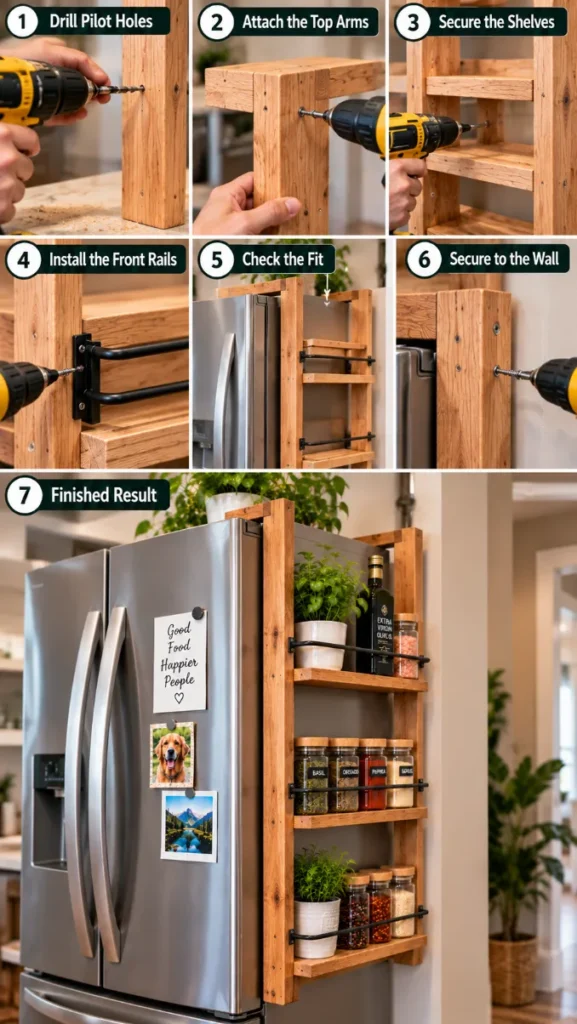
A visual overview of the build sequence, from cutting the wooden frame and L-shaped top arms to installing the three shelves and front retaining rails.
Visual:Exploded Assembly Diagram
Same warm wood as the final rack, neutral background.
Show:
LEFT VERTICAL SUPPORT
RIGHT VERTICAL SUPPORT
THREE SHELVES
FRONT RETAINING RAILS
WALL ATTACHMENT POINTS
Use arrows to show assembly direction.
Important visual rule: the refrigerator must NOT be shown as structural support.
This would probably be the most useful new instructional image in the article.
Step 7: Drill Pilot Holes
Mark fastener locations carefully.
Pilot holes reduce the chance of splitting narrow wood components and make assembly easier to control.
Where screw heads need to sit flush, use an appropriate countersink.
Do a test on scrap material first if you’re unfamiliar with the screw/wood combination.
Step 8: Assemble the Frame Square
Start with the structural frame.
Don’t install accessories simply because they’re easy to reach.
Clamp the first shelf/support assembly in position and verify it is square before driving the final fasteners.
Then add the remaining structural components in sequence.
At every stage:
align;
clamp;
check square;
drill;
fasten;
recheck.
A tiny alignment error at the first shelf can become very visible by the third.
Step 9: Add the Retaining Rails
The dark rails in our concept aren’t just decorative.
They’re there to help prevent containers from sliding off the shallow shelves during normal use.
Position each rail high enough to restrain the intended containers without making them awkward to remove.
Don’t rely on a rail to make an overloaded or unstable shelf safe.
Step 10: Sand and Finish Before Installation
It’s generally easier to sand and finish the rack before putting it into a narrow refrigerator gap.
Ease sharp edges and corners.
Remove dust.
Then apply your chosen finish according to the product manufacturer’s instructions and allow it to cure appropriately before loading the shelves.
For a kitchen, choose a finish suited to the environment and follow its label instructions for application, ventilation and cure time.
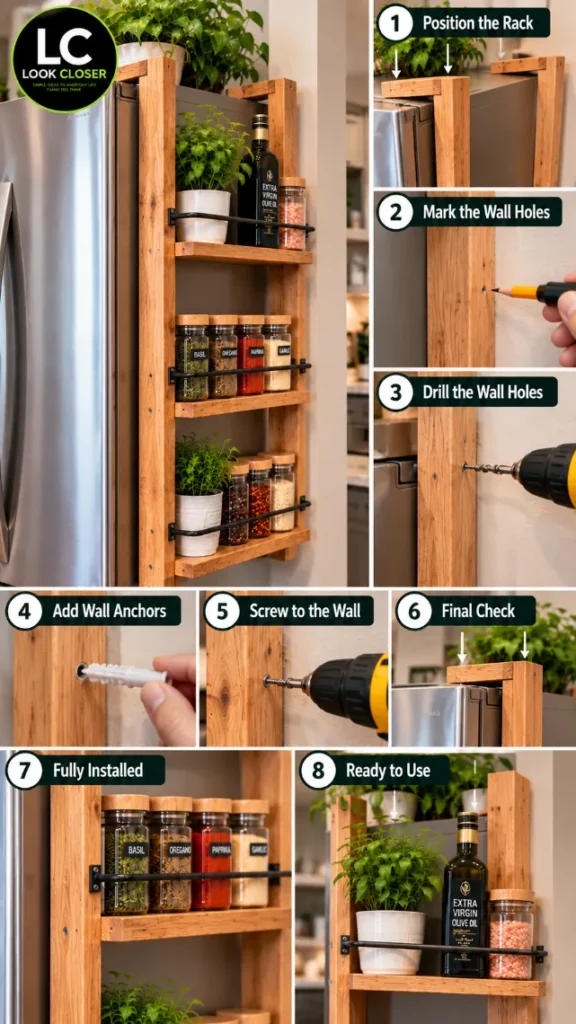
From pilot holes to final installation: a visual overview of assembling, fitting and securing the three-tier refrigerator-side storage rack.
The Most Important Part: Installing It Safely
Step 11: Locate the Wall Structure
Use a stud finder or another appropriate method to identify suitable attachment locations.
Mark them.
Then compare those positions with the mounting points on your rack.
Do not assume every wall is conventional wood-stud drywall.
If you have masonry, metal framing, tile, unknown wall construction, plumbing/electrical concerns or another unusual condition, the mounting strategy changes.
If you’re uncertain, consult a qualified professional.
Step 12: Position the Rack and Check the L-Shaped Top Arms
Now the real installation begins to resemble the Look Closer visualization.
Position the rack beside the refrigerator and check how the two L-shaped upper arms align above the appliance. They are part of the visual design, but their presence does not mean the refrigerator should become the rack’s sole structural support.
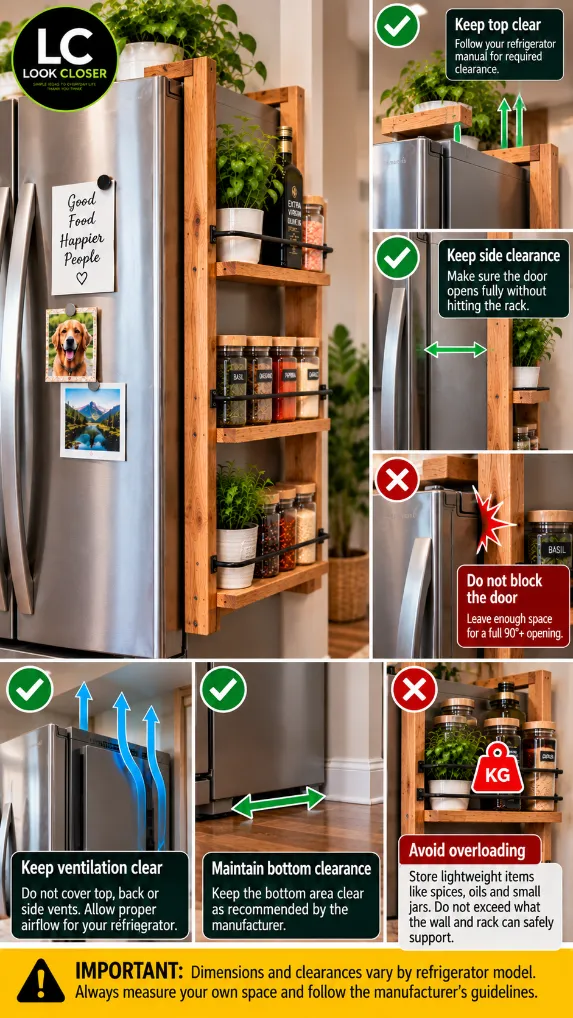
Maintain every clearance required by the manufacturer of your specific refrigerator. The upper arms must not obstruct ventilation, interfere with hinges or doors, damage the appliance finish, or prevent the refrigerator from being moved for service.
Check the rack with a level and verify its independent mounting points before loading the shelves.
Finally, open the refrigerator and freezer doors and confirm that the appliance can still operate normally.
Step 13: Secure the Rack
Use hardware appropriate to the wall and load.
A tall, narrow shelving structure deserves particular attention to stability.
The U.S. Consumer Product Safety Commission specifically recommends securing top-heavy furniture and shelving to help prevent tip-over incidents.
For this project, secure the rack to appropriate structural support using hardware suitable for the actual wall.
Safety Check
Before loading anything, gently test for:
forward movement;
side-to-side movement;
twisting;
loose joints;
loose mounting hardware.
If it moves unexpectedly, stop and correct the mounting.
Position the rack carefully, identify suitable attachment points, secure it appropriately for the wall construction, and check stability before loading the shelves.
Visual:Correct Installation vs. Wrong Installation
Split image.
CORRECT: rack independently attached to wall, visible small separation from refrigerator, ventilation space preserved.
WRONG: rack physically fastened into or resting on refrigerator.
Keep it simple and visual.
Text:
“Support the rack from the wall — not the appliance.”
This addresses one of the biggest questions your Facebook audience is likely to raise.
Step 14: Check the Refrigerator Again
Before putting anything on the shelves:
Open every refrigerator door fully through the range you normally use.
Pull out refrigerator drawers.
Check handles.
Look at the base grille.
Verify the rack hasn’t compromised any required clearance.
If the refrigerator has to move forward or sideways to accommodate the rack in a way that violates its installation instructions, rethink the project.
Before installing the rack, verify ventilation, door movement, appliance clearances and safe loading according to your refrigerator manufacturer’s instructions.
Step 15: Load the Shelves From the Bottom Up
Start light.
Put heavier everyday containers on the lowest shelf and lighter items higher.
Don’t immediately fill every inch simply because space exists.
CPSC safety guidance similarly recommends keeping heavier items lower on furniture to improve stability.
After loading the rack, check the mounting and shelves again.
After: The Gap Finally Has a Job
This is what makes small-space DIY interesting.
We didn’t add a pantry.
We didn’t remodel the kitchen.
We didn’t sacrifice another cabinet.
We simply asked a better question about a piece of space that was already there:
What could this spot be doing for us?
Three shallow shelves won’t transform the square footage of a kitchen.
But they can transform how that square footage works.
What Should You Store Here?
Think small, frequently used and relatively lightweight.
Good candidates
Item
Why It Works
Spice jars
Small and frequently used
Seasonings
Easy to group
Small dry-goods containers
Efficient use of shallow depth
Lightweight bottles
Good if rail height is appropriate
Small kitchen accessories
Keeps counters clearer
Things I’d Avoid
Very heavy bottles, bulk canned goods, large glass collections, small appliances, or anything that makes the rack feel top-heavy.
The visualization shows an oil bottle, but that does not establish a tested shelf load or certify the rack for heavy glass bottles.
How Much Will This Project Cost?
Material prices vary dramatically by location, wood species, finish and hardware, so treat this as a planning range.
Item
Rough Planning Range
Lumber / plywood
$25–$70
Screws / fasteners
$8–$20
Retaining rails/lips
$10–$30
Wall mounting hardware
$5–$20
Sandpaper / consumables
$5–$15
Finish
$10–$30
Approximate total
$60–$185+
Tools aren’t included because buying a drill, saw and clamps specifically for one project can completely change the budget.
Affiliate disclosure: As an Amazon Associate, DIY SpaceUp earns from qualifying purchases. Some links below are affiliate links, which means we may earn a commission at no extra cost to you.
Common Mistakes to Avoid
1. Treating the entire visible gap as usable space
It may include required refrigerator clearance.
Fix: Check the appliance manual first.
2. Using the refrigerator as part of the rack structure
The visualization can make the two appear connected.
Fix: Build an independently supported rack.
3. Measuring only once
Walls, floors and refrigerators aren’t guaranteed to be perfectly parallel.
Fix: Measure top, middle and bottom.
4. Forgetting the door swing
A rack can technically fit and still make the refrigerator frustrating to use.
Fix: Test the complete door movement before installation.
5. Ignoring the baseboard
A baseboard can steal an inch from exactly the place where your vertical support needs to sit.
Fix: Account for trim in the design rather than forcing the rack against it.
6. Guessing at wall anchors
A fastener suitable for one wall isn’t automatically appropriate for another.
Fix: Identify the wall construction and use appropriate hardware.
7. Making shelves too deep
Deeper isn’t automatically better beside an appliance.
Fix: Build for the objects you intend to store while preserving access and clearance.
8. Loading heavy objects at the top
This increases the consequences of an unstable installation.
Fix: Keep heavier items low and secure the rack appropriately.
9. Publishing a fake “100-lb capacity”
A custom DIY rack has not undergone the standardized load testing of a manufactured commercial shelving product.
Fix: Don’t claim a certified capacity you haven’t tested.
What If My Gap Is Too Small?
Then don’t build this exact project.
That’s actually an important outcome of measuring correctly.
You could instead consider:
A very shallow spice ledge
If the wall provides enough independent space but not enough depth for bottles.
Wall-mounted narrow shelves elsewhere
Same organization principle, different location.
A rolling gap cart
Potentially useful in some layouts—but it still must not consume clearance required by the refrigerator.
Inside-cabinet storage
If maintaining refrigerator clearance leaves essentially no usable side space, another storage location is the better project.
The goal isn’t to force this design into every kitchen.
The goal is to use overlooked space intelligently when the conditions make sense.
Refrigerator-Side Rack Final Safety Checklist
Before calling the project finished, check every box:
Final Check
Done
Refrigerator manual checked
☐
Required ventilation clearance preserved
☐
Door opens normally
☐
Base grille/vents unobstructed
☐
Water/electrical access unaffected
☐
Rack is level
☐
Rack doesn’t rely on refrigerator for support
☐
Appropriate wall mounting used
☐
No sharp unfinished edges
☐
Shelf rails securely installed
☐
Heavy items kept lower
☐
Rack checked again after loading
☐
Frequently Asked Questions
Do the L-shaped arms attach the rack to the refrigerator?
In the Look Closer visualization, the two L-shaped arms extend over the top of the refrigerator and make the rack appear suspended from the appliance. That is part of the concept’s visual design, not a tested structural specification.
For a real build, do not drill into the refrigerator or assume its exterior cabinet is designed to carry the loaded rack. Preserve the L-shaped design only if it can coexist with the refrigerator manufacturer’s required clearances, ventilation and service access, while the rack receives appropriate independent structural support.
How much space do I need beside my refrigerator?
There is no universal answer.
You need enough space for the manufacturer’s required refrigerator clearances plus the physical dimensions of your rack. Check the installation instructions for your exact refrigerator model before designing the rack. Manufacturer requirements vary.
Is a 10-inch gap enough?
Possibly—but a 10-inch physical gap does not automatically mean you can build a 10-inch rack.
Subtract whatever space must remain clear for the refrigerator and its operation.
How deep should the shelves be?
Only as deep as necessary for the items you’re storing and as your particular installation safely permits. A shallow spice rack can be much narrower than storage designed for bottles.
What wood should I use?
Straight solid lumber and quality plywood are both practical options. Material selection depends on your joinery, finish, dimensions and expected loads.
Can I use MDF?
It can be used for some interior shelving projects, but it is relatively heavy and its edges require appropriate finishing. For a narrow wall-mounted rack, plywood or straight solid lumber may make construction and fastening more straightforward.
Does the rack need to be anchored?
A tall, narrow shelving structure should be treated seriously from a stability standpoint. CPSC recommends securing top-heavy furniture and shelving to help prevent tip-over hazards.
How much weight can each shelf hold?
We intentionally don’t publish a specific capacity for this concept.
Capacity depends on shelf material, span, joints, fasteners, wall structure, mounting hardware and workmanship. Without physical load testing of the exact finished build, giving readers a precise pound rating would be misleading.
Can a beginner build it?
A beginner comfortable with measuring, making straight cuts, drilling pilot holes and safely operating basic power tools can potentially tackle a simple version.
The wall installation is the part where you should stop and get qualified help if you don’t understand the wall structure or appropriate fastening method.
What if there is an electrical outlet behind the rack?
Don’t cover or interfere with required electrical access, and don’t drill where concealed wiring or plumbing may be present. Modify the design or consult a qualified professional if the installation creates uncertainty.
Can I make the rack removable?
Yes, the woodworking concept can be adapted, but a removable version still needs a safe, stable mounting strategy. “Removable” shouldn’t mean “unsecured.”
Will this affect refrigerator ventilation?
It can if designed incorrectly. That’s why refrigerator clearance is checked before calculating rack dimensions. Follow the installation instructions for your exact appliance.
Is This Project Worth Building?
The interesting thing about this project isn’t really the three shelves.
It’s the thought process behind them.
Walk through almost any home and you’ll find spaces we’ve unconsciously classified as useless: a narrow kitchen gap, the wall behind a door, an awkward entryway corner, the few inches beside a cabinet.
Sometimes they’re unusable for a good reason.
Sometimes they’re not.
The difference comes from looking closer, measuring carefully and designing around the way the home actually works.
For this refrigerator-side rack, that means resisting the temptation to simply copy the photograph.
Measure your space. Protect the appliance clearance. Build the rack independently. Secure it properly. Then customize the shelves around the things your kitchen actually needs.
That’s how an overlooked gap becomes genuinely useful storage—not just a good Before & After photo.
Article Transparency
This project originated as an AI-assisted DIY design visualization created to explore a possible use for an overlooked kitchen space.
The images are conceptual and should not be interpreted as engineering drawings, certified construction plans or evidence that the illustrated installation has undergone physical load testing.
DIY SpaceUp develops its accompanying guides by adding practical planning, materials, tool, installation and safety considerations so readers can better evaluate whether an idea is appropriate for their own home.
Building conditions, appliances and local requirements vary. Follow manufacturer instructions and applicable local requirements, and consult a qualified professional when a project involves conditions outside your experience.
We use cookies and similar technologies to help our website function properly, understand how visitors use the site, and improve your experience. You can accept or manage your preferences at any time. Some features may not work as intended if certain cookies are disabled.
Functional
Always active
The technical storage or access is strictly necessary for the legitimate purpose of enabling the use of a specific service explicitly requested by the subscriber or user, or for the sole purpose of carrying out the transmission of a communication over an electronic communications network.
Preferences
The technical storage or access is necessary for the legitimate purpose of storing preferences that are not requested by the subscriber or user.
Statistics
The technical storage or access that is used exclusively for statistical purposes.The technical storage or access that is used exclusively for anonymous statistical purposes. Without a subpoena, voluntary compliance on the part of your Internet Service Provider, or additional records from a third party, information stored or retrieved for this purpose alone cannot usually be used to identify you.
Marketing
The technical storage or access is required to create user profiles to send advertising, or to track the user on a website or across several websites for similar marketing purposes.