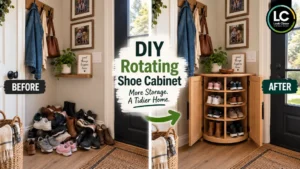

The problem started with something familiar: too many shoes and nowhere good to put them.
In this entryway, the front door opened onto a small corner that had slowly become the family shoe drop zone. Sneakers landed beside boots. Kids’ shoes disappeared underneath adult pairs. A backpack joined the pile. Before long, a useful corner of the room had turned into clutter.
The obvious answer would have been a shoe rack.
But a long rack would have taken up valuable wall space, and a deep cabinet could have interfered with the path through the entryway.
So we looked at the corner differently.
Instead of spreading storage across the floor, the concept was to build upward and use rotation to make the storage easier to access.
The result is a compact, tall shoe cabinet with divided circular shelves, two front doors, and a rotating interior designed to hold multiple pairs while keeping the entryway visually calmer.
But the transformation image is only the beginning.
If you actually want to build something inspired by this idea, there are important questions the short video cannot answer: How large should it be? What kind of plywood should you use? How should the rotating mechanism work? How much weight can it carry? How do you prevent it from tipping? And how much might it cost?
That is what this guide is for.
AI Visualization Note: This project originated as an AI-assisted DIY design visualization. The images show the storage concept and intended result; they are not engineering drawings or proof of a completed physical build. This guide translates the idea into practical planning considerations for someone exploring a real-world version.
Project at a Glance
Project: Rotating entryway shoe cabinet
Best for: Entryways, mudrooms, hallway corners and other underused spaces
Skill level: Intermediate to advanced DIY
Estimated build time: One weekend or longer, depending on tools, finish and experience
Main material: Cabinet-grade plywood
Key hardware: Rotating bearing/mechanism, hinges, handles and anti-tip hardware
Installation: Freestanding cabinet with appropriate wall restraint strongly recommended
Estimated capacity: Depends entirely on cabinet diameter, shelf spacing and shoe sizes
Estimated DIY material budget: Roughly $250–$500+, depending heavily on plywood grade, rotating hardware, doors, finish and hardware choices.
That budget is intentionally a range rather than a promise. As one current reference point, a 3/4-in. x 4-ft. x 8-ft. birch plywood sheet was listed at about $74.98 at Home Depot when this guide was prepared in September 2026. Local pricing and availability vary.
Why a Rotating Cabinet Can Work in a Small Entryway
The interesting part of this design isn’t simply that it hides shoes.
It’s that it changes how the available volume is used.
A traditional shoe bench uses horizontal space. A tall conventional cabinet uses vertical space but may leave shoes at the back difficult to reach.
A rotating organizer can potentially combine vertical storage with easier access to multiple compartments.
But there is a tradeoff.
The rotating mechanism adds complexity, weight and moving parts. If your entryway can accommodate a simple fixed cabinet with straight shelves, that will generally be easier and less expensive to build.
The rotating version makes the most sense when the mechanism actually solves an access problem, rather than being added only because it looks interesting.
Before You Build: Measure the Space, Not the Picture
This is the most important part of the project.
Do not copy dimensions from an AI visualization.
Your cabinet needs to fit your entryway, your shoes and your door swing.
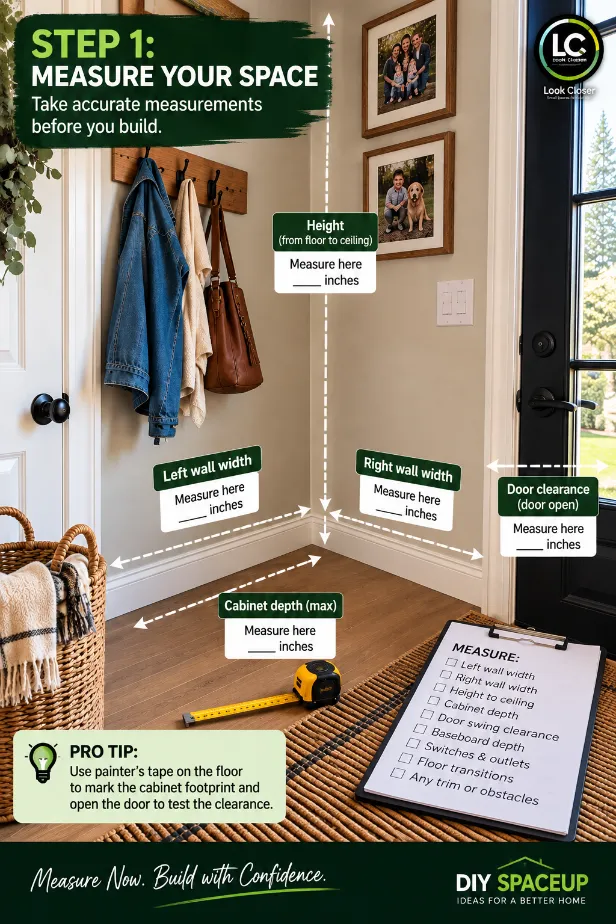
1. Measure the available footprint
Measure:
- wall-to-wall width of the corner;
- maximum cabinet depth;
- baseboard projection;
- available height;
- distance to nearby switches and outlets;
- distance to door casing;
- and any floor transition or threshold.
Measure at the floor, middle and upper portion of the proposed cabinet location.
Older walls and corners are not always perfectly square.
2. Check the front-door swing
Open the front door completely.
Then measure the actual clearance between the door and the proposed cabinet footprint.
Don’t design the cabinet with the door closed and discover after installation that the handle or cabinet door interferes with your entry door.
Leave practical clearance rather than designing two moving components to barely miss each other.
3. Measure the shoes that will actually live there
A shoe cabinet should be designed around shoes, not generic shelf dimensions.
Take the largest everyday shoes in your household and measure:
heel-to-toe length + maximum width + height.
Then measure taller items separately.
Running shoes, work shoes, kids’ sneakers and ankle boots do not need the same clearance.
The tall boots shown in our concept, for example, may require a dedicated lower compartment rather than the same spacing used for sneakers.
SpaceUp Tip
Lay several pairs of shoes on a piece of cardboard and draw the proposed shelf footprint around them.
It is a surprisingly useful full-scale test.
If the shoes don’t fit comfortably on cardboard, they won’t magically fit after the plywood is cut.
Choosing a Practical Cabinet Size
There is no universal correct diameter.
For many homes, a conceptual starting range might be somewhere around 30–36 inches wide and approximately 48–60 inches tall, but those numbers are planning examples, not construction specifications.
Your measurements determine the final dimensions.
A smaller household might need a much smaller cabinet.
A family storing large men’s shoes and boots may need significantly more depth.

Don’t forget the doors
The open doors themselves occupy space.
Before cutting anything, mark the proposed footprint on the floor with painter’s tape. Then mark where the cabinet doors would swing.
Walk through the entryway several times.
Open the front door.
Carry a grocery bag through it.
Imagine two people entering simultaneously.
If the taped footprint already feels intrusive, make the cabinet smaller before you build it.
Materials
For a cabinet intended to carry multiple pairs of shoes and a rotating assembly, I would favor cabinet-grade 3/4-inch plywood for the primary structural components rather than thin particleboard.
A typical build may require:
- 3/4-inch cabinet-grade birch or maple plywood;
- additional plywood for circular shelves and dividers;
- hardwood or plywood for the doors;
- solid wood edge banding or iron-on veneer edge banding;
- heavy-duty rotating bearing or purpose-built turntable hardware;
- compatible fasteners;
- wood glue;
- concealed or conventional cabinet hinges;
- two cabinet handles;
- anti-tip restraint hardware;
- wall fasteners appropriate for the actual wall construction;
- sandpaper;
- wood filler;
- stain, paint, polyurethane or another appropriate furniture finish.
Inspect plywood before buying it. Flatness and veneer quality can vary, and retailer feedback on current hardwood plywood products includes reports of warping, veneer damage and chipping.
Optional shopping link
Heavy-Duty Lazy Susan / Turntable Bearings:
Tools
Depending on your construction method, useful tools may include:
- tape measure;
- pencil;
- combination or framing square;
- long straightedge;
- drill/driver;
- circular saw with a suitable plywood blade;
- table saw if available and used safely;
- jigsaw;
- router with a circle-cutting jig or another reliable method for producing repeatable circles;
- random-orbit sander;
- clamps;
- level;
- stud finder;
- countersink bit;
- appropriate PPE.
If a reader is building more than one cabinetry project, these are the tools I would make easiest to find rather than scattering product links throughout every paragraph:
Quality Stud Finder : Useful when locating framing for the final anti-tip restraint.
Plywood/Finish Circular Saw Blade : A suitable sharp blade can help produce cleaner plywood cuts.
These are convenience links, not requirements to buy a specific brand.
Safety First
This project combines power tools, large sheet goods, a heavy cabinet and a moving mechanism. Treat those as separate hazards rather than focusing only on the finished appearance.
OSHA’s woodworking guidance identifies machine contact, kickback, flying material, noise and wood dust among common woodworking hazards. Its circular-saw guidance specifically warns about hands entering the cutting line and kickback.
Wear appropriate eye protection and hearing protection when required by the tool and task. Control wood dust with suitable collection/extraction and respiratory protection appropriate to the work. OSHA notes that wood dust can cause respiratory and skin effects and recommends engineering controls such as local exhaust where practical.
Follow the instructions supplied with every saw, router, bearing, hinge, fastener and finish you use.
And if you are not comfortable making repeatable circular cuts or safely operating the required tools, have the circular components cut professionally.
That is not a shortcut. It is good project planning.
How the Rotating Shoe Cabinet Could Be Built
The construction sequence matters.
Do not install shelves before the support system exists. Do not attach doors before checking rotation. And do not finish the cabinet before confirming that everything fits.
Step 1: Create a full-size layout
After measuring the entryway, draw the cabinet footprint at full scale.
A sheet of cardboard or inexpensive hardboard makes a useful template.
Mark:
- cabinet diameter;
- door position;
- rotating shelf diameter;
- clearance between moving and stationary parts;
- central axis;
- divider positions.
This is where inexpensive mistakes should happen.
Not after cutting expensive plywood.
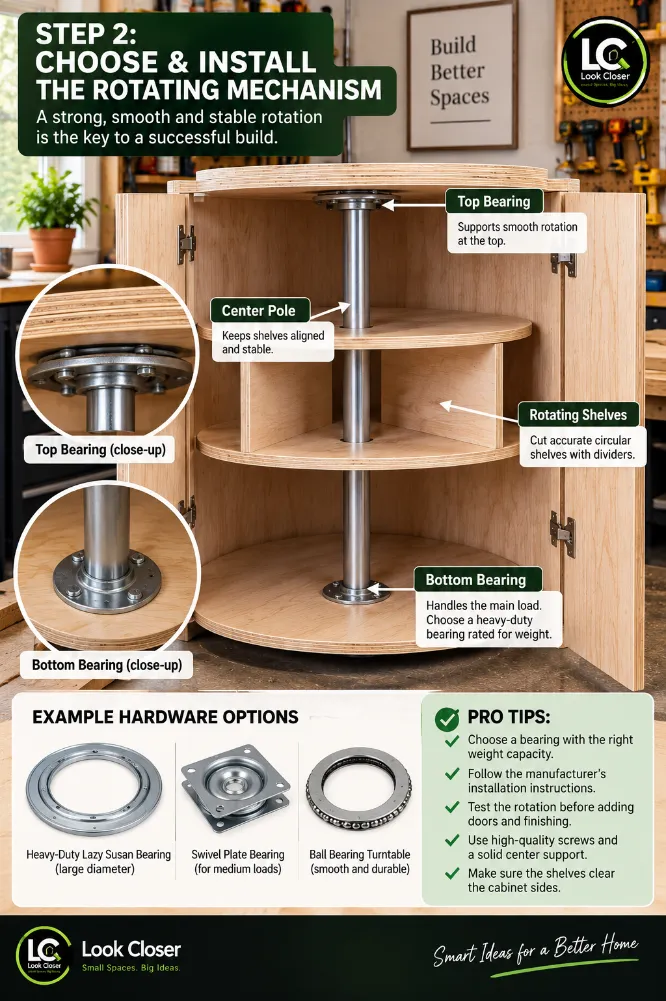
Step 2: Plan the rotating system before cutting the shelves
The rotating mechanism is the engineering heart of the project.
The AI concept imagery shows a central rotating assembly, but that visual should not be interpreted as a tested hardware specification.
A real version needs a mechanism rated for the combined weight of:
all rotating plywood + dividers + shoes + expected dynamic loading + a sensible safety margin.
The exact hardware determines how the bottom, shelves and center support must be designed.
Common Mistake
Buying a turntable bearing after building the cabinet.
Don’t.
Choose the actual hardware first, read its installation requirements, and design the surrounding components around it.
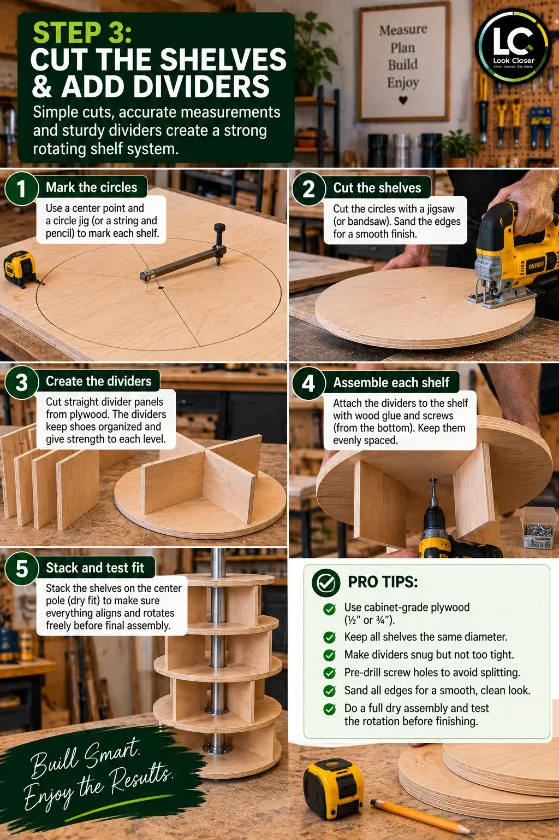
Step 3: Cut the base and circular shelf components
Once the final diameter has been established, create one accurate master template.
Use that template to produce consistent circular pieces.
Depending on the design, you may need:
- a stationary cabinet/base component;
- rotating shelf discs;
- a top;
- and possibly additional support plates required by the selected bearing.
Consistency matters.
If one rotating shelf is noticeably larger than the others, it may rub against the cabinet or doors.
Allow clearance
Do not make the rotating shelves exactly the same diameter as the available interior.
Moving parts need clearance.
The required amount depends on the mechanism, material tolerances and cabinet geometry.
Step 4: Build the Shelf Dividers
The vertical dividers do two jobs:
- create individual shoe compartments;
- help transfer load between shelf levels if the design uses them structurally.
Cut the dividers consistently and dry-fit the complete rotating assembly before permanent fastening.
The visual concept uses approximately quartered shelf sections, but you don’t have to copy that arrangement.
Larger shoes may work better with fewer, wider compartments.
Kids’ shoes could work with smaller compartments.
Build for the household using it.
Step 5: Dry-Assemble the Entire Rotating Core
Before glue or finish, assemble enough of the mechanism to test it.
Rotate it through 360 degrees.
Listen.
Feel for resistance.
Check that:
- nothing rubs;
- shelves remain level;
- fasteners don’t protrude into moving areas;
- dividers remain square;
- the bearing stays centered;
- and the assembly does not wobble excessively.
Then add representative weight.
Do not jump directly from an empty rotation test to filling the cabinet with every shoe in the house.
Step 6: Build the Stationary Cabinet Structure
The rotating core needs a stable surrounding structure.
Depending on the final design, this may include:
- side panels;
- back or partial back;
- top;
- base;
- face-frame components;
- door mounting surfaces.
The stationary cabinet must remain square.
Measure diagonally across the cabinet in both directions. Significant disagreement between the two measurements indicates the box is out of square.
Correct that before installing doors or the rotating assembly.
Step 7: Install and Test the Rotating Assembly
Install the bearing or rotating mechanism according to its manufacturer’s instructions.
Do not substitute random screw lengths.
A screw that is too short may not provide adequate engagement; one that is too long can penetrate a visible surface or interfere with another component.
After installation:
- rotate empty;
- add a small amount of weight;
- rotate again;
- distribute weight around the shelves;
- check for deflection, rubbing or looseness.
If the mechanism binds under load, stop and determine why.
Don’t assume it will “wear in.”
Step 8: Build and Fit the Doors
The two doors give the cabinet a furniture-like appearance and hide the shoes when closed.
Dry-fit them before finishing.
Check:
- even gaps;
- hinge clearance;
- floor clearance;
- front-door interference;
- handles;
- full rotation with cabinet doors open.
Step 9: Sand and Finish
Break sharp edges and sand according to the finish system you’re using.
For plywood with a thin decorative veneer, avoid aggressive sanding that can cut through the face veneer.
Remove dust before applying finish.
For an entryway, choose a finish suitable for regular handling and follow the coating manufacturer’s instructions for application, ventilation, drying and full cure time.
Shoes bring moisture, dirt and grit into furniture, so a cleanable interior finish can be useful.
Step 10: Move the Cabinet Into Position
A finished cabinet of this size may be heavy.
Remove detachable components where possible before moving it and use adequate help.
Once positioned, check:
- floor level;
- door clearance;
- wall clearance;
- rotation;
- stability;
- access to nearby switches/outlets;
- and the path people use to enter and leave the home.
Do not block a required exit path.
Step 11: Address Tip-Over Risk
This is not an optional afterthought.
A tall cabinet can become hazardous if someone pulls, climbs, leans on or unevenly loads it.
The U.S. Consumer Product Safety Commission continues to recommend securing furniture to prevent tip-over incidents, particularly where children may be present. In September 2026, the agency again warned about unstable storage furniture and the potential for serious injury or death.
For this concept, use an appropriate anti-tip solution compatible with both the cabinet and the actual wall construction.
Drywall alone should not automatically be assumed to provide the required anchoring point. Locate appropriate structural support or use an anchoring system specifically rated and installed for the substrate involved.
Amazon convenience link
[AMAZON LINK — Furniture Anti-Tip Restraint Kit]
Choose a restraint based on its instructions and compatibility with your wall and furniture. A generic product link is not a substitute for proper installation.

Step 12: Load the Cabinet Gradually
Start with heavier footwear on lower levels where practical.
Add shoes gradually while checking the rotating action.
Avoid placing unusually heavy objects on upper shelves merely because there is empty space.
The CPSC also recommends keeping heavier items lower and avoiding tempting objects high on furniture where children might try to climb to reach them.
How Many Shoes Could It Hold?
That depends on something social media transformations often skip:
shoe size.
The same compartment might hold two pairs of children’s shoes but only one pair of large adult shoes.
Boots change the equation again.
Instead of advertising a fixed capacity, calculate your own.
Count the usable compartments and test them using the largest footwear you plan to store.
That produces a much more useful number than saying a cabinet “holds 30 pairs” when it only does so with small shoes arranged perfectly.
What Could This Project Cost?
A realistic DIY budget should include more than plywood.
For planning purposes, expect costs from:
Plywood: potentially $150+ depending on number and grade of sheets
Rotating hardware: varies substantially by capacity and design
Hinges and handles: roughly $25–$80+ depending on hardware
Anti-tip hardware: generally a relatively small portion of the budget
Edge treatment: variable
Glue and fasteners: variable
Finish: roughly $20–$60+ depending on system and quantity
A reasonable planning range of roughly $250–$500+ is more useful than pretending every version costs the same.
As of September 2026, one 3/4-inch 4×8 birch plywood option at Home Depot was listed around $74.98 per sheet; regional prices and availability can differ.
If you already own the tools, the project is obviously less expensive than if you need to buy a router, saw, clamps and drill specifically for this build.
Where I Would Spend More — and Where I Would Save
If the budget is limited, I would prioritize money toward:
the structural plywood, rotating hardware, hinges and anchoring system.
Those components affect how the cabinet actually functions.
Decorative handles are much easier to upgrade later.
I would not choose an undersized rotating bearing to save a few dollars after investing in the rest of the cabinet.
Five Mistakes to Avoid
Building before measuring the door swing.
A beautiful cabinet that interferes with the front door is a failed entryway project.
Choosing rotating hardware by appearance alone.
Verify manufacturer specifications, capacity and mounting requirements.
Making the rotating shelves too tight.
Woodworking tolerances and moving components need clearance.
Skipping a loaded test.
An empty shelf turning smoothly tells you very little about how the mechanism behaves under actual load.
Ignoring stability.
Treat anti-tip planning as part of the original design, not an accessory added after installation.
What If You Don’t Want the Rotating Mechanism?
The same corner could support a simpler project.
You could build a fixed corner cabinet with conventional shelves, a tall shoe cubby, adjustable shelving, or a narrower cabinet with pull-out trays.
In many homes, the simplest mechanism that solves the problem is the best one.
The lesson from this transformation isn’t that every entryway needs a rotating cabinet.
It’s that an awkward corner can sometimes hold much more useful storage than it appears to.
Maintenance
Every few months, inspect:
- rotating hardware;
- visible fasteners;
- hinges;
- anti-tip restraint;
- shelf movement;
- signs of plywood separation;
- moisture damage;
- unusual wobble or noise.
Clean dirt and grit before it accumulates around the moving mechanism.
If the cabinet suddenly becomes harder to rotate, investigate the cause rather than forcing it.
Is This a Beginner DIY Project?
Not really.
A simpler fixed shoe cabinet can be beginner-friendly.
This version requires accurate repetitive circular work, moving hardware, cabinetry, doors and stability planning.
I would classify it as an intermediate-to-advanced DIY project, depending on the final mechanism.
A beginner could still use the concept by simplifying it: have the circular pieces professionally cut, use fixed shelves, or work with an experienced woodworker for the rotating assembly.
Before You Build: Final Checklist
Before buying material, make sure you can answer these questions:
Does the cabinet fit without interfering with the entry door?
Have I measured my largest shoes?
Do I know the actual diameter of every moving component?
Have I selected the rotating hardware before finalizing the design?
Is the hardware rated for the expected load?
Can the cabinet be safely restrained against tipping?
Do I know what is behind the wall where it will be secured?
Can I safely make the required cuts with my tools and experience?
Will the finished cabinet preserve a comfortable path through the entryway?
If any answer is “I don’t know,” solve that question before cutting plywood.
Frequently Asked Questions
How much space does a rotating shoe cabinet need?
The exact footprint depends on the cabinet design and rotating hardware. As a planning example, a compact cabinet might be around 30–36 inches wide and 48–60 inches tall. Always measure the available floor space, baseboards, door swing and your actual footwear before choosing final dimensions.
How many pairs of shoes can a rotating shoe cabinet hold?
Capacity depends on the number of levels, shelf diameter, divider spacing and the size of the shoes being stored. Children’s shoes and low-profile footwear require much less space than boots or large athletic shoes, so it is better to design around your household’s actual footwear rather than a fixed pair count.
What type of plywood should I use?
For a cabinet like this, 3/4-inch cabinet-grade plywood is a practical starting material because it provides a good balance of strength, stability and finish quality. The final material choice should also account for the cabinet dimensions, rotating hardware and expected load.
What kind of rotating hardware do I need?
A heavy-duty turntable or Lazy Susan-style bearing designed for the expected size and load is one possible approach. Choose the rotating hardware before finalizing the shelves and center support, and follow the manufacturer’s installation and load-rating requirements.
Does the cabinet need to be attached to the wall?
A tall cabinet loaded with shoes can present a tip-over risk. The stationary structure should be evaluated for stability and, where appropriate, secured using a suitable furniture restraint system. The correct attachment method depends on the cabinet, wall construction and restraint hardware, so follow the hardware manufacturer’s instructions.
Can a beginner build this project?
This is better suited to an intermediate DIYer because accurate circular cuts, cabinet assembly and installation of the rotating mechanism require careful measuring and tool control. A simpler stationary shoe cabinet may be a better first project for someone new to woodworking.
How much could it cost to build?
A reasonable planning budget for a DIY version could be approximately $250–$500 or more, depending on plywood, rotating hardware, hinges, finishing materials and tools you already own. Local material prices can vary considerably.
Can I build it without the rotating mechanism?
Yes. The same small-space concept can be adapted into a stationary cabinet with shelves, pull-out storage or adjustable shelving. That removes the rotating hardware and can make the project considerably simpler.
From Shoe Pile to Useful Space
The biggest change in this entryway isn’t the cabinet itself.
It’s what happened to a corner that had stopped working.
Before, every pair of shoes competed for the same few square feet of floor. The solution wasn’t to find a larger room. It was to reconsider the unused space already there.
That’s the idea behind many of our projects at DIY SpaceUp:
look at the overlooked space first.
Sometimes the answer is a rotating cabinet.
Sometimes it is a shelf, a bench, a pull-out or something much simpler.
The goal isn’t to build the most complicated project possible.
It’s to make the space work better.
Project Transparency
This concept was developed using AI-assisted visualization to explore how an underused entryway corner could be transformed into compact shoe storage.
The visualizations are intended for design inspiration. They are not architectural, structural or engineering drawings and should not be used as exact construction plans.
Dimensions, hardware capacities, anchoring methods, local requirements and installation conditions should always be verified for the actual home and products being used.
For structural questions or conditions outside your experience, consult an appropriately qualified professional.
Continue Exploring DIY SpaceUp
If this project made you look differently at an awkward corner in your home, explore our Indoor Spaces and Project Guides for more ideas designed around overlooked areas.
And if you came here from the original transformation video, this guide is the part the short Reel couldn’t show: the planning, materials, measurements, safety checks and decisions that matter before the first cut.
Affiliate Disclosure
Some links in this guide may be affiliate links. If you purchase through an eligible link, DIY SpaceUp may earn a commission at no additional cost to you. Product selection should always be based on what is appropriate for your specific project, not simply because a product is linked here.