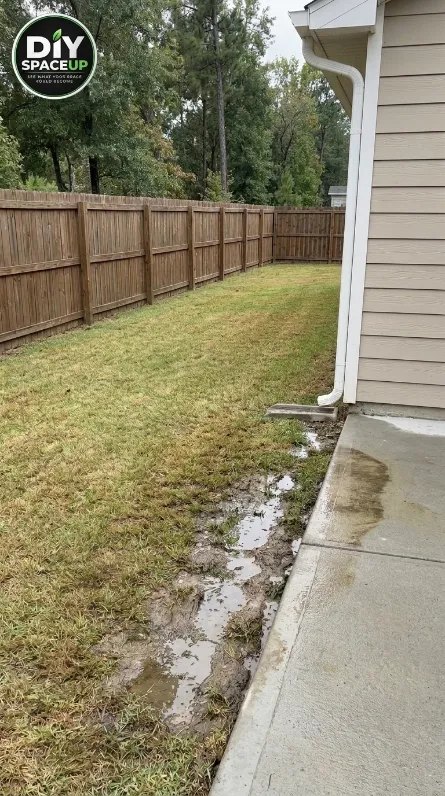
A muddy strip beside the house can make an otherwise usable backyard frustrating to maintain. When water repeatedly collects along a concrete walk or patio, simply adding more soil or reseeding the grass usually treats the symptom rather than the drainage problem.
This project takes a more practical approach: remove the saturated soil, establish a controlled trench, install a linear drainage channel where surface water needs to be collected, and restore the surrounding lawn so the area becomes cleaner and easier to maintain.
The exact drainage layout will always depend on the property, existing grades, soil conditions, rainfall, and where collected water can legally and safely discharge.
Affiliate disclosure: As an Amazon Associate, DIY SpaceUp earns from qualifying purchases. Some links below are affiliate links, which means we may earn a commission at no extra cost to you.
Table of Contents
What We’re Building
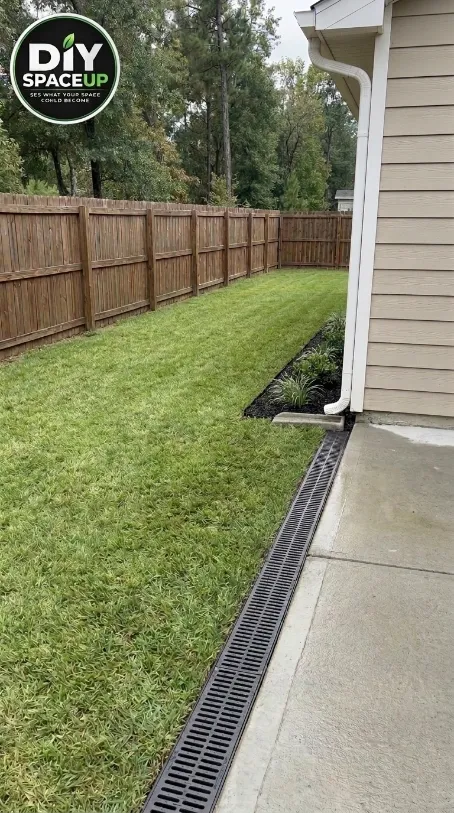
The project shown in the references is a residential drainage improvement along the edge of an existing concrete surface.
Component
Purpose
Excavated drainage trench
Creates controlled space for the drainage assembly
Drainage aggregate
Provides a stable, permeable base around the drainage installation where appropriate
Linear trench/channel drain
Collects surface water along the problem area
Drain grate
Provides a finished walking/landscape surface over the channel
Existing downspout area
One of the water sources that must be considered during planning
Restored lawn
Re-establishes the finished grade around the drainage work
The photographs do not establish the complete underground outlet configuration. That portion needs to be designed and verified for the actual property rather than assumed from the finished surface.
Before You Start: Find Out Where the Water Is Coming From
Start with observation rather than digging.
The project begins with a waterlogged strip of lawn beside the house where surface water repeatedly collects.
Walk the area during or immediately after a significant rainfall and identify where water originates, where it travels, and where it stops.
In this project, the problem area is immediately beside the concrete surface and the house. The existing downspout also needs to be considered because roof runoff can contribute substantially to the amount of water reaching this part of the yard.
Look for:
standing water;
muddy or soft soil;
erosion;
water flowing toward the house;
water collecting beside concrete;
saturated grass;
runoff coming from higher ground;
downspout discharge;
existing drains or buried utilities.
A drainage channel is most useful when it is placed where water naturally needs to be collected. It should not simply be installed at the lowest-looking spot without understanding the overall drainage path.
Check Local Requirements Before Excavating
Drainage work can affect neighboring properties, easements, utilities, stormwater systems, and the finished grade around the house.
Before excavation:
contact the appropriate utility-locating service;
check local requirements for stormwater discharge;
determine whether an easement crosses the work area;
verify property boundaries where relevant;
check whether your municipality restricts where collected water may discharge;
confirm requirements for any connection to an existing drainage system.
Do not assume that water can simply be redirected onto a neighboring property, toward a sidewalk, or into a municipal system.
Plan the Drainage Grade
A channel drain only works properly when water has somewhere to go.
Establish the intended high and low points before excavating. A laser level can be particularly useful when the drainage run is long or the grade is difficult to judge visually.
For a short residential project, a long level, straightedge, stakes, string line, and careful measurements may also be useful.
The important point is not to copy a generic slope from another property. The required grade depends on the drain system, site conditions, outlet arrangement, and applicable installation requirements.
Where Should a Backyard Channel Drain Discharge?
Before installing a backyard channel drain, determine where the collected water will go. A drainage channel can capture surface runoff, but it cannot solve a muddy yard if the water has no suitable discharge destination.
Possible discharge options include:
An approved existing stormwater drainage system: Where permitted, the channel may connect to an existing drainage route that has been verified as suitable for the additional flow. Local approval and compatible fittings may be required.
An appropriate surface discharge location: Some properties allow water to be released at a suitable downhill location, provided it does not create erosion, foundation problems, unsafe conditions, or drainage impacts on neighboring properties.
An engineered infiltration system: A dry well or other infiltration feature may be suitable where soil permeability, groundwater conditions, setbacks, storage capacity, and local regulations allow it. These systems are not appropriate for every yard.
Never assume that a nearby storm drain, sanitary sewer, property line, or low spot is an acceptable discharge point.
Before selecting an outlet, check:
Where the water originates and how much runoff the system must handle.
Whether the proposed route has sufficient elevation difference for gravity drainage.
Whether the discharge location is permitted by local authorities.
Whether the outlet could affect foundations, neighboring properties, sidewalks, or slopes.
Whether the selected drainage system and outlet can handle the expected flow.
If there is no suitable gravity-fed outlet, or if water regularly accumulates near the foundation, consult a qualified drainage professional before excavating.
The key principle: Plan and verify the complete water path—from the channel grate to the final discharge location—before installing the drainage system.
Measure the Drainage Run
Measure the entire area before ordering materials.
Record:
total drain length;
trench width;
required excavation depth;
distance from the concrete edge;
connection points;
high and low points;
available discharge location;
quantity of channel sections;
end caps or outlet components required by the selected system.
Do not rely on the apparent dimensions in a photograph. The images show the construction concept, not verified project measurements.
A useful planning table looks like this:
Item
What to Measure
Drain length
Full installed run
Trench width
Based on selected drain system
Excavation depth
Based on system requirements and site grade
Concrete edge
Distance between concrete and drain
Outlet
Actual discharge route
Aggregate
Required volume based on trench dimensions
Sod
Area removed and area to restore
Tools and Materials
The exact quantities depend on your site and the drainage system you select.
Core Materials
Linear/trench drain system sized for the application
Compatible grate
Compatible end caps and outlet fittings
Clean drainage aggregate appropriate for the system
Geotextile or landscape fabric where appropriate to separate soil from drainage material
Bedding/base material specified by the drain manufacturer
Topsoil
Replacement sod or grass seed
Stakes and string
Marking paint
For a drainage channel, use components designed to work together rather than mixing unrelated grates, channels, and fittings.
Plate compactor when the amount of aggregate and site conditions justify one
For a one-time residential project, renting a plate compactor can make more sense than purchasing one.
A sod cuttercan also be worth considering when a large amount of healthy turf needs to be removed cleanly and replanted.
Safety Checklist
Drainage excavation looks simple, but the risks increase quickly when digging near a house.
Before Digging
Locate buried utilities.
Identify irrigation lines.
Check for buried electrical wiring.
Check for existing drainage pipes.
Keep excavation away from unstable structures.
Wear work gloves and protective footwear.
Use eye protection when cutting or compacting material.
Keep children and pets away from the excavation.
During Excavation
Never enter an excavation that is unsafe or unstable simply because it appears shallow.
Keep excavated soil and heavy materials far enough from the trench edge that they do not create unnecessary pressure or collapse hazards.
If the trench becomes deep enough to present a cave-in hazard, stop and follow applicable excavation-safety requirements rather than treating it as a normal landscaping task.
Step 1: Remove the Existing Grass and Topsoil
Begin by removing the turf from the drainage area.
Where practical, preserve usable sod rather than destroying it. Cut the turf into manageable sections and keep reusable pieces moist and protected from excessive heat.
Continue removing unsuitable topsoil and organic material until the planned drainage assembly can be installed at the required elevation.
Do not bury soft organic soil beneath the drainage system simply to avoid excavation.
The finished drainage system needs a stable foundation.
Step 2: Excavate the Drainage Trench
Excavate along the planned drainage line.
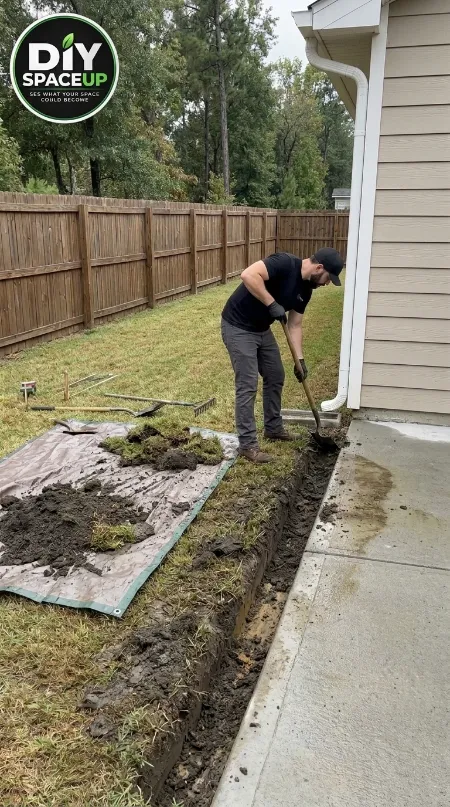
The drainage trench is excavated along the concrete edge to prepare the area for the new drainage channel.
Keep the trench as consistent as practical while following the grade established during planning.
The trench shown in the references runs immediately alongside the existing concrete surface. Maintain that relationship throughout the project rather than allowing the drain to wander away from the area where water actually collects.
Remove loose soil, roots, and debris.
Keep the excavated material organized on a tarp or other protected area so it does not contaminate the prepared drainage materials.
Step 3: Prepare the Trench Bottom
Once excavation is complete, inspect the exposed soil.
The base should be firm enough to support the drainage assembly and any required aggregate.
Remove soft spots rather than simply covering them.
Where the selected drainage system calls for a specific bedding material or concrete surround, follow the manufacturer’s installation requirements.
This is one of the areas where there is no universal DIY recipe: different channel-drain products have different installation details.
Step 4: Establish the Drainage Base
Add the specified base or drainage aggregate in controlled layers.
Spread the material evenly rather than dumping one large pile into the trench and trying to level it afterward.
Compact the base where required by the drainage system and site conditions.
A hand tamper is useful for small areas. A plate compactor can be more efficient for larger aggregate areas, but it should be used appropriately and not directly over a component that the manufacturer says could be damaged.
The objective is a stable, properly graded base—not simply a trench filled with loose stone.
Step 5: Install the Linear Drainage Channel
Set the channel according to the manufacturer’s instructions and the established grade.
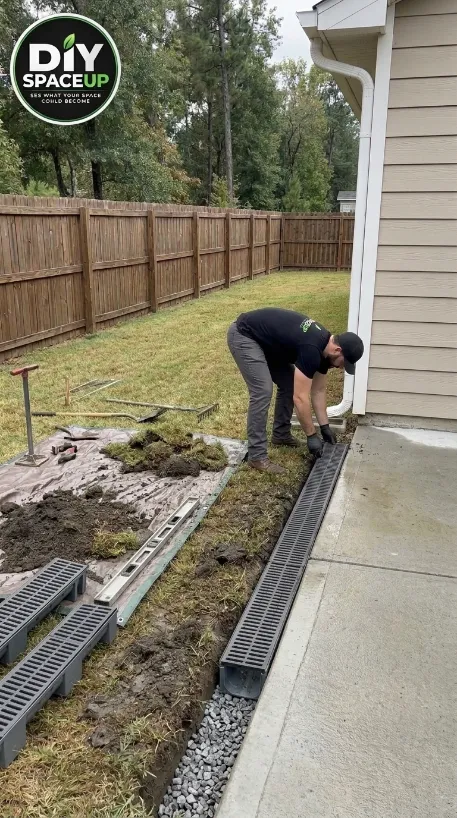
The linear drainage channel is positioned in the prepared trench beside the existing concrete surface.
The top of the finished grate needs to relate correctly to the surrounding surface.
This is particularly important beside concrete.
You do not want the finished lawn to form a ridge that blocks water from reaching the drain, nor do you want the drain sitting excessively low and becoming a trip or debris-collection problem.
Check the alignment continuously.
Use a level or laser level to verify the installation rather than relying only on visual judgment.
Step 6: Connect the Drainage Outlet
The channel must have a verified discharge path.
This is the part that should never be guessed from a photograph.
Depending on the property and selected system, the outlet may connect to an approved drainage route, another drainage component, or an appropriate discharge location.
Before closing the trench, verify:
the outlet is actually connected;
the route is open;
fittings are compatible;
water has somewhere appropriate to discharge;
the installation complies with applicable local requirements.
Never assume that a hidden pipe exists simply because water disappears from the grate.
Step 7: Test the Drain Before Closing Everything
This is one of the most useful quality-control steps in the entire project.
Introduce water into the drainage system in a controlled way and observe what happens.
Check that:
water enters the channel;
the channel is not blocked;
water travels toward the intended outlet;
there are no obvious leaks at accessible connections;
the surrounding soil is not washing into the system;
water does not back up toward the house.
Correct problems now.
Once the trench is covered and the lawn is restored, finding an installation problem becomes much harder.
Step 8: Backfill Around the Drainage System
Once the drainage system has passed inspection, backfill around it according to the manufacturer’s requirements.
Use the appropriate material for the specific system.
Place fill in controlled layers rather than dumping large quantities around the channel.
Compact where required while protecting the drain and maintaining the intended grade.
The finished surface should guide water toward the collection point rather than away from it.
Step 9: Restore the Lawn
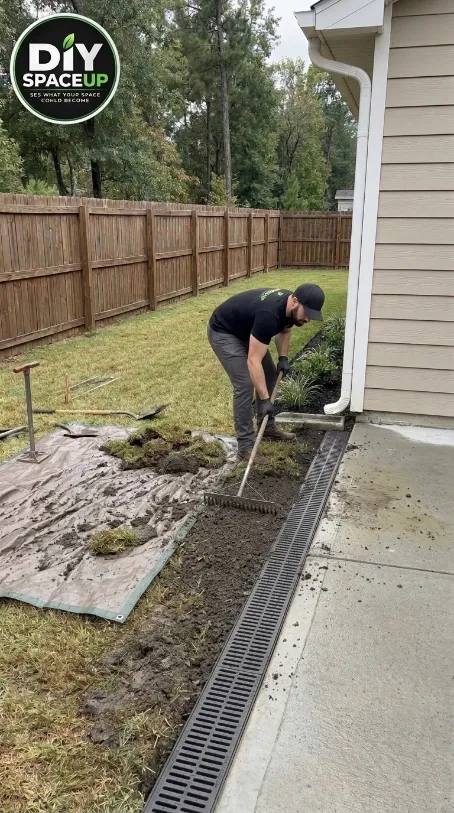
The final reference shows the surrounding lawn restored around the completed drainage installation.
Prepare the soil around the drain so the finished grade transitions naturally into the existing lawn.
The area around the installed drainage channel is backfilled, graded, and prepared for lawn restoration.
Replace saved sod where appropriate or install new sod.
Press the turf firmly into contact with the soil and water it according to the turf supplier’s recommendations.
Do not bury the drain grate under soil or grass.
The finished grate should remain accessible for inspection and cleaning.
Step 10: Clean the Area and Inspect the Finished Drain
Remove:
excess soil;
loose aggregate;
construction debris;
unused materials;
damaged turf.
Rake the surrounding lawn and inspect the complete installation.
Check the grate, edges, lawn transition, downspout area, and visible drainage components.
A drainage system is not finished simply because it looks clean. It should also be accessible for future inspection.
The completed drainage channel is integrated beside the concrete surface with the surrounding lawn restored.
Maintenance After Installation
A linear drain collects exactly what flows across the surface—including leaves, grass clippings, soil and other debris.
Inspect the grate regularly, especially:
after heavy storms;
during autumn leaf season;
after nearby landscaping work;
when water begins draining more slowly.
Remove debris before it blocks the openings.
Keep surrounding soil and mulch below the grate rather than allowing them to gradually bury the drainage channel.
If the system connects to an underground outlet, inspect accessible cleanouts or outlet points according to the installed system.
What About the Downspout?
The downspout visible in the project should be considered as part of the overall drainage strategy.
Do not automatically connect a downspout directly into a new drain simply because it is nearby.
First determine:
where the roof water currently goes;
whether the existing discharge contributes to the problem;
whether the selected drainage system is designed to receive that flow;
where the combined water would discharge;
whether that arrangement is permitted locally.
A channel drain intended for surface runoff is not automatically a substitute for a dedicated downspout drainage system.
Common Mistakes
Mistake
Better Approach
Digging without locating utilities
Locate underground services first
Installing a drain without planning the outlet
Determine the complete drainage route before excavation
Using loose soil as the base
Prepare a stable base appropriate to the system
Ignoring the existing grade
Establish elevations before digging
Installing the grate too high
Coordinate the grate with the surrounding finished grade
Installing the drain too low
Maintain the required surface relationship and manufacturer specifications
Assuming any gravel will work
Use material appropriate to the drainage assembly
Filling the trench before testing
Test the system while connections remain accessible
Covering the grate with soil
Keep the grate exposed and serviceable
Sending water onto a neighboring property
Use an approved discharge solution
Copying dimensions from a photo
Measure the actual property
Treating the channel as a complete solution for every water problem
Identify all sources and flow paths first
Is This a DIY Project?
The physical landscaping work can be manageable for an experienced DIYer, particularly when the drainage run is short and accessible.
The more difficult part is often water management rather than digging.
Consider professional help when:
water is affecting the foundation;
the property has significant elevation changes;
a large amount of stormwater is involved;
excavation is close to the house foundation;
buried utilities are complicated;
the proposed outlet requires connection to a regulated system;
the drainage solution could affect neighboring properties;
the required excavation becomes deep or unstable.
A professional assessment can be especially valuable when the visible muddy area is only one symptom of a larger grading or drainage problem.
Estimated Project Cost
Actual cost varies significantly with drain length, excavation conditions, aggregate quantity, sod, outlet requirements, local labor rates, and whether equipment is purchased or rented.
Cost Category
Typical Planning Consideration
Channel drain
Main system cost varies by length and load rating
Grates/fittings
Depends on the selected system
Aggregate/base
Depends on trench size
Topsoil/sod
Depends on restoration area
Fabric
Depends on soil and system design
Hand tools
Lower cost if already owned
Laser level
Useful upgrade for accurate grading
Plate compactor
Often worth renting for a one-time project
Excavation equipment
May be unnecessary for a small trench
Treat these as budgeting categories rather than a universal project price.
Tools That Actually Make Sense
The goal is not to buy every tool. Choose equipment based on the amount of work and the accuracy required.
For layout and grade control, a laser level can be one of the most useful upgrades because drainage depends on elevation rather than appearance alone.
For preparing and compacting aggregate, a plate compactor can save substantial manual effort on a larger installation. For a single backyard project, renting one may be more sensible than purchasing it.
For excavation, a quality digging shovel, landscape rake, wheelbarrow, and hand tamper cover much of the work on a smaller installation.
For restoring the lawn, a sod cutter is worth considering when a substantial amount of existing turf needs to be removed cleanly.
And for basic layout, a durable 25-foot tape measure, string line, and marking paint are inexpensive tools that are useful long after this project is finished.
The important purchase is the drainage system itself: choose a compatible channel, grate, fittings, and outlet components rather than mixing parts based only on appearance.
Final Quality Check
Before calling the project complete, walk the entire drainage route.
Confirm that:
the grate is secure;
the finished grade directs surface water toward the drain;
the lawn transitions cleanly into the drainage area;
the outlet works;
no soil is washing into the channel;
the downspout does not create an unresolved drainage problem;
the surrounding concrete remains accessible;
the grate can be removed for maintenance;
the lawn is properly established;
water has an appropriate final destination.
Then test the system again during the next substantial rainfall.
The best drainage project is one that quietly does its job without becoming the most noticeable feature of the yard.
We use cookies and similar technologies to help our website function properly, understand how visitors use the site, and improve your experience. You can accept or manage your preferences at any time. Some features may not work as intended if certain cookies are disabled.
Functional
Always active
The technical storage or access is strictly necessary for the legitimate purpose of enabling the use of a specific service explicitly requested by the subscriber or user, or for the sole purpose of carrying out the transmission of a communication over an electronic communications network.
Preferences
The technical storage or access is necessary for the legitimate purpose of storing preferences that are not requested by the subscriber or user.
Statistics
The technical storage or access that is used exclusively for statistical purposes.The technical storage or access that is used exclusively for anonymous statistical purposes. Without a subpoena, voluntary compliance on the part of your Internet Service Provider, or additional records from a third party, information stored or retrieved for this purpose alone cannot usually be used to identify you.
Marketing
The technical storage or access is required to create user profiles to send advertising, or to track the user on a website or across several websites for similar marketing purposes.