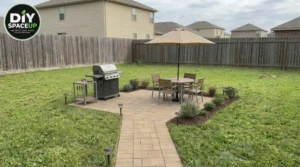
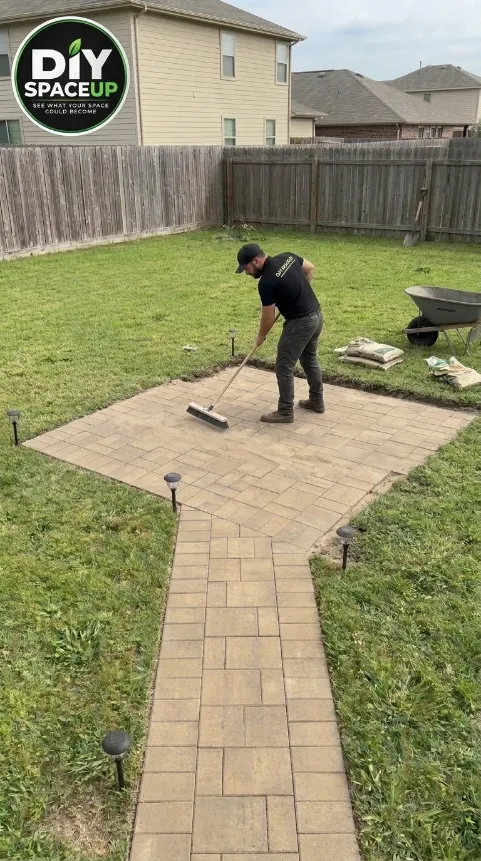
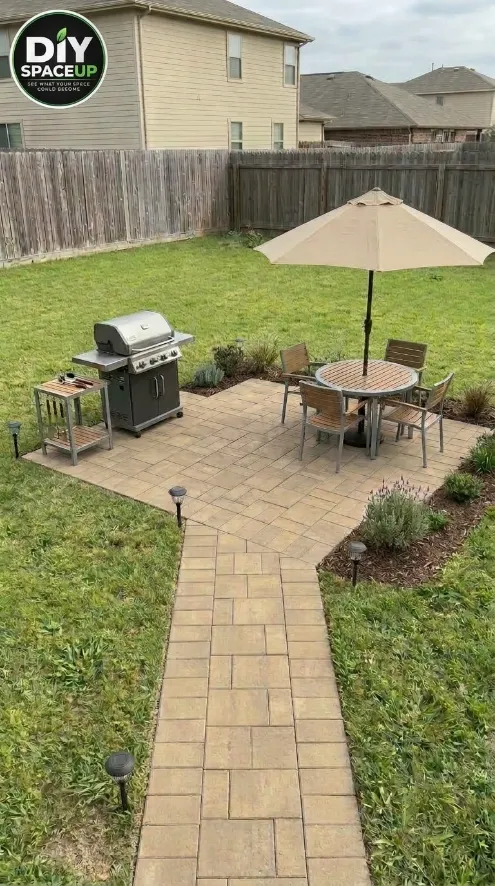
A finished paver patio and connected walkway create a practical outdoor living area in the backyard.
How to Build a Paver Patio and Walkway
A backyard transformation from an ordinary lawn into a functional paver patio and connected walkway, creating a dedicated outdoor space for dining, grilling, and relaxing.
A patch of ordinary backyard lawn can become much more useful when the right hardscape is built into it. In this project, the goal was to create a dedicated outdoor patio with a connecting walkway—enough space for a dining set, umbrella, grill, and comfortable circulation without turning the entire backyard into hardscape.
The finished result looks simple, but a durable paver patio is really a series of layers working together. The pavers are only the surface you see. The long-term performance depends heavily on the excavation, drainage, subgrade preparation, aggregate base, bedding sand, edge restraint, and compaction underneath.
This guide walks through the project in that order so you can plan a similar patio and walkway with the construction logic a professional installer would use.
Affiliate disclosure: As an Amazon Associate, DIY SpaceUp earns from qualifying purchases. Some links below are affiliate links, which means we may earn a commission at no extra cost to you.
Table of Contents
What We’re Building
The project consists of two connected elements:
Component
Purpose
Paver patio
Creates the main outdoor living and dining area
Paver walkway
Connects the patio to the surrounding yard
Compacted subgrade
Provides the prepared foundation below the pavement system
Aggregate base
Provides structural support and helps distribute loads
Bedding sand
Creates the thin leveling layer immediately below the pavers
Concrete pavers
Form the finished walking surface
Edge restraints
Help prevent lateral movement at exposed edges
Joint sand
Fills the joints and helps lock the pavers together
Landscape planting areas
Define the patio without covering the entire yard
Outdoor furniture and grill
Complete the usable finished space
The reference project is a pedestrian/residential patio and walkway, not a driveway. If vehicles will use the area, the pavement structure, paver thickness, base design, drainage and engineering requirements need to be reconsidered.
Before You Start: Decide Whether the Site Is Suitable
The first decision is not which paver to buy. It is whether the proposed location can support a properly drained, stable pavement system.
Walk the entire proposed patio and walkway area after rain if possible.
Look for:
standing water;
soft or muddy areas;
water flowing toward the house;
downspouts discharging into the proposed patio;
low points;
tree roots;
irrigation lines;
buried utilities;
slopes;
existing concrete or other hardscape;
property-line constraints.
A paver surface needs positive drainage. CMHA guidance treats drainage and pavement grade as fundamental parts of the pavement system, not as an afterthought. A slope around 2% is a common planning target for directing surface water, but the appropriate slope depends on the site, local requirements, drainage design, and the surrounding elevations. Masonry & Hardscapes Association
Check Local Requirements
Before excavation, verify:
local setback requirements;
property-line restrictions;
stormwater requirements;
permit requirements;
utility-marking requirements;
HOA restrictions if applicable;
accessibility requirements if the walkway serves an accessible route.
There is no single “worldwide” patio specification that replaces local requirements. Use recognized paving standards and manufacturer instructions, then adapt the design to the actual site and jurisdiction.
Plan the Patio and Walkway Together
One important feature of this project is that the walkway is not an unrelated path added later. It connects directly into the patio.
Lay out both areas before excavation begins.
Use stakes and string lines to establish:
patio corners;
walkway width;
walkway centerline;
finished edges;
transitions;
approximate finished elevations.
For a professional-looking installation, spend time on layout.
A straight walkway should actually be straight. A patio should have consistent edges and deliberate proportions rather than simply following whatever shape the excavation happens to produce.
A STANLEY FATMAX 25-Foot Tape Measure and a long DEWALT 48-Inch I-Beam Level are useful here because layout errors become much harder to correct once the base is installed.
Calculate the Finished Elevation
The most important elevation is not the top of the grass.
You need to know where the finished paver surface will sit.
The exact base thickness should be determined from the soil, drainage, climate, expected use and applicable local specification.
Do not simply choose a thickness because it worked for another backyard.
Mark the Full Excavation Area
Mark the patio and walkway, then extend the excavation far enough to accommodate the planned edge restraints and working room.
Do not make the excavation exactly the size of the visible finished pavers and then discover that there is no room to construct the edge system.
A good layout should account for:
paver dimensions;
pattern;
cuts;
edge restraints;
transitions;
drainage;
surrounding landscape.
For complex shapes, calculate the area carefully before ordering material.
Order Extra Pavers
Pavers will need to be cut around:
patio edges;
walkway transitions;
corners;
planting areas;
irregular boundaries.
Ordering only the exact calculated square footage leaves no room for cuts, breakage or future repairs.
A reasonable project allowance is commonly 5–10% extra, with more potentially appropriate for complicated patterns or many cuts.
Mark Utilities Before Digging
Before excavation, have underground utilities located according to the requirements of your location.
Never assume that a shallow-looking backyard is free of buried infrastructure.
Potential hazards include:
electrical cables;
gas lines;
irrigation;
water lines;
drainage;
communications cables.
If the patio approaches the house, also pay attention to downspouts, cleanouts, utility access and any drainage infrastructure that must remain accessible.
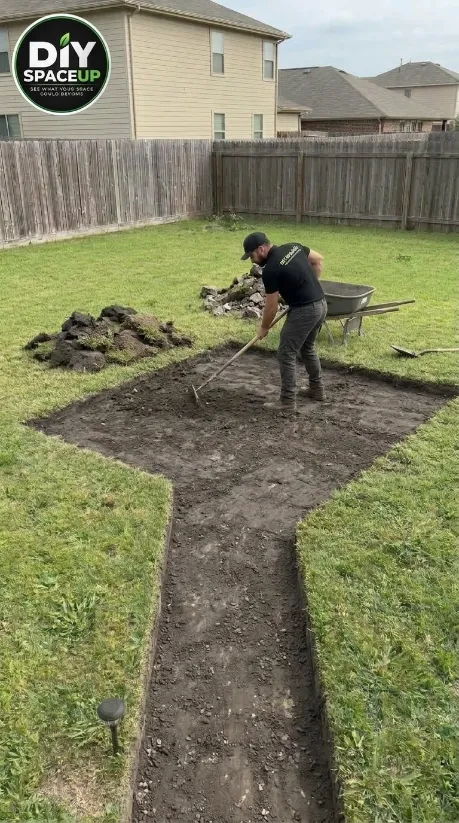
Excavate the Patio and Walkway
Once the layout and utilities are established, remove the existing turf and excavate the entire pavement footprint.
The objective is not simply to remove enough soil for the pavers.
You are creating room for the entire pavement assembly.
That means accounting for:
finished paver thickness;
bedding sand;
aggregate base;
any additional depth required by the actual subgrade and design.
The required base thickness is site-specific. Pedestrian/residential interlocking concrete pavements commonly use 60 mm (2⅜-inch) pavers in CMHA guidance, but the base below them still needs to be designed for the soil and site conditions. Masonry & Hardscapes Association
Protect the Existing Lawn
Keep the excavation boundaries clean.
Avoid unnecessarily damaging the surrounding lawn, especially where the finished walkway will meet existing grass.
The cleaner the excavation edges, the easier it will be to restore the surrounding landscape later.
Evaluate the Exposed Subgrade
The patio and connected walkway are excavated before the subgrade and aggregate base are prepared.
Once excavation is complete, inspect the soil.
This is one of the stages that separates a durable patio from a patio that settles.
The subgrade should be:
reasonably uniform;
free of organic material;
properly shaped for drainage;
compactable;
free of obvious soft spots.
If you encounter soft, wet or unstable soil, do not simply bury it under more aggregate.
Remove or otherwise address unsuitable material according to the site conditions and design.
For difficult soils, expansive soils, poor drainage, steep sites, or areas subject to significant seasonal movement, professional site-specific advice may be appropriate.
Establish the Drainage Grade
Before placing the base, establish the intended slope.
The finished surface, bedding layer and base should work together rather than creating a low point that traps water.
For a typical patio next to a house, the design should generally direct water away from the structure unless a properly designed drainage system is intentionally provided.
Do not use the bedding sand to create drainage.
The CMHA specifically warns against using bedding sand to correct depressions in the aggregate base because irregularities can transfer through to the finished pavement. Masonry & Hardscapes Association
A Johnson Level & Tool 48-Inch Box Levelor comparable long level can help with smaller residential layouts, while a laser level becomes much more useful on larger patios or sites where several elevations must be coordinated.
Compact the Subgrade
The exposed soil needs to be compacted before the aggregate base is installed.
For larger residential projects, a plate compactor is far more appropriate than trying to compact the entire area by hand.
Work systematically across the excavation.
Pay particular attention to:
edges;
corners;
transitions;
the walkway connection;
areas that were recently excavated.
If the soil is too wet, compaction may not produce the intended result. Allow unsuitable conditions to improve or address the soil according to the site design rather than simply continuing to compact it.
Install the Aggregate Base in Controlled Lifts
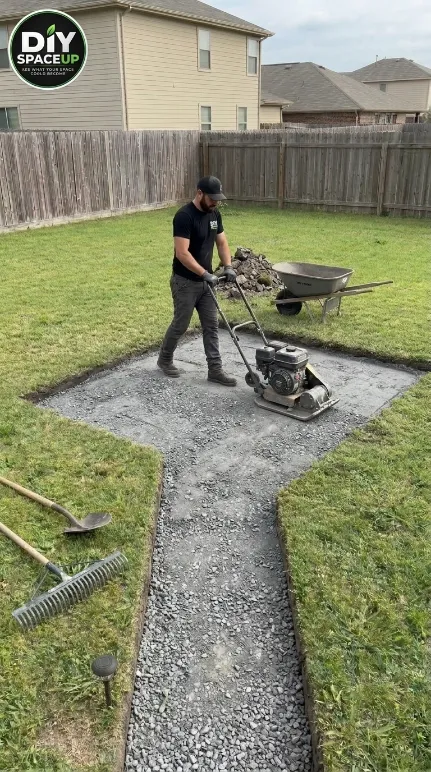
The aggregate base is compacted across the patio and connected walkway before the bedding sand and pavers are installed.
The aggregate base is one of the most important parts of the project.
Do not dump the entire thickness into the excavation and expect one pass of a compactor to create a uniformly dense foundation.
Place the aggregate in manageable lifts and compact each lift thoroughly.
For pedestrian and residential applications, CMHA guidance calls for aggregate base compaction to at least 98% of Standard Proctor density under ASTM D698. That is a technical construction target, not something that can reliably be verified by simply walking over the material or looking at it. Masonry & Hardscapes Association
On a serious professional installation, density testing can be appropriate.
Choosing the Aggregate
Use a properly graded aggregate base material appropriate for the local paving system.
Do not substitute random:
topsoil;
loose gravel;
decorative stone;
rounded river rock;
construction debris.
The base needs to compact into a stable, interlocking layer.
For a one-time DIY project, renting a suitable plate compactor is often more sensible than buying a large machine.
A Wacker Neuson plate compactor or comparable professional machine is an example of the equipment category used for this type of work. For a homeowner completing one patio, however, renting a plate compactor locally will often be the more economical choice.
Check the Compacted Base Before Moving On
This is an important pause point.
Before placing bedding sand, check:
elevation;
slope;
flatness;
compactness;
soft spots;
transitions;
drainage direction.
CMHA guidance calls for the compacted base surface to be smooth and within a specified tolerance; importantly, depressions should be corrected with base material, not hidden under extra bedding sand. Masonry & Hardscapes Association
This is where a DEWALT DW088CG Cross Line Laser or comparable laser level can become a worthwhile higher-ticket tool on a larger project.
If this is a one-off patio, renting a laser level may make more sense than buying one.
Install Edge Restraints
Edge restraint is not just decorative.
The restraint system helps keep the pavers from spreading laterally under use.
Install the selected restraint system according to the manufacturer’s instructions and the actual pavement design.
CMHA specifications place edge restraints on the finished base rather than simply burying them in the bedding sand. Masonry & Hardscapes Association
The exact restraint product depends on:
pavement edge;
soil;
paver system;
expected loads;
drainage;
manufacturer requirements.
Do not assume that every plastic edge restraint is interchangeable.
Screed the Bedding Sand
Once the base and edge restraints are ready, install the bedding sand.
CMHA guidance specifies a nominal 1-inch (25 mm) uncompacted bedding layer, with an acceptable range depending on the application and specification. The important point is consistency. Masonry & Hardscapes Association
Use screed rails or another controlled method to create a uniform surface.
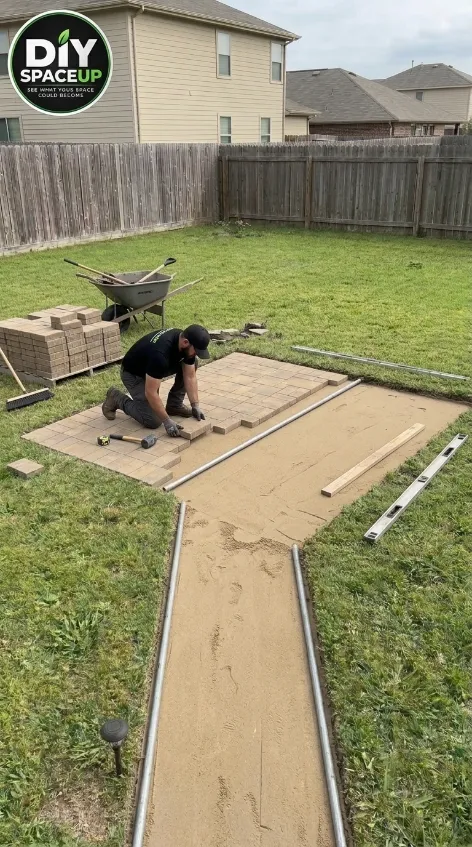
A uniform bedding layer is screeded before the concrete pavers are progressively installed across the patio.
The sand should not be used to compensate for a badly graded base.
If the base has a dip, fix the base.
Do not bury the problem under extra sand.
For the bedding material, CMHA recommends sand meeting the appropriate ASTM C33 or CSA A23.1 grading requirements and specifically warns against using mason sand, stone dust, or screenings as bedding sand. Masonry & Hardscapes Association
Lay the Pavers
Now begin installing the concrete pavers according to the selected pattern.
The exact pattern in this project can be adapted to the paver style, but the installation principles remain the same:
start from a controlled reference edge;
keep bond lines aligned;
maintain consistent joints;
avoid disturbing the screeded sand;
periodically check alignment;
keep the working area organized.
CMHA guidance indicates typical paver joints in the range of approximately 2–5 mm, subject to the actual paver manufacturer’s recommendations and the product design. Masonry & Hardscapes Association
Do not walk heavily across exposed bedding sand.
Place pavers progressively so the finished surface is built over undisturbed, properly screeded bedding material.
Build the Walkway Connection
The walkway should be treated as part of the same pavement system.
Where the path meets the patio:
maintain the intended elevation;
maintain the drainage grade;
keep the pattern aligned where practical;
avoid creating a lip;
maintain the edge restraint system;
make necessary cuts cleanly.
This connection is visually important and functionally important.
A walkway that meets the patio at the wrong elevation can create a trip hazard or collect water.
Cut the Edge Pavers
Most patios will require cuts.
Use a proper wet saw or paver-cutting system for clean, controlled cuts.
A DEWALT D24000 Wet Tile Saw is an example of the type of wet-cutting equipment that can be useful for detailed residential hardscape work, although the appropriate saw depends on the paver material, thickness and manufacturer’s recommendations.
For a one-time project, renting a suitable paver saw can be much more practical than buying one.
Wear appropriate eye, hearing and respiratory protection according to the cutting method and manufacturer’s instructions.
Do not use dry cutting methods indoors or in poorly ventilated areas.
Compact the Installed Pavers
Once enough pavers are installed, compact the surface according to the paver manufacturer’s instructions.
CMHA recommends a vibrating plate compactor for consolidating the pavers and joint/bedding materials. Masonry & Hardscapes Association
For concrete pavers, use the appropriate protective pad or machine setup recommended for the product so the surface is not unnecessarily damaged.
Compact systematically rather than repeatedly concentrating on one small area.
The objective is to seat the pavers into the bedding layer and establish a stable surface.
Add the Joint Sand
After the pavers have been properly seated, sweep the appropriate jointing sand across the surface.
The joint material needs to match the paver system and joint dimensions.
CMHA notes that joint sand may use materials meeting ASTM C144 or appropriate alternatives depending on the system, while the bedding sand and joint sand should not automatically be treated as the same material. Masonry & Hardscapes Association
For many residential installations, a compatible polymeric jointing sand can be a useful option when permitted by the paver manufacturer and appropriate for the climate and joint configuration.
A product such as Techniseal HP NextGel Polymeric Sand is the kind of specialized consumable worth considering, but the exact product should be selected based on the paver manufacturer’s instructions and local conditions.
Do not choose polymeric sand simply because it is marketed as an upgrade.
Compact and Refill the Joints
After sweeping the joint material into the gaps, compact the pavers again as directed by the selected joint-sand system.
The finished pavers are swept and the joints are completed before the patio is furnished.
Then inspect the joints.
Low joints should be refilled.
The objective is to have the joint material properly seated throughout the full accessible joint depth.
Do not rush this stage.
Incomplete joints can contribute to movement, erosion, weed growth, or premature loss of joint material.
Activate or Set the Jointing Material Correctly
If you are using a polymeric product, follow that product’s exact installation instructions.
Depending on the product, activation may involve controlled watering.
Avoid flooding the surface.
Excessive water can wash material out of the joints before the binder has properly set.
Weather also matters.
Do not install polymeric jointing material during conditions outside the manufacturer’s recommended temperature, moisture or rainfall window.
Clean the Finished Surface
Once the joints are properly installed, clean the paver surface.
The reference project shows the surface being swept clean after the joint material is distributed.
Use a stiff outdoor broom suitable for the paver surface and sweep material away from the finished pavement.
Do not leave piles of jointing material sitting on the surface longer than the manufacturer’s instructions allow.
The finished patio should have:
clean paver faces;
full joints;
consistent lines;
no large piles of residual sand;
no visible construction debris.
Restore the Surrounding Landscape
Only after the hardscape is structurally complete should the surrounding lawn and planting areas be finished.
The reference project uses planting beds around portions of the patio rather than extending pavers across the entire yard.
This is a useful design principle: the hardscape does not need to consume the entire available space.
Regrade small disturbed areas as needed without directing soil or mulch onto the new pavement.
Keep planting and irrigation from creating persistent wet areas along the pavement edge.
Add the Outdoor Living Elements
The final stage is where the patio becomes an outdoor room.
The supplied finished reference shows:
an outdoor dining table;
multiple chairs;
a large patio umbrella;
a grill;
a small side/work table;
surrounding planting;
pathway lighting.
These are finish-stage elements, not construction components.
Place furniture only after the paving surface and joints have properly settled or cured according to the materials used.
Choosing the Furniture
For an exposed patio, choose outdoor furniture rated for the expected weather conditions.
A powder-coated aluminum dining set can be easier to maintain than untreated outdoor furniture, while wood can provide a warmer appearance but may require more maintenance.
A cantilever or offset-style umbrella can also provide usable shade without putting a central pole directly through the middle of the dining area.
These are design choices rather than requirements of the paving system.
Safety Checklist
Before excavation
Locate underground utilities.
Check local permit and setback requirements.
Confirm drainage direction.
Identify irrigation and drainage lines.
Establish safe excavation boundaries.
During excavation
Wear safety footwear.
Wear gloves when handling sharp aggregate or pavers.
Use eye protection.
Keep excavated material away from unstable edges.
Do not enter an unsafe deep excavation.
During compaction
Wear hearing protection.
Wear eye protection.
Follow the compactor manufacturer’s operating instructions.
Keep hands and feet away from moving components.
Never bypass safety controls.
Be especially careful around edges and slopes.
During cutting
Use the correct blade and machine for the paver.
Follow the saw manufacturer’s instructions.
Control dust appropriately.
Wear eye and hearing protection.
Use respiratory protection where required by the cutting method and product.
Keep bystanders away from the cutting area.
During installation
Use proper lifting technique for heavy pavers.
Avoid repeatedly carrying large quantities by hand when mechanical handling is practical.
Keep the work area organized.
Do not leave loose pavers where someone can trip over them.
How Much Base Do You Need?
There is no responsible single number for every backyard.
A professional base design depends on:
soil type;
drainage;
climate;
freeze-thaw exposure;
groundwater;
expected traffic;
pavement use;
paver thickness;
local specifications.
For a pedestrian/residential patio, CMHA references 60 mm pavers as a common thickness, while heavier vehicular applications require different pavement structures and thicker units. Masonry & Hardscapes Association
For this reason, treat any generic base-depth chart you see online as a planning starting point, not a universal engineering specification.
If the soil is weak, expansive, poorly drained or subject to significant frost movement, get site-specific advice rather than simply adding more sand.
What You May Actually Want to Buy or Rent
The most useful purchases for this project are not necessarily the most expensive ones.
Measuring and Layout
A STANLEY FATMAX 25-Foot Tape Measure is inexpensive and useful for nearly every stage.
A DEWALT 48-Inch I-Beam Level helps with patio edges, grade checks and layout.
For larger patios, a DEWALT Cross Line Laser or comparable outdoor-capable laser can save considerable time when transferring elevations.
Excavation
A good digging shovel, square shovel, landscape rake and wheelbarrow are basic necessities.
A Razor-Back Landscape Rake or comparable heavy-duty grading rake is useful for distributing aggregate and cleaning the work area.
For larger excavation, renting a compact machine can make sense, but only if the site and access justify it.
Compaction
A plate compactor is one of the most important pieces of equipment on this project.
For a one-time DIY installation, renting a plate compactor is often smarter than buying one.
If you do hardscape work regularly, a professional Wacker Neuson Plate Compactor or comparable machine becomes a legitimate higher-ticket equipment consideration.
Paver Cutting
A quality wet saw can produce cleaner cuts than improvised cutting methods.
For occasional DIY use, renting a professional paver saw is usually more economical.
Joint Installation
A stiff push broom, polymeric-sand broom and appropriate watering equipment are inexpensive but important.
The jointing material itself should be selected based on the paver manufacturer’s recommendations rather than simply buying whichever bag is cheapest.
Estimated Project Cost
The largest cost variables are the pavers, excavation, aggregate volume, delivery, equipment rental and labor.
For a project of this general residential scale, a planning budget of roughly $3,000–$8,000+ can be reasonable depending on local material prices, site conditions and whether the work is DIY or contracted.
Category
Typical planning range
Pavers
$1,000–$3,000+
Aggregate base
$400–$1,200+
Bedding sand
$100–$300
Edge restraints
$100–$300
Joint sand
$100–$300
Equipment rental
$200–$800+
Delivery / hauling
$200–$600+
Landscape restoration
$200–$800+
Planning total
$3,000–$8,000+
These are planning ranges, not current quotations. A complicated excavation, poor soil, drainage work, long material-hauling distance, premium pavers or professional labor can push the cost substantially higher.
Furniture, grill, umbrella and decorative accessories are excluded.
Common Mistakes
Mistake
Better approach
Excavating only for the paver thickness
Plan the complete pavement assembly
Ignoring drainage
Establish finished elevations before installing the base
Leaving soft soil underneath
Address unsuitable subgrade before continuing
Installing all aggregate in one thick layer
Compact the base in controlled lifts
Using bedding sand to fix a bad base
Correct the aggregate base first
Using the wrong sand for bedding
Use sand meeting the applicable specification
Skipping edge restraints
Install an appropriate restraint system
Installing pavers on disturbed sand
Keep screeded bedding undisturbed
Cutting every edge freehand
Use the correct paver-cutting equipment
Skipping final compaction
Compact according to the paver/system instructions
Filling joints incompletely
Sweep, compact and refill until properly filled
Installing furniture immediately
Respect curing/setting requirements
Copying a base thickness from another project
Design for the actual soil, climate and use
Treating the walkway separately
Build its grade and base as part of the same pavement system
Maintenance After the Build
A properly installed paver patio is relatively straightforward to maintain.
Inspect it periodically for:
settled areas;
cracked or damaged pavers;
missing joint sand;
weeds;
moss or algae;
edge movement;
drainage problems.
If one paver eventually becomes damaged, one advantage of an interlocking system is that individual units can often be removed and replaced rather than demolishing the entire surface.
Keep drainage paths clear.
Do not allow downspouts or irrigation systems to continuously discharge onto one section of the pavement.
If joint sand is lost over time, repair the joints rather than simply sweeping loose sand across the entire surface without addressing the underlying cause.
Is Sealing Necessary?
Not always.
Sealing is a maintenance/design choice, not a requirement for every paver patio.
Depending on the paver material and desired appearance, a compatible sealer may help with staining or change the appearance of the surface.
But sealing should never be used to compensate for:
poor drainage;
unstable base;
incomplete joints;
incorrect installation;
settlement.
If you choose to seal, use a product compatible with the exact paver and jointing system and follow the manufacturer’s preparation and application requirements.
Final Project Check
Before considering the patio finished, walk the entire installation.
Check that:
the surface drains correctly;
there are no obvious low spots;
the walkway transitions smoothly into the patio;
the pavers are stable;
joints are filled;
edge restraints are secure;
cuts are clean;
no loose sand remains on the surface;
surrounding soil is not washing onto the pavers;
furniture sits level and stable;
drainage infrastructure remains accessible.
The finished reference shows why all of this preparation matters: the final patio looks like a simple outdoor living area, but that appearance depends on the layers underneath it.
The Finished Backyard Patio
The transformation is more than replacing grass with pavers. The new patio creates a defined destination in the backyard, while the walkway gives it a natural connection to the rest of the property.
The completed paver patio and connected walkway create a practical outdoor living and dining area in the backyard.
The dining set, umbrella and grill turn the finished surface into a practical outdoor living area, while the surrounding lawn and planting beds keep the project from feeling like one large slab of hardscape.
That balance is one of the strongest ideas to take from this project: build the hardscape where it improves how the yard is used, then let the landscape frame it.
We use cookies and similar technologies to help our website function properly, understand how visitors use the site, and improve your experience. You can accept or manage your preferences at any time. Some features may not work as intended if certain cookies are disabled.
Functional
Always active
The technical storage or access is strictly necessary for the legitimate purpose of enabling the use of a specific service explicitly requested by the subscriber or user, or for the sole purpose of carrying out the transmission of a communication over an electronic communications network.
Preferences
The technical storage or access is necessary for the legitimate purpose of storing preferences that are not requested by the subscriber or user.
Statistics
The technical storage or access that is used exclusively for statistical purposes.The technical storage or access that is used exclusively for anonymous statistical purposes. Without a subpoena, voluntary compliance on the part of your Internet Service Provider, or additional records from a third party, information stored or retrieved for this purpose alone cannot usually be used to identify you.
Marketing
The technical storage or access is required to create user profiles to send advertising, or to track the user on a website or across several websites for similar marketing purposes.