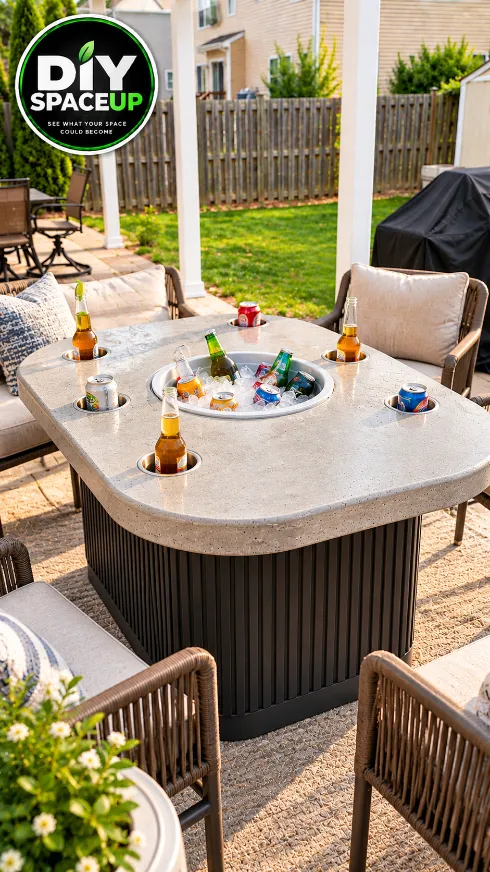
A multifunctional DIY concrete patio table with a built-in ice cooler and six drink holders, designed for backyard dining and entertaining.
DIY Concrete Patio Table With a Built-In Ice Cooler and Drink Holders
See how a custom concrete tabletop combines backyard dining space, a removable center ice cooler and six drink holders in one practical outdoor DIY project.
We wanted a backyard table that could do more than simply hold plates and drinks.
The idea was to build one substantial outdoor table with three functions in the same surface: a full-size dining and serving area, a recessed center basin that can be filled with ice for cold drinks, and six individual drink holders around it.
Looking closely at the build, this isn’t simply a concrete slab placed on a base. The important work happens before the concrete is poured. The tabletop shape, cooler opening, six cup-holder openings, reinforcement, edge form and final base all have to work together.
The finished project can be a great centerpiece for cookouts, but concrete is extremely heavy. Treat the dimensions below as planning guidance rather than dimensions measured from the photos, and size the structure for your own patio, basin and materials.
Affiliate disclosure: As an Amazon Associate, DIY SpaceUp earns from qualifying purchases. Some links below are affiliate links, which means we may earn a commission at no extra cost to you.
Table of Contents
What We’re Building
The finished table has a thick rounded-rectangle concrete top supported by a wide central pedestal-style base. A removable round basin sits in the center of the tabletop and functions as an ice cooler.
Six circular openings are positioned around the cooler for drinks.
The reference build also uses a dark vertically ribbed finish around the base, creating a cleaner furniture-like appearance instead of leaving the supporting structure exposed.
Component
Purpose
Concrete tabletop
Main work, dining and serving surface
Center basin
Removable ice-and-drink cooler
6 circular inserts/openings
Individual drink holders
Reinforcement
Helps control cracking and strengthen the slab
Edge form
Creates the rounded tabletop perimeter
Wide center base
Supports the heavy top
Ribbed exterior finish
Gives the base its finished appearance
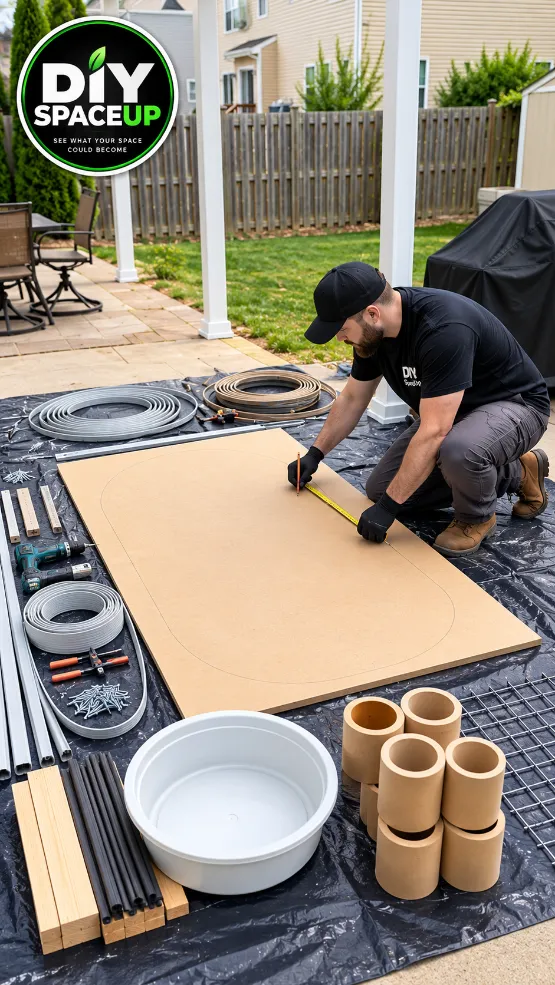
The build starts with a full-size tabletop template so the rounded perimeter, center cooler and six drink holders can be planned before any concrete is poured.
Step 1: Decide the Finished Size Before Building the Form
Start with the space, not the concrete.
Allow enough room for chairs to pull out comfortably and for people to move around the table. Also make sure the completed table can actually be moved from the casting location to its final position if you aren’t casting it nearby.
For a project inspired by the photos, a useful planning range might be:
Measurement
Planning Range
Tabletop length
60–72 in
Tabletop width
36–42 in
Finished table height
About 29–30 in
Concrete top thickness
About 2–3 in*
Center cooler opening
Sized to the actual basin
Drink-holder openings
Sized to the actual inserts
Number of drink holders
6
*The required thickness depends on the concrete system, reinforcement, spans, loads and manufacturer recommendations. Don’t choose slab thickness from appearance alone.
Step 2: Buy the Basin and Cup Inserts Before Cutting Anything
This is an easy detail to overlook.
Don’t cut a generic 18-inch circle because you intend to buy an 18-inch basin later. Buy the actual basin first and measure the portion that needs to pass through the concrete.
The same rule applies to the six drink holders.
The center basin needs a rim or another properly designed support so it cannot simply fall through the opening.
If you want the cooler to remain removable for cleaning—as it appears to be in this concept—don’t permanently cast the plastic basin into the slab unless the basin and design are specifically intended for that installation.
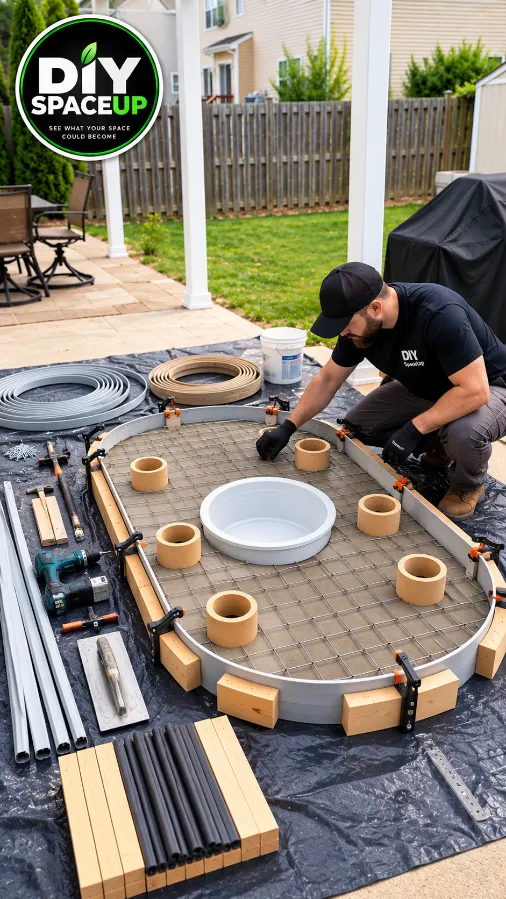
Before pouring concrete, the curved perimeter form, reinforcement, center cooler opening and six drink-holder forms are positioned and checked for proper spacing.
Step 3: Make a Full-Size Tabletop Template
The construction photos show the tabletop outline being drawn full-size on a large sheet before the pour.
This is a smart step because you can see the proportions before committing to concrete.
Draw the rounded rectangular perimeter first. Then establish the exact center for the cooler and arrange the six drink holders around it.
Check that every drink position leaves enough concrete between:
the cup opening and outside edge,
the cup opening and cooler,
neighboring openings.
Don’t crowd holes together merely to make the design symmetrical. Openings interrupt the concrete section and need adequate material around them.
Step 4: Build a Strong, Leak-Resistant Form
The perimeter form determines the final shape of the concrete top.
The reference build uses a flexible curved perimeter, allowing the ends and corners to flow continuously rather than creating sharp 90-degree corners.
Build the form on a flat, rigid casting surface. Secure the perimeter carefully so wet concrete cannot push it outward.
Seal joints where appropriate so cement paste doesn’t escape underneath the form.
Before pouring anything, check the overall length, width, diagonals and opening locations one final time.
Step 5: Create the Cooler and Six Drink-Holder Voids
The center basin and six smaller circular pieces shown during construction act as the basis for the openings in the finished top.
The important distinction is this:
The opening former and the finished insert do not necessarily have the same outside diameter.
Account for the rim, taper and required clearance of the actual component.
A small amount of planning here prevents a frustrating situation where the finished basin is 1/4 inch too large to fit the cured concrete.
Step 6: Add Appropriate Reinforcement
The construction image shows reinforcement being prepared for the tabletop.
This matters because the tabletop contains seven large interruptions: one center opening plus six drink-holder openings.
Reinforcement must remain inside the concrete section rather than resting directly against the bottom of the form.
A QLT Concrete Reinforcing Mesh or an appropriate reinforcement system can be useful, but reinforcement requirements vary with slab geometry, concrete product and structural design.
Cut reinforcement around the openings without leaving loose steel projecting into them.
For a large or unusually heavy tabletop, consult a concrete professional or engineer rather than treating a generic mesh layout as a structural specification.
Step 7: Choose Concrete Intended for the Application
Not every bag of concrete is ideal for a relatively thin furniture top.
Use a concrete mix suitable for the required section thickness and exterior exposure. Follow its specified water ratio rather than making the mix excessively wet simply because wetter concrete feels easier to spread.
A QUIKRETE Concrete Mix or suitable countertop/concrete product can be considered depending on the required thickness and local availability.
Follow the product manufacturer’s instructions for minimum thickness, mixing, reinforcement, curing and exterior use.
Step 8: Pour Around the Openings
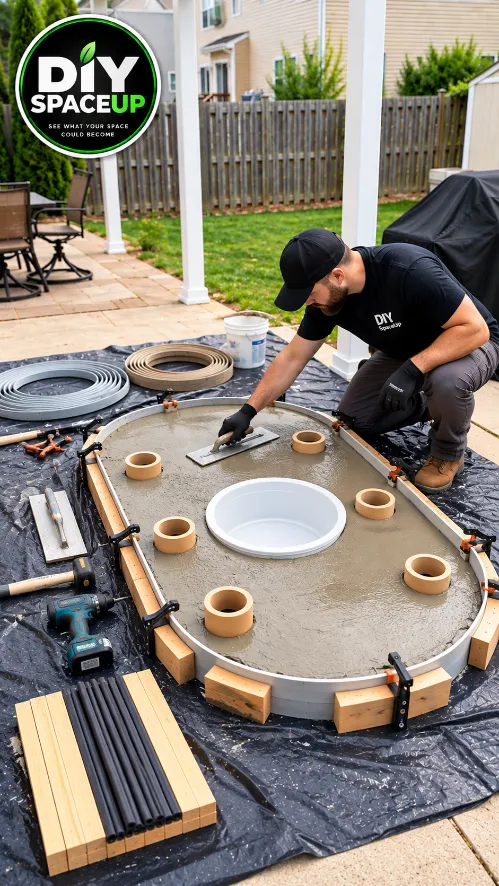
This is the stage visible in the third construction photo.
Place concrete progressively around the perimeter, center basin former and six drink-holder forms.
Don’t dump everything into one spot and hope it distributes itself.
Work the material carefully into confined areas, particularly between openings. Consolidate it sufficiently to reduce major voids without displacing the forms or reinforcement.
Fresh concrete is carefully leveled around the center cooler and six drink-holder forms while the perimeter form keeps the rounded tabletop shape.
Step 9: Finish the Surface Without Overworking It
Once the concrete has reached the appropriate stage, refine the surface.
The final table in the reference has a relatively smooth, understated concrete finish rather than an aggressively polished countertop appearance.
Avoid repeatedly adding water to the surface during finishing. Excess water can weaken the surface and contribute to cosmetic problems.
The rounded perimeter should also be smooth enough that people sitting around the table aren’t leaning against a sharp concrete edge.
Step 10: Let the Concrete Cure Properly
Finishing the surface doesn’t mean the tabletop is ready to use.
Concrete gains strength through curing.
Follow the concrete manufacturer’s curing instructions and don’t rush to strip, lift or heavily load the slab simply because the surface looks dry.
This is especially important around the cooler and drink-holder openings, where narrow concrete sections can be more vulnerable during handling.
Step 11: Carefully Remove the Form
Remove the perimeter and opening forms without aggressively prying against finished edges.
Inspect:
perimeter edges,
cooler opening,
six drink openings,
underside,
visible cracks,
honeycombing or significant voids.
Small cosmetic imperfections are different from structural damage. If you discover substantial cracking around an opening or across a narrow section, don’t simply hide it under sealer.
Step 12: Build a Base That Can Actually Support the Top
This is one area where appearance can be misleading.
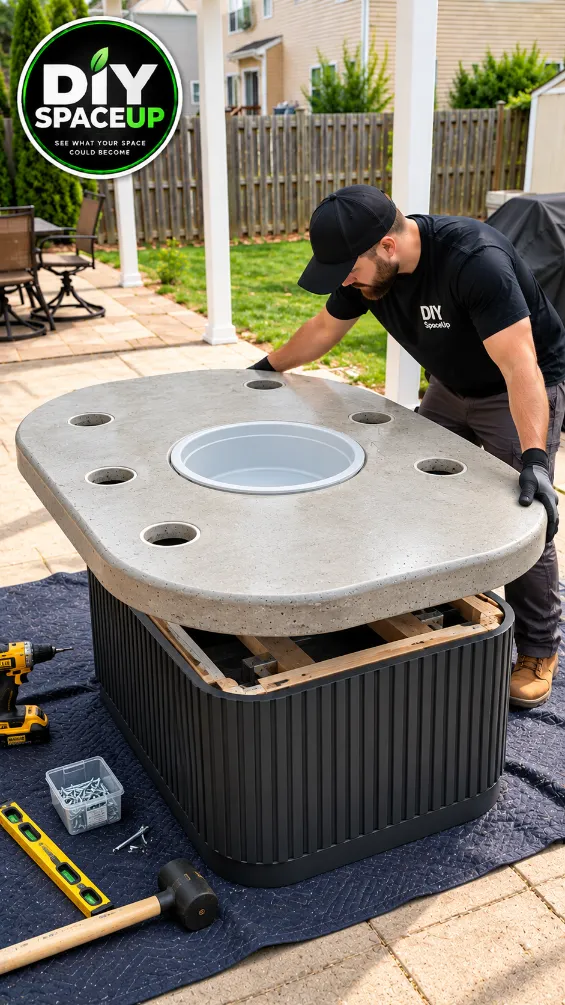
The finished photo shows a wide central pedestal with a dark vertical ribbed exterior. What we cannot determine from the finished photograph alone is the exact internal structural frame.
Therefore, don’t assume the decorative ribbed material itself supports the concrete.
The internal base must safely support the tabletop’s dead load plus normal use loads while resisting tipping and lateral movement.
A wide base is especially important because people may lean on the outer edge of the table.
How Heavy Will the Concrete Top Be?
Calculate this before deciding how you will lift or support it.
Normal concrete weighs roughly 145–150 lb per cubic foot. The center cooler and six drink openings reduce the actual volume, but a tabletop of this size can still weigh several hundred pounds.
For example, a hypothetical 66 × 40 × 2.5-inch solid slab would contain about 3.8 cubic feet before subtracting openings:
3.8 × 145–150 lb ≈ 550–570 lb.
That is only an illustration—not the weight of the photographed table.
Your actual weight depends on exact dimensions, thickness, concrete density and opening volume.
Never plan to manually lift a large tabletop like this with one or two people.
Step 13: Install the Top and Basin
Once the concrete has adequately cured and the structural base is complete, move the tabletop using an appropriate lifting plan.
The support should distribute the concrete load rather than creating isolated pressure points.
Set the center basin into its opening and verify that its rim is properly supported.
The basin should be easy to remove if the design relies on removal for draining and cleaning.
After curing, the heavy concrete tabletop is carefully positioned on its structural pedestal before the removable center cooler is put into service.
What About Drainage?
This is important because melted ice eventually becomes water.
The simplest approach for a removable basin is exactly that: remove it and empty the water manually.
A permanent drain can be added only if the basin is compatible with one and the hose can be routed safely through the pedestal without compromising the structure.
Don’t drill a random drain through a finished basin or structural component after construction without planning where the water will go.
Step 14: Seal the Concrete for Outdoor Use
An outdoor tabletop encounters water, food, sunlight, temperature changes and stains.
Use an exterior-compatible concrete sealer appropriate for a tabletop environment.
A product such as Foundation Armor Concrete Sealer may be worth considering depending on the desired finish and manufacturer-approved application. For surfaces that may contact food, confirm the selected product’s suitability and instructions rather than assuming every concrete sealer is appropriate.
Reapply according to the manufacturer’s maintenance schedule.
Step 15: Load the Cooler and Enjoy the Table
Once everything is cured, sealed and stable, the fun part is simple.
Fill the removable center basin with ice and chilled drinks. The six surrounding openings keep individual beverages within reach while leaving most of the concrete surface available for plates, serving dishes and conversation.
The finished concrete patio table combines a central ice-filled cooler, six individual drink holders and a full-size outdoor dining surface in one backyard centerpiece.
The biggest variables are the tabletop size, concrete system, base construction and whether you already own the tools.
Category
Typical Planning Allowance
Concrete & reinforcement
$60–$150
Form materials
$30–$80
Basin & drink inserts
$30–$100
Structural base
$75–$200+
Exterior finish/sealer
$30–$80
Approx. materials total
$225–$610+
These are planning ranges, not quotes. Local material prices can vary significantly.
Safety Checks Before Using the Table
Concrete furniture deserves more respect than an ordinary lightweight patio table.
Check
Why It Matters
Base structurally sound
Concrete top can weigh hundreds of pounds
Table doesn’t rock
Reduces tipping risk
Top fully supported
Avoids concentrated stress
Concrete adequately cured
Early handling can damage it
No major structural cracks
Especially important near openings
Edges smooth
Prevents cuts and scrapes
Cooler securely seated
Prevents it dropping through
Cup inserts secure
Prevents unexpected movement
Sealer suitable for use
Outdoor/tabletop compatibility matters
Patio is stable and level
Heavy furniture needs dependable support
Also use gloves, eye protection and appropriate respiratory protection when cutting dry cementitious products or generating concrete/silica dust. Follow the concrete and tool manufacturers’ safety instructions.
Common Mistakes to Avoid
Mistake
Better Approach
Designing the holes before buying inserts
Buy and measure the actual components first
Guessing tabletop thickness
Follow the selected concrete system’s requirements
Making the mix excessively wet
Follow the manufacturer’s water ratio
Letting reinforcement sit on the form bottom
Support it in the intended concrete section
Crowding holes together
Preserve adequate concrete between openings
Removing forms too early
Respect curing requirements
Treating decorative cladding as structure
Build a real load-bearing base underneath
Ignoring finished weight
Calculate weight before pouring
Moving the slab casually
Plan lifting before construction
Forgetting melted ice
Use a removable basin or planned drainage
A Few Important Questions Before You Build
Can I make the tabletop thinner to reduce weight? Only if the concrete system, reinforcement and structural design allow it. A thinner slab isn’t automatically safe simply because reinforcement was added.
Can the cooler stay permanently inside? It can be designed that way, but then drainage and cleaning become more important. A removable basin is much simpler for a DIY version.
Can I use the drink holes directly in the concrete? I prefer removable inserts or liners. They create a cleaner interface and are easier to clean than unfinished concrete recesses.
Will it survive winter? That depends on the concrete mix, curing, sealing, drainage and climate. In freeze-thaw regions, use materials specifically suitable for exterior freeze-thaw exposure and prevent water from remaining trapped in vulnerable areas.
Do I need a permit? A movable patio table normally isn’t treated like a permanent structure, but requirements vary. If the project becomes permanently anchored or incorporates utilities, check local requirements.
Why This Project Works
The best part isn’t simply the concrete.
It’s that the center of a large patio table—space that often ends up holding a decorative bowl—becomes useful. Drinks stay cold in the middle, six people get dedicated holders, and the surrounding tabletop remains usable for a backyard meal.
But the order matters:
measure the real inserts → create the template → build the form → position the openings → reinforce → pour → cure → build a genuinely structural base → install → seal → use.
That sequence is what turns the visual idea into a project that has a much better chance of working in the real world.
Sometimes a better backyard doesn’t need another piece of furniture. It needs one piece of furniture to do more.
We use cookies and similar technologies to help our website function properly, understand how visitors use the site, and improve your experience. You can accept or manage your preferences at any time. Some features may not work as intended if certain cookies are disabled.
Functional
Always active
The technical storage or access is strictly necessary for the legitimate purpose of enabling the use of a specific service explicitly requested by the subscriber or user, or for the sole purpose of carrying out the transmission of a communication over an electronic communications network.
Preferences
The technical storage or access is necessary for the legitimate purpose of storing preferences that are not requested by the subscriber or user.
Statistics
The technical storage or access that is used exclusively for statistical purposes.The technical storage or access that is used exclusively for anonymous statistical purposes. Without a subpoena, voluntary compliance on the part of your Internet Service Provider, or additional records from a third party, information stored or retrieved for this purpose alone cannot usually be used to identify you.
Marketing
The technical storage or access is required to create user profiles to send advertising, or to track the user on a website or across several websites for similar marketing purposes.