A buried downspout drain carries roof runoff away from the foundation and releases it through a pop-up emitter farther into the yard.
DIY Underground Downspout Drainage: How to Move Rainwater Away From Your Foundation
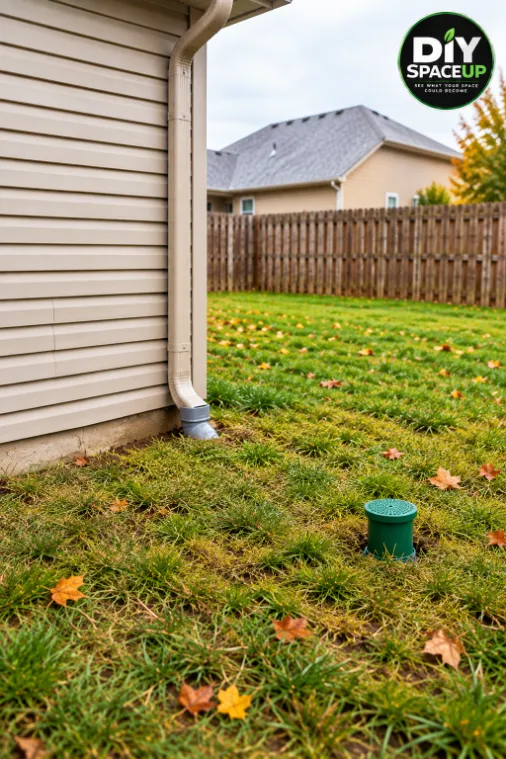
Finished DIY underground downspout drainage project showing the house downspout connected to a buried solid drain line and a green pop-up emitter positioned farther into the lawn.
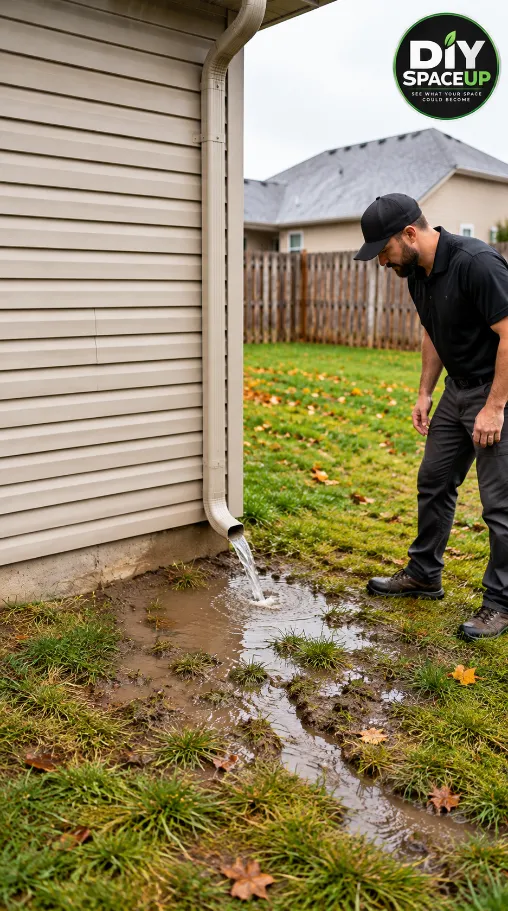
Water rushed down the gutter, poured out of the downspout, and landed in almost exactly the same spot beside the house.
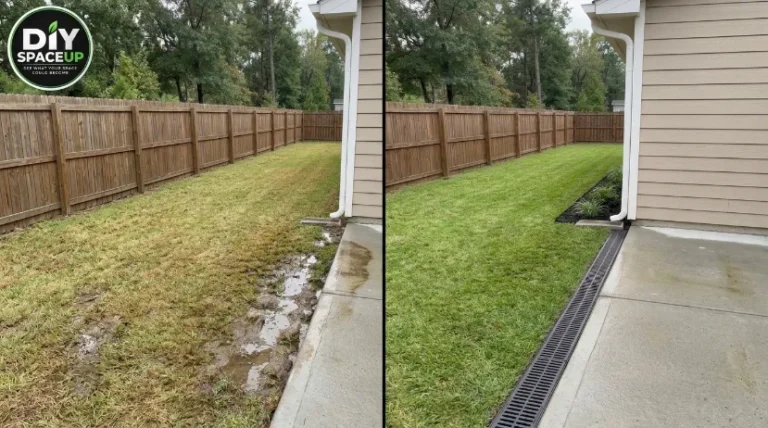
At first, it looked like a minor yard problem. But after enough rain, that patch of grass became muddy, water lingered beside the foundation, and the downspout was clearly doing only half its job.
It was collecting roof water—but it wasn’t carrying that water far enough away.
The solution shown in this project is surprisingly simple: connect the downspout to a solid underground drain pipe, slope that pipe away from the house, and terminate it farther into the yard with a pop-up drainage emitter.
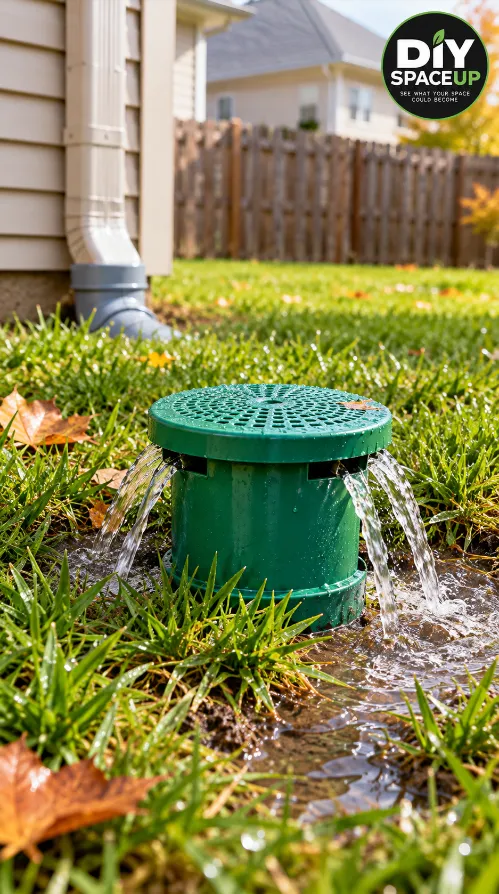
When rainwater enters the system, it travels through the buried pipe and reaches the emitter. Water pressure lifts the cap so the runoff can discharge onto a safer part of the yard. When the flow stops, the cap closes again.
The concept is simple. Getting the slope, discharge location, fittings, depth, and installation right is where the real work happens.
Affiliate disclosure: As an Amazon Associate I earn from qualifying purchases. Product links in this article may earn a commission at no additional cost to you.
Table of Contents
What This Project Actually Does
This is not a French drain.
A French drain normally collects groundwater through a perforated pipe surrounded by drainage aggregate. The system in this project does something different: it takes concentrated roof runoff directly from a downspout and transports it through solid, non-perforated pipe to another location.
NDS lists downspout drainage as one of the common uses for pop-up emitters. NDS
Component
Purpose
Existing gutter
Collects roof runoff
Downspout
Carries roof water toward ground level
Downspout adapter/elbow
Transitions into the underground system
Solid drain pipe
Carries water without intentionally releasing it beside the foundation
Pop-up emitter
Releases water at the remote discharge point
Proper slope
Allows gravity to move water toward the outlet
The finished installation is mostly invisible. Once the trench is backfilled and the grass recovers, only the downspout connection and small green emitter remain visible.
Why Dumping Water Beside the House Can Be a Problem
A short downspout outlet can repeatedly concentrate a large amount of roof runoff in one small area.
Depending on the property, soil and grading, that can contribute to muddy ground, erosion, water collecting near the foundation, and an inconvenient wet area after storms.
The goal isn’t simply to hide the pipe.
The goal is to move the discharge point to a suitable location where the water can safely disperse.
That distinction matters.
You don’t want to solve a wet spot beside your house by creating another problem beside a patio, walkway, neighboring property, septic area, or another structure.
Before You Dig: Find the Right Discharge Location
This is the most important planning step.
The pop-up emitter needs to be at a location that allows the system to drain by gravity. NDS specifies that the emitter must be lower than the point where stormwater enters the system. NDS
Look for a location that is:
downhill from the downspout when possible;
far enough from the foundation to improve the existing drainage problem;
able to disperse runoff without immediately sending it back toward the house;
away from neighboring property;
away from areas where discharged water could create a slipping or erosion problem;
accessible enough for future inspection and cleaning.
There isn’t one universal distance that works for every house. The correct location depends on the grade, soil, roof drainage volume, property boundaries and local drainage rules.
For more complex drainage conditions—or where you cannot obtain positive fall away from the house—professional evaluation may be more appropriate than simply burying a pipe.
Call Before You Dig
Never choose a trench route solely because it looks clear from above.
Electrical lines, gas, communications, irrigation and other utilities can be underground.
NDS installation guidance specifically calls for having utilities located before excavation. NDS
In the United States, follow your applicable utility-location requirements before digging.
Also check local rules concerning stormwater discharge. Some jurisdictions restrict where roof runoff can be directed.
Materials for This Downspout Drain Project
For a project like the one shown here, the shopping list is relatively short.
Material
What to Look For
Solid drain pipe
Compatible with your selected fittings
Downspout adapter
Correct size for existing downspout and drain pipe
Elbows/couplers
Compatible with the pipe system
Pop-up emitter
Correct size for the drain line
Appropriate connection sealant
Only where required by the fitting manufacturer
Gravel
Useful where specified around the outlet/weep area
Soil/turf
For restoring the trench
Pop-Up Drainage Emitter
For this project, a 4-inch NDS-style pop-up emitter is a logical product category to investigate. NDS offers several 3-inch and 4-inch configurations, including models supplied with elbows or adapters. NDS
Why it belongs here: this is the visible green outlet at the end of the system shown in the project.
Solid 4-Inch Drain Pipe
Use solid pipe, not perforated French-drain pipe, for the section whose purpose is simply transporting downspout water away from the foundation.
NDS documentation for roof-runoff drainage likewise specifies solid/unperforated piping for transporting runoff away from a building before other drainage components where applicable. NDS
Buying a specialized tool makes more sense when it solves a real installation problem, so these links belong near the stage where readers actually need them rather than being grouped into a large sales block.
Step 1: Watch What Happens During Rain
Before digging anything, observe the problem.
In our project, the downspout emptied immediately beside the house. During rain, the soil became saturated and muddy in that exact location.
That tells us both the source of the water and the location that needs relief.
The original downspout releases roof runoff directly beside the foundation, leaving a muddy, waterlogged area after rain.
If the water problem continues even when the downspout isn’t running, however, you may have additional grading or groundwater issues that this project alone won’t address.
Step 2: Plan the Underground Route
Choose the emitter location first, then establish a practical route between it and the downspout.
Keep the run as straightforward as possible.
Every unnecessary bend adds resistance and another potential place for debris to accumulate.
Measure:
Measurement
Record Yours
Downspout size
______
Pipe diameter
______
Total pipe run
______
Starting elevation
______
Outlet elevation
______
Total vertical fall
______
This is where many DIY installations succeed or fail.
The pipe must not accidentally rise somewhere in the middle and create a low section that traps water.
Step 3: Establish the Slope
For the type of high-capacity drainage installation documented by NDS, its installation instructions specify trenching at a minimum 1% slope away from the house. NDS
A 1% grade equals approximately:
Horizontal Run
Approximate Fall at 1%
10 ft
1.2 in
20 ft
2.4 in
30 ft
3.6 in
40 ft
4.8 in
Don’t blindly use those numbers without checking the requirements of the specific pipe and drainage products you purchase. Manufacturer instructions and site conditions come first.
A long level, string line or laser level can make this much easier.
Step 4: Dig the Trench
Now excavate along the planned route.
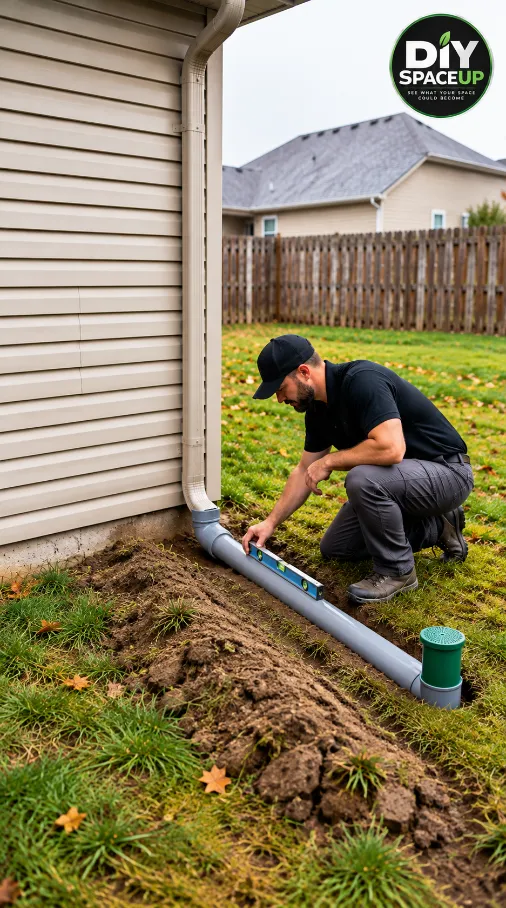
The photos from this project show the pipe running from the base of the downspout across the yard toward the emitter.
Check the drain pipe slope before backfilling to make sure rainwater can travel away from the house toward the pop-up emitter.
Notice something important here: the pipe is being checked before the trench disappears.
That’s exactly when problems should be discovered.
Don’t rush to backfill simply because everything fits.
Check the entire run first.
Step 5: Dry-Fit Everything
Connect the downspout transition, pipe sections, couplers, outlet elbow and emitter without permanently sealing everything initially.
NDS also recommends dry-fitting the drainage system before final assembly. NDS
Verify that:
every fitting matches;
the pipe reaches the intended outlet;
there are no unexpected high points;
the emitter is lower than the inlet;
the emitter can finish at the correct lawn elevation.
Only after the layout works should connections requiring permanent sealing be completed according to their manufacturer’s instructions.
Step 6: Connect the Downspout
Transition the existing downspout into the underground pipe using a properly sized adapter.
The connection should guide water cleanly into the pipe rather than allowing runoff to escape beside the foundation.
Avoid creating a complicated collection of improvised reducers if one correctly sized transition fitting will do the job.
Also think about maintenance.
Leaves and roof debris can eventually enter downspout drainage systems. A system that cannot be accessed or cleaned can become much harder to maintain.
Step 7: Install the Pop-Up Emitter
At the far end, connect the drain pipe to the appropriate elbow and pop-up emitter assembly.
NDS explains that the emitter opens as water pressure builds and closes as flow diminishes. The manufacturer recommends installing it at the system’s low point and positioning the cover at or below ground level. NDS
Its installation guidance also calls for a weep hole at the outlet elbow to help residual water escape. Follow the instructions for your specific emitter because fitting designs vary. NDS
The emitter should not sit buried beneath soil or turf.
It needs room to open.
The pop-up emitter opens as water reaches the end of the underground drain line, allowing roof runoff to discharge away from the house.
Step 8: Test It Before Backfilling
This may be the most valuable five minutes of the entire project.
Send water through the downspout or upstream drain connection while the pipe is still accessible.
Watch the system.
You want to see water travel toward the outlet, lift the emitter and discharge normally.
NDS specifically recommends testing flow, checking that the emitter opens and closes, and inspecting for leaks before finishing the installation. NDS
If water sits in the pipe because of an incorrect grade, fix the trench now.
After several feet of soil and grass are back in place, the same correction becomes much more frustrating.
Step 9: Backfill and Restore the Lawn
Once the system passes its test, carefully backfill around the pipe.
Avoid moving the pipe enough to destroy the slope you just established.
Compact the soil reasonably as you work rather than leaving a loose mound that will settle dramatically after the first heavy rain.
Restore the turf while keeping the pop-up emitter unobstructed.
After backfilling, the underground drain is hidden beneath the lawn while the pop-up emitter remains accessible for rainwater discharge and maintenance.
The transformation is deliberately subtle.
A good underground drainage project shouldn’t dominate the backyard. Most of the work disappears underground.
How Much Does This Project Cost?
There is no honest universal price because pipe length is the biggest variable.
For a relatively short DIY installation, the major costs are generally pipe, fittings, adapter and emitter. Longer runs, difficult excavation, drainage structures or professional labor can increase the total substantially.
A better way to budget is:
Item
Quantity to Calculate
Solid pipe
Actual route + small allowance
Downspout adapter
1 per connected downspout
Couplers
Based on pipe sections
Elbows
Based on route
Pop-up emitter
Usually 1 per discharge run
Gravel
As required by outlet/system design
Tools
Only what you don’t already own
I would rather have readers price these components locally than promise a misleading “$50 project” that may bear little resemblance to their yard.
What About Freezing Weather?
This deserves attention in colder U.S. climates.
Residual water left inside an improperly graded line can freeze.
NDS recommends an elbow/installation incorporating a weep hole so residual water can drain, helping reduce stagnation and freezing risk. NDS
Proper continuous slope remains important.
Before winter, inspect the emitter and make sure grass, leaves and debris aren’t preventing it from opening or draining.
Common Mistakes to Avoid
Mistake
Why It Matters
Using perforated pipe for the transport run
Can release roof water where you were trying to move it away
No consistent fall
Water can remain trapped
Outlet higher than inlet
Gravity system may not drain
Discharging toward a neighbor
Can create drainage/property problems
Burying the emitter cap
Prevents normal operation
Backfilling before testing
Hides leaks and grading mistakes
Ignoring underground utilities
Creates a serious safety hazard
Too many unnecessary bends
Can restrict flow and complicate cleaning
Forgetting maintenance access
Makes future clog removal harder
Is This the Same as a French Drain?
No.
This distinction is worth repeating because the two projects are frequently confused.
This project transports roof water.
A typical French drain collects water from saturated soil through a perforated drainage system.
You may sometimes see both systems used on the same property, but they solve different problems.
How Far Should the Pop-Up Emitter Be From the House?
There isn’t one distance that can safely be prescribed for every property.
What matters is that the discharge point is appropriately located away from the structure and the system has adequate elevation change to drain.
NDS says pop-up emitters should be used away from buildings and landscaping at a low point in the drainage system. NDS
Local conditions and codes can require something different.
Will the Emitter Get Hit by the Lawn Mower?
It shouldn’t stick prominently above the lawn.
NDS recommends positioning the emitter at or slightly below finished grade and cautions against mower damage. NDS
Keep the surrounding grass trimmed enough that it doesn’t grow across the lid.
Does the Pipe Need Gravel Around It?
Not automatically.
This isn’t a perforated French drain where the entire pipe is intentionally surrounded by drainage aggregate to collect groundwater.
For the solid transport pipe shown here, follow the bedding and backfill requirements of the specific pipe manufacturer and your soil/site conditions.
Gravel may still be used at specific components or drainage points where the system design calls for it.
How Do I Maintain the System?
A few times per year—and especially after leaf season—inspect:
gutters;
downspout;
inlet connection;
accessible cleanouts;
pop-up emitter;
surrounding turf.
Remove leaves, mud and grass that could obstruct the emitter.
NDS warns that a clogged emitter can back up the drainage system and recommends routine inspection of the cap and underlying pipe. NDS
If the system suddenly stops flowing correctly, investigate rather than assuming the emitter itself failed. A blockage, crushed pipe, poor grade, root intrusion or turf growth can all cause problems. NDS
Final Project Checklist
Before calling the project finished, verify:
Check
Done
Underground utilities located
☐
Local drainage requirements checked
☐
Correct solid pipe selected
☐
Discharge location safely chosen
☐
Continuous downward slope verified
☐
All fittings dry-fitted
☐
Downspout connection secure
☐
Emitter lower than inlet
☐
Emitter at appropriate finished grade
☐
System tested with water
☐
No leaks or obvious standing-water problems
☐
Trench restored
☐
Emitter remains accessible for maintenance
☐
A Small Change That Makes the Next Rainstorm Very Different
The most satisfying part of this project isn’t what you see after it’s finished.
It’s what you don’t see.
The next time heavy rain hits the roof, water no longer has to dump into that same muddy patch beside the foundation.
Instead, the gutter collects it, the downspout sends it underground, the solid pipe carries it farther into the yard, and the pop-up emitter releases it at the planned discharge point.
Most of the installation disappears beneath the grass.
And that’s exactly the point.
A successful drainage project isn’t about adding something impressive to the backyard. It’s about giving rainwater a predictable path before the next storm decides where that path will be for you.
[…] for backyard flooding walks through that version. If downspouts are part of the problem, see our underground downspout drainage guide. For serious or recurring water problems, talk to a licensed landscape contractor, a drainage […]
We use cookies and similar technologies to help our website function properly, understand how visitors use the site, and improve your experience. You can accept or manage your preferences at any time. Some features may not work as intended if certain cookies are disabled.
Functional
Always active
The technical storage or access is strictly necessary for the legitimate purpose of enabling the use of a specific service explicitly requested by the subscriber or user, or for the sole purpose of carrying out the transmission of a communication over an electronic communications network.
Preferences
The technical storage or access is necessary for the legitimate purpose of storing preferences that are not requested by the subscriber or user.
Statistics
The technical storage or access that is used exclusively for statistical purposes.The technical storage or access that is used exclusively for anonymous statistical purposes. Without a subpoena, voluntary compliance on the part of your Internet Service Provider, or additional records from a third party, information stored or retrieved for this purpose alone cannot usually be used to identify you.
Marketing
The technical storage or access is required to create user profiles to send advertising, or to track the user on a website or across several websites for similar marketing purposes.



[…] for backyard flooding walks through that version. If downspouts are part of the problem, see our underground downspout drainage guide. For serious or recurring water problems, talk to a licensed landscape contractor, a drainage […]