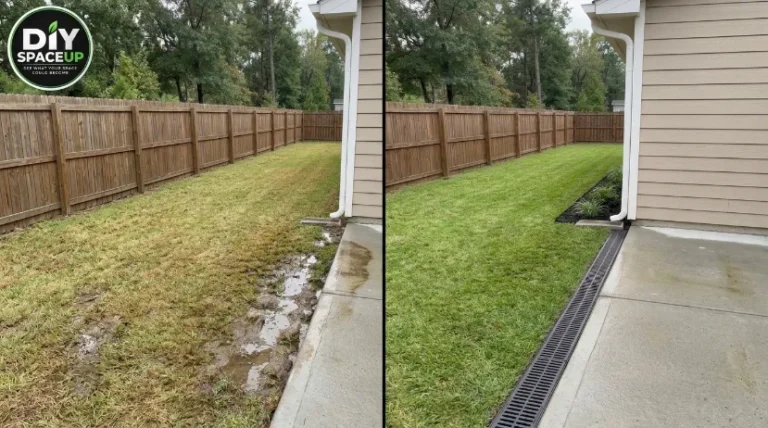
From an Empty Patch of Grass to the Place Everyone Wants to Gather
There is usually one part of a backyard that never quite finds a purpose.
Maybe it is a patch of worn grass beside the house. Maybe the patio ends a little too soon. Or maybe the grill gets rolled outside every weekend, surrounded by folding tables, utensils, food trays, and everything else you need to carry back inside afterward.
That was the idea behind this project: take an ordinary unused backyard area and turn it into a permanent, practical place to cook and gather.
The finished station may look ambitious, but the project becomes much easier to understand when you stop thinking of it as one giant outdoor kitchen.
It is really a series of smaller jobs:
choose the right location → establish the footprint → build a stable base → construct the shelter → build the counters → create a safe grill zone → finish and organize the space.
This guide walks through that process in plain English.
It is not a permit-ready engineering plan, because soil conditions, snow and wind loads, frost depth, building codes, grill requirements, and property layouts vary widely across the United States. Instead, use it as a planning and construction roadmap and adapt the final dimensions to your home.
Table of Contents
1. What Are We Building?
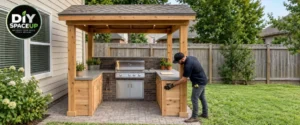
The inspiration for this project is a compact, freestanding covered grilling station with:
four structural posts;
a simple roof;
a paved floor;
two side work counters;
enclosed storage;
a central grill area;
weather-resistant finishes;
enough open space for one or two people to cook comfortably.
This is intentionally not a giant luxury outdoor kitchen.
For most families, a smaller station is easier to build, less expensive to maintain, and more useful day to day.
2. Before You Buy Anything
One of the easiest DIY mistakes is buying lumber because the finished project looks simple.
Don’t.
The first purchase should actually be the decision about which grill will be used.
Why?
Because the grill affects:
cabinet width;
counter depth;
heat protection;
ventilation;
combustible-material clearances;
gas or propane arrangement;
overhead clearances;
whether the appliance may be built into a cabinet at all.
A freestanding grill should never automatically be converted into a built-in grill just because it physically fits.
Use the installation manual for your exact grill as part of your construction plan.
3. Choosing the Right Part of the Backyard
The prettiest location isn’t necessarily the best location.
Stand in the proposed area before measuring anything and look in every direction.
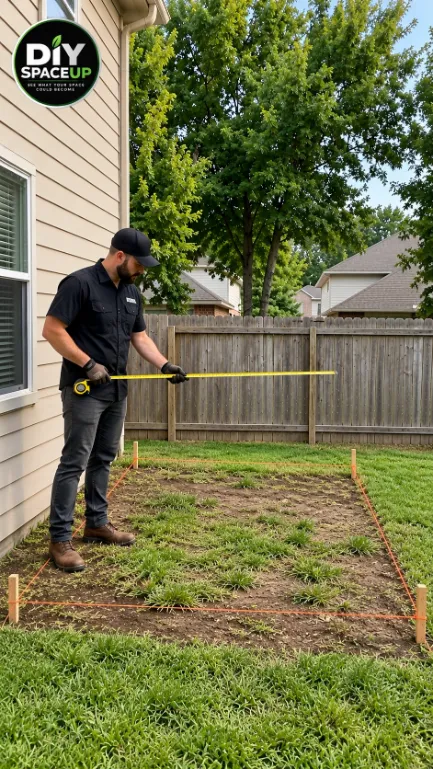
Start with the space, not the lumber. Measure the available area and mark the proposed footprint before deciding on the final grill station dimensions.
Ask yourself:
Question
Why It Matters
Is the ground reasonably level?
Less excavation and easier construction
Does water collect here after rain?
Standing water is bad for posts, pavers and cabinets
Is it close to the house?
Convenient for carrying food and dishes
Is it too close to the house?
Heat, smoke and fire safety become concerns
Are tree branches overhead?
Heat/fire hazard and constant debris
Where does smoke naturally travel?
You don’t want it entering windows
Is there enough room behind the cook?
Prevents a cramped workspace
Will people walk through the cooking zone?
Creates collision and burn risks
Is electricity nearby?
Useful for lighting and appliances
Is gas planned?
May require professional installation
The NFPA recommends using propane and charcoal grills outdoors and placing grills well away from the home, deck railings, eaves and overhanging branches. It also recommends keeping children and pets at least three feet from the grilling area.
Place a folding table or several cardboard boxes where you imagine the counters will be.
Then pretend to cook.
Open the grill. Turn around. Put down a platter. Walk out of the station.
Five minutes of this can reveal problems that are difficult to notice on a drawing.
4. How Big Should a Backyard Grill Station Be?
There isn’t one correct size.
For a compact family station similar to our inspiration, a rough planning footprint around 8 × 10 ft to 10 × 12 ft can be a useful starting point — not a prescribed construction dimension.
Your grill and circulation space determine the final footprint.
Comfortable planning dimensions
Feature
Useful Starting Point
Counter height
About 36 in
Counter depth
About 24–26 in
Clear working aisle
About 42–48 in when space allows
Prep counter beside grill
24–36+ in is useful
Finished roof height
Determined by design/code/appliance
Grill clearances
Manufacturer-specific — never assume
A couple cooking dinner needs less space than someone entertaining twelve people every weekend.
Don’t build square footage simply because you have it.
5. Think About Sun, Wind and Smoke
Orientation can make the difference between a grill station you use every weekend and one that looks nice but is uncomfortable.
Sun
If possible, observe the proposed location around lunch and dinner time.
A western exposure can become extremely hot in late afternoon.
The roof helps, but low-angle sunlight can still enter from the sides.
Wind
Don’t design the entire station based on one windy afternoon.
Observe the area over several days if possible.
The goal is to reduce the chance of smoke constantly blowing toward:
the house;
an open window;
guests;
neighboring properties.
Don’t solve wind problems by enclosing the grill tightly. Combustion appliances require appropriate ventilation.
Rain
The roof should send water somewhere intentional rather than dumping it onto the cook, cabinet faces or house foundation.
6. Permits, HOA Rules and Utilities
This is the part of a backyard project that isn’t exciting on video — and is extremely important in reality.
Before digging, check:
local building department requirements;
setbacks;
HOA restrictions if applicable;
property easements;
underground utilities;
frost depth;
local wind/snow-load requirements;
gas and electrical requirements.
The 2024 International Residential Code model language includes an exemption from building permits for certain detached one-story accessory structures no larger than 200 sq ft. But the same provision explicitly says a permit exemption does not authorize work that violates other code requirements or local laws. Your jurisdiction may also amend the model code.
In the United States, contact 811 before digging so underground utilities can be located.
Gas and permanent electrical work are two areas where hiring a licensed professional can be money well spent.
7. Choose the Grill Before Designing Around It
This deserves repeating.
Grill first. Cabinet second.
Don’t look at a beautiful Pinterest outdoor kitchen and build the opening before buying the appliance.
Obtain the installation manual for the exact model.
Look specifically for:
Clearance to combustibles, ventilation requirements, enclosure requirements, overhead restrictions, gas connections, access requirements and whether built-in installation is permitted.
If the manual says the grill cannot be installed in an enclosure, don’t redesign the enclosure to make it fit.
Choose another configuration.
8. Materials Checklist
Quantities depend on your final dimensions, so calculate them from your drawings rather than copying a universal shopping list.
Structure
Pressure-treated lumber where appropriate
Exterior-rated structural lumber
Posts sized for the actual structure
Exterior structural screws/approved fasteners
Post bases/anchors
Concrete if required by foundation design
Structural connectors/hurricane ties where required
Patio/Base
Geotextile if appropriate for your soil/system
Compacted aggregate base
Bedding material
Pavers
Edge restraint
Polymeric sand or specified joint material
Roof
Rafters/trusses according to design
Roof sheathing
Underlayment
Drip edge/flashing
Roofing compatible with your climate
Appropriate roof fasteners
Cabinet/Counter Area
Exterior-rated framing/materials
Weather-resistant cabinet material
Noncombustible materials where required around grill
Exterior-rated doors/hardware
Outdoor-rated countertop
Exterior caulk/sealant
Finishing
Exterior stain/sealer or paint
Corrosion-resistant hardware
Cabinet pulls
Outdoor-rated lighting if desired
9. Tools: What You Actually Need
You don’t need to buy an entire contractor’s workshop.
Affiliate disclosure: As an Amazon Associate, DIY SpaceUp earns from qualifying purchases. Some links below are affiliate links, which means we may earn a commission at no extra cost to you.
A miter saw makes repeated framing cuts faster and more consistent.
An impact driver is convenient when installing many structural screws.
A laser level becomes useful when transferring heights between several posts.
A plate compactor is valuable for a paver foundation, but most homeowners should rent one rather than buy one for a single project.
10. Step 1 — Mark the Exact Footprint
Now construction can finally begin.
Start with stakes and mason’s string.
Mark the outside corners.
Measure both diagonals.
For a rectangular footprint, matching diagonals are a quick way to verify that the layout is square.
Then physically walk through it again.
Check:
grill location;
post locations;
counter depth;
working aisle;
entrance;
house clearance;
door and gate access.
This is your cheapest opportunity to move the entire project six inches.
After excavation starts, every change becomes harder.
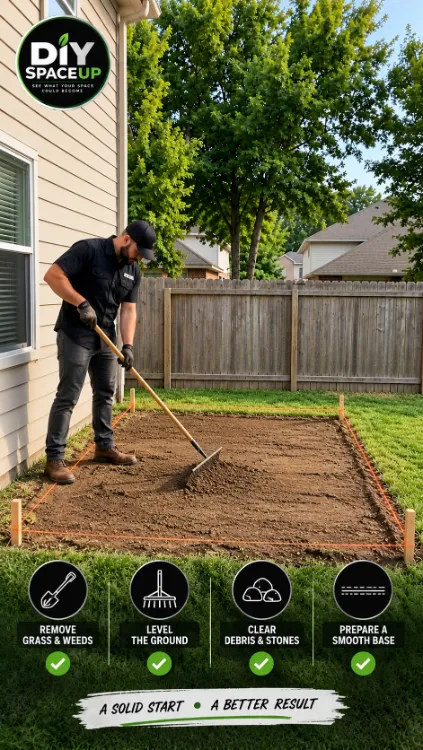
Remove grass, weeds, stones and loose debris before building the patio base. A clean, level and properly prepared footprint gives the rest of the project a better start.
11. Step 2 — Prepare the Ground Properly
Don’t build a beautiful grill station over an unstable surface.
Remove vegetation and organic material from the construction footprint.
Excavate to the depth required by your chosen patio system and local conditions.
Correct soft areas.
Establish drainage.
Then install the base in compacted lifts rather than dumping a thick layer and compacting only the top.
A common beginner mistake is trying to make the pavers level by adjusting large amounts of bedding material.
The base itself should already be properly graded and compacted.
Important
Water should not be directed toward the home’s foundation.
Climate matters too. A patio foundation appropriate in a warm climate may not perform the same way in an area with deep frost.
12. Step 3 — Build the Patio Surface
Once the compacted base is ready:
establish finished elevation;
screed the bedding layer according to the paver system;
install pavers from a straight reference;
maintain the intended drainage slope;
cut perimeter pieces where necessary;
install edge restraints;
compact according to the paver manufacturer’s instructions;
fill joints with the specified material.
The finished surface should feel solid before the structure is built over it.
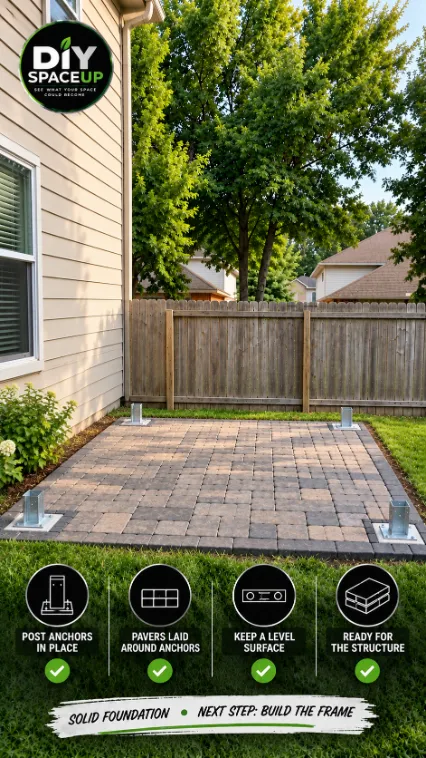
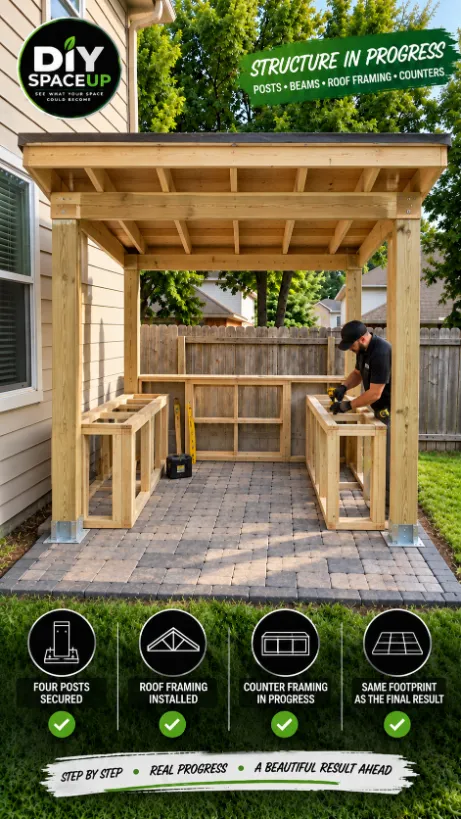
The patio is finished around four previously planned structural post locations, preparing the project for installation of the roof-supporting posts.
13. Step 4 — Set and Anchor the Post
The reference project uses four substantial corner posts supporting the roof.
This part of the project deserves more attention than a 15-second Reel can show.
The posts transfer roof loads to the ground.
Their foundation therefore depends on:
structure size;
soil;
local frost depth;
wind loads;
roof weight;
snow loads where applicable;
local code.
Don’t simply place structural posts loose on patio pavers.
Use an approved foundation and anchoring method for your design.
Check every post in two directions with a level before permanently bracing it.
Then measure diagonals again.
Builder’s tip
Temporary diagonal braces make post installation dramatically easier.
A post that appears vertical while you’re holding it can move as soon as the next component is installed.
Brace first. Verify. Then proceed.
14. Step 5 — Build the Overhead Structure
This is where the project begins to resemble the inspiration image.
Install the primary beams according to your structural design.
Only after the primary structure is stable should the roof framing be added.
Do not install roofing simply because the rafters look aligned.
First verify the whole frame.
With the four posts secured, the primary structure, roof framing and counter frames begin to establish the final shape of the covered grill station.
15. Step 6 — Frame the Side Counters
With the shelter structurally established, move to the working surfaces.
The inspiration uses two side cabinets with the grill centered at the rear.
Before cutting cabinet framing, mark the finished countertop height around the structure.
A typical kitchen-like work height is around 36 inches, but choose what is comfortable for the primary users and compatible with your appliance.
Build the cabinet frames square.
Then check that doors will have room to open without hitting posts, grill components or the cook.
Think about storage before enclosing anything
Decide what will actually live outside:
grill tools;
trays;
cleaning supplies;
paper towels;
serving pieces;
spare utensils.
Do not automatically store combustible or heat-sensitive items near the grill.
And never create an unapproved enclosed propane-cylinder compartment just because there is empty space available.
16. Step 7 — The Most Important Part: Grill Safety
This is where the photograph becomes inspiration rather than specification.
The finished visual shows wood construction relatively close to the cooking appliance. A real installation must instead be designed around the manufacturer’s required clearances and enclosure instructions.
The NFPA recommends positioning grills well away from the home, railings, eaves and overhanging branches.
That means you should not say:
“Every grill needs exactly X inches.”
Different appliances have different requirements.
Instead:
Before framing the grill opening
Find these values in your grill manual:
Requirement
Your Grill
Minimum rear clearance
______
Minimum side clearance
______
Overhead requirement
______
Combustible-material clearance
______
Ventilation requirement
______
Cutout dimensions
______
Gas/propane access
______
Built-in installation permitted?
Yes / No
If the grill is specifically designed for built-in use, follow its required cutout and noncombustible-zone details.
If it is freestanding, keep it freestanding unless the manufacturer explicitly approves another installation.
17. Step 8 — Install the Countertops
Outdoor countertops deal with conditions indoor counters never see:
sun, rain, freeze/thaw cycles, temperature swings and cooking grease.
Good options can include appropriately specified:
natural stone;
concrete;
porcelain;
exterior-rated tile systems;
outdoor-rated manufactured surfaces.
Check the manufacturer’s outdoor-use requirements.
Before permanently setting countertops, dry-fit them and verify:
overhang;
cabinet alignment;
grill clearance;
door movement;
seams;
drainage exposure.
A little counter space on both sides of the cooking area is especially convenient: one side can receive uncooked food and the other can receive finished dishes.
18. Step 9 — Finish the Roof
Once the roof framing has been inspected and confirmed, install the roofing assembly appropriate to your design.
A typical shingle-style assembly may involve roof sheathing, underlayment, drip edge/flashing and shingles, but the exact sequence depends on the roof system and manufacturer.
Pay particular attention where the roof approaches the house.
Water intrusion is far more expensive than an imperfect cabinet door.
If the new structure actually attaches to the house rather than remaining freestanding, flashing and structural connection details become especially important and may warrant professional involvement.
19. Step 10 — Finish the Cabinets
Now the project finally begins to look finished.
Install exterior-facing panels and doors using materials appropriate for outdoor exposure.
Seal cut ends where required.
Use exterior-rated fasteners and hardware.
Then apply the selected outdoor finish.
Don’t rush this step because the framing is already complete.
Water usually finds the little unfinished edges.
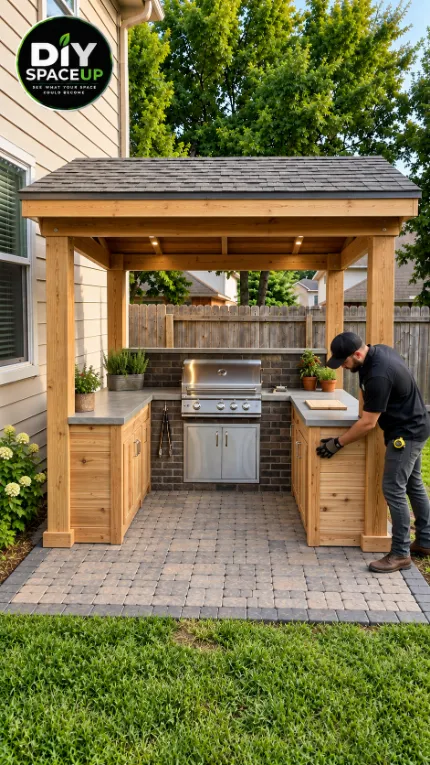
The completed backyard transformation: a covered grill station with outdoor prep counters, storage, a paved work area and dedicated cooking space.
20. Gas, Propane and Electricity
This is a good place to know when DIY stops being economical.
Propane
Follow the grill manufacturer’s cylinder location, ventilation, hose-routing and clearance requirements.
Check hoses and connections regularly.
The NFPA recommends opening a gas grill lid before lighting and checking equipment for safe operation.
Natural Gas
If the station will have a permanent natural-gas supply, use a qualified professional where required.
A gas line is not the part of the project where saving a few dollars should be the priority.
Electricity
Outdoor receptacles, lighting and circuits have specific weather and shock-protection requirements.
Plan wiring before closing walls and cabinets, then have required electrical work completed/verified appropriately.
21. Final Safety Check Before the First Cookout
Don’t celebrate by immediately firing the grill.
Walk around the completed project first.
Check that the structure is solid, hardware is tightened, countertop sections are stable, doors operate freely, grill clearances comply with its manual, combustibles are kept away from heat, gas components show no obvious damage, electrical components are outdoor appropriate, and there are no trip hazards.
Keep children and pets away from the active grilling zone; NFPA recommends at least 3 feet.
And never leave an operating grill unattended.
22. Don’t Forget Food Safety
A beautiful grill station doesn’t make unsafe food safe.
USDA advises using a food thermometer because exterior color and grill marks aren’t reliable indicators that food has reached a safe temperature.
Useful USDA minimums include:
Food
Minimum Internal Temperature
Beef/lamb/veal steaks, chops & roasts
145°F + 3-minute rest
Ground meats
160°F
Poultry
165°F
Fish
145°F
Leftovers
165°F
Keep raw and cooked food on separate plates and utensils to reduce cross-contamination.
23. How Much Does a DIY Covered Grill Station Cost?
I would not publish a fake $1,200 or $2,000 promise just to make the article attractive.
Material prices vary enormously by location, lumber choice, grill, countertop, foundation and roof.
Instead, budget by category.
Category
Lower-Cost Approach
What Raises the Cost
Base
Simple paver area
Excavation, premium pavers
Structure
Standard exterior lumber
Large timbers/premium species
Roof
Basic roofing
Premium metal/custom roofing
Cabinets
DIY exterior construction
Manufactured outdoor cabinetry
Counter
Basic outdoor-rated material
Stone/custom fabrication
Grill
Existing compatible grill
Premium built-in appliance
Utilities
None/minimal
Gas, electrical, plumbing
Labor
Mostly DIY
Contractor/electrician/gas fitter
Where I would spend more
Foundation, structural connectors, roofing/waterproofing, grill safety and electrical/gas work.
Where you can simplify
Decorative trim, cabinet interiors, premium hardware and accessories can always be upgraded later.
24. How Long Does the Project Take?
The Reel may take 15 seconds.
The real project doesn’t.
For a homeowner working mainly on weekends, it makes more sense to think in stages rather than promises of “one weekend.”
A sensible sequence is:
Weekend/stage 1: layout, excavation and foundation preparation.
Stage 2: patio/base.
Stage 3: posts and primary structure.
Stage 4: roof framing and roofing.
Stage 5: cabinet framing.
Stage 6: grill-safe surfaces and countertops.
Stage 7: doors, finish, lighting and final details.
Weather, inspections and professional utility work can extend the schedule.
That’s normal.
25. 10 Mistakes Worth Avoiding
Designing before choosing the grill. The appliance determines critical dimensions.
Copying clearances from another project. Use your exact grill manual.
Building directly on unstable soil. A pretty structure won’t fix a poor foundation.
Ignoring drainage. Water should have somewhere to go.
Assuming patio pavers alone are structural footings. Roof posts need an appropriate support/anchoring system.
Skipping diagonal measurements. A frame can look square while being noticeably out.
Enclosing a freestanding grill. Only do what its manufacturer permits.
Putting untreated indoor materials outdoors. Sun and moisture will quickly expose the mistake.
Running gas or permanent electrical systems casually. Use qualified help where required.
Building every feature immediately. Get the core station right first. Accessories can come later.
26. A Few Small Details That Make the Station Better
Once the basic project is finished, inexpensive details can improve daily use considerably.
A removable trash container near the prep side prevents repeated trips indoors.
A weather-resistant paper towel holder is surprisingly useful.
Hooks can keep grill tools off the counter.
A small exterior-rated light over the prep area can make the station far more useful in fall when sunset comes earlier.
But avoid filling every empty wall with accessories.
Working counter space is itself a feature.
27. Seasonal Maintenance
At least a few times each year, inspect the station rather than waiting for something to fail.
Look at:
roof condition;
flashing;
loose structural hardware;
wood finish;
cracked caulk;
countertop seams;
cabinet hinges;
paver settlement;
grill grease buildup;
gas hoses and fittings;
outdoor electrical covers.
NFPA specifically recommends removing grease and fat buildup from grills and trays below them.
Touching up a small exposed wood edge today is easier than replacing a swollen cabinet panel next year.
Is This a Beginner DIY Project?
Parts of it are. The complete project is better considered an intermediate DIY build.
A beginner who is comfortable measuring, using a circular saw, drilling and following instructions can participate in much of the work.
But roof structures, foundations, structural connections, gas lines and electrical work shouldn’t be treated as beginner tasks merely because a social-media video makes them look fast.
A good family approach is to DIY the portions you’re comfortable with and hire out the portions where mistakes have serious consequences.
That still makes it your project.
FAQ
Can I build a covered grill station next to my house?
Possibly, but proximity to the house introduces combustible-material, smoke, heat, structural, roof and potentially code considerations. NFPA recommends grills be well away from the home and out from under eaves and overhanging branches. Your grill manufacturer’s instructions and local requirements should determine the final arrangement.
Can I put a grill under a wooden roof?
Don’t make that decision from a generic online measurement. Check whether your specific appliance permits the proposed overhead configuration and follow its combustible-material clearances and ventilation requirements. If the requirements can’t be met, change the design.
Can I turn my regular freestanding grill into a built-in grill?
Only if the manufacturer specifically permits that installation. A grill fitting inside an opening does not mean the installation is safe.
Do I need a permit for a backyard grill station?
Possibly. Requirements depend on jurisdiction, size, attachment to the house, utilities and construction. The 2024 IRC model code has a permit exemption for certain one-story detached accessory structures up to 200 sq ft, but expressly states that exemption does not authorize work that violates other applicable provisions or laws. Local rules control.
Should the posts sit directly on the pavers?
Don’t assume ordinary patio pavers constitute an adequate structural footing. The roof-support system should transfer loads through a foundation and anchoring arrangement appropriate to the structure and local conditions.
What is the best countertop for an outdoor grill station?
There isn’t one universal winner. Compare outdoor-rated stone, concrete, porcelain, tile systems and other surfaces based on your climate, maintenance expectations, heat exposure, budget and manufacturer requirements.
How wide should the walkway be?
For a compact station, roughly 42–48 inches of working aisle can be a useful planning target when the property allows it, but appliance doors, traffic patterns and accessibility needs can require more room.
Should I add a sink?
Only if you’ll genuinely use it. A sink introduces water supply, drainage, winterization and potentially permitting requirements. For a compact station near the kitchen, additional prep counter can sometimes be more useful.
Can I use regular kitchen cabinets outside?
Generally, indoor cabinetry isn’t designed for prolonged rain, humidity, UV exposure and outdoor temperature changes. Use materials and finishes designed for the conditions they’ll face.
What’s the first thing I should buy?
Choose the grill/appliance specification first, not the lumber. Its dimensions and installation requirements influence much of the station.
Final Thoughts
The best part of this project isn’t the grill.
It’s what happens to a part of the backyard that previously had no real purpose.
An empty patch beside the house becomes somewhere to prepare dinner. A simple paved area becomes somewhere people naturally gather. And instead of rolling a grill around and balancing trays wherever they’ll fit, everything has a place.
But the difference between an inspirational outdoor kitchen and a good DIY outdoor kitchen is planning.
And don’t be afraid to simplify the project to match your family’s needs, budget and experience.
A smaller station that is safe, comfortable and used every weekend is a much better project than a giant outdoor kitchen that looked impressive on a screen.
Important Project Note
This guide is intended for general DIY planning and education. It is not an engineered construction plan. Foundation requirements, structural member sizes, connections, frost depth, wind/snow loads, fire clearances, permits, gas installation and electrical requirements vary by property, jurisdiction and appliance.
Always follow the installation instructions supplied with your exact grill and other equipment, and use qualified professionals for work requiring permits, engineering or licensed trades.
We use cookies and similar technologies to help our website function properly, understand how visitors use the site, and improve your experience. You can accept or manage your preferences at any time. Some features may not work as intended if certain cookies are disabled.
Functional
Always active
The technical storage or access is strictly necessary for the legitimate purpose of enabling the use of a specific service explicitly requested by the subscriber or user, or for the sole purpose of carrying out the transmission of a communication over an electronic communications network.
Preferences
The technical storage or access is necessary for the legitimate purpose of storing preferences that are not requested by the subscriber or user.
Statistics
The technical storage or access that is used exclusively for statistical purposes.The technical storage or access that is used exclusively for anonymous statistical purposes. Without a subpoena, voluntary compliance on the part of your Internet Service Provider, or additional records from a third party, information stored or retrieved for this purpose alone cannot usually be used to identify you.
Marketing
The technical storage or access is required to create user profiles to send advertising, or to track the user on a website or across several websites for similar marketing purposes.