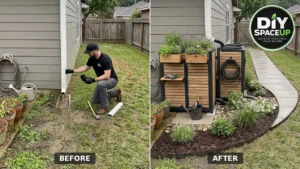

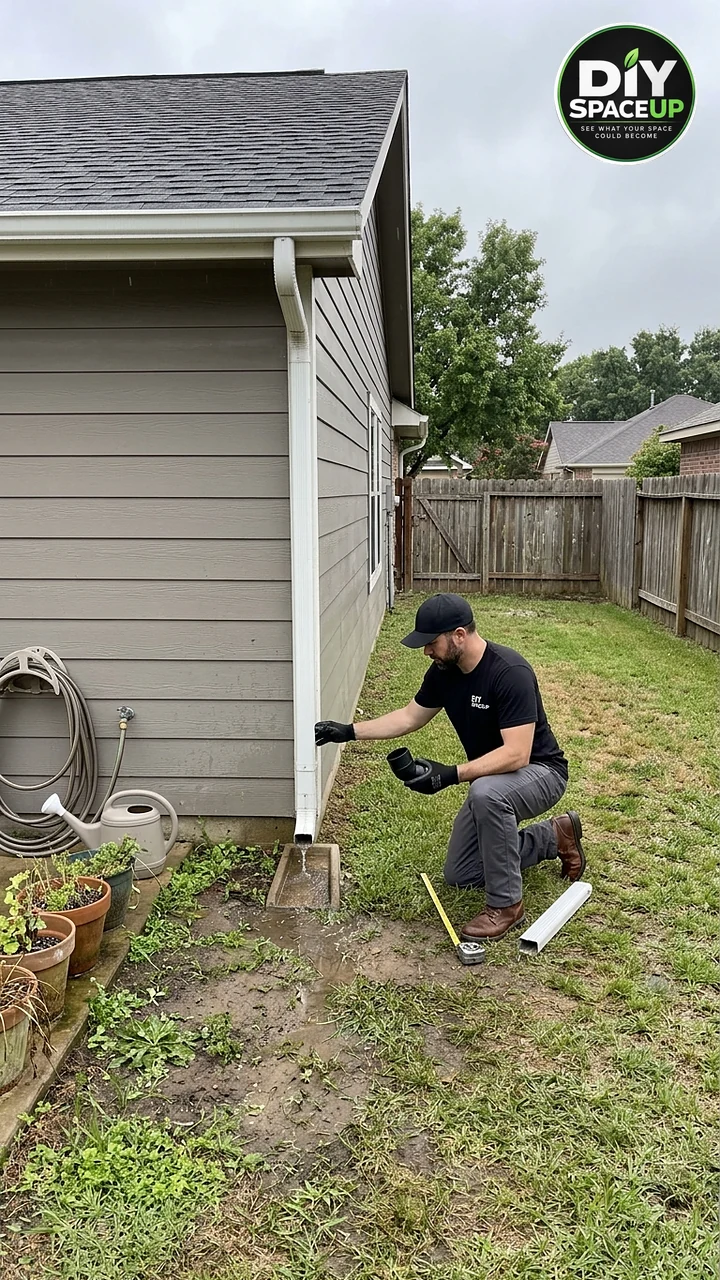
Almost every house has a corner like this one. On the side of the house, a white downspout dropped roof water onto a small splash block, and every storm left a muddy patch of thin grass right against the foundation. A few clay pots and a coiled hose leaned on the siding, and a strip of lawn ran past toward the back fence. Nobody used the spot. It just got wet.
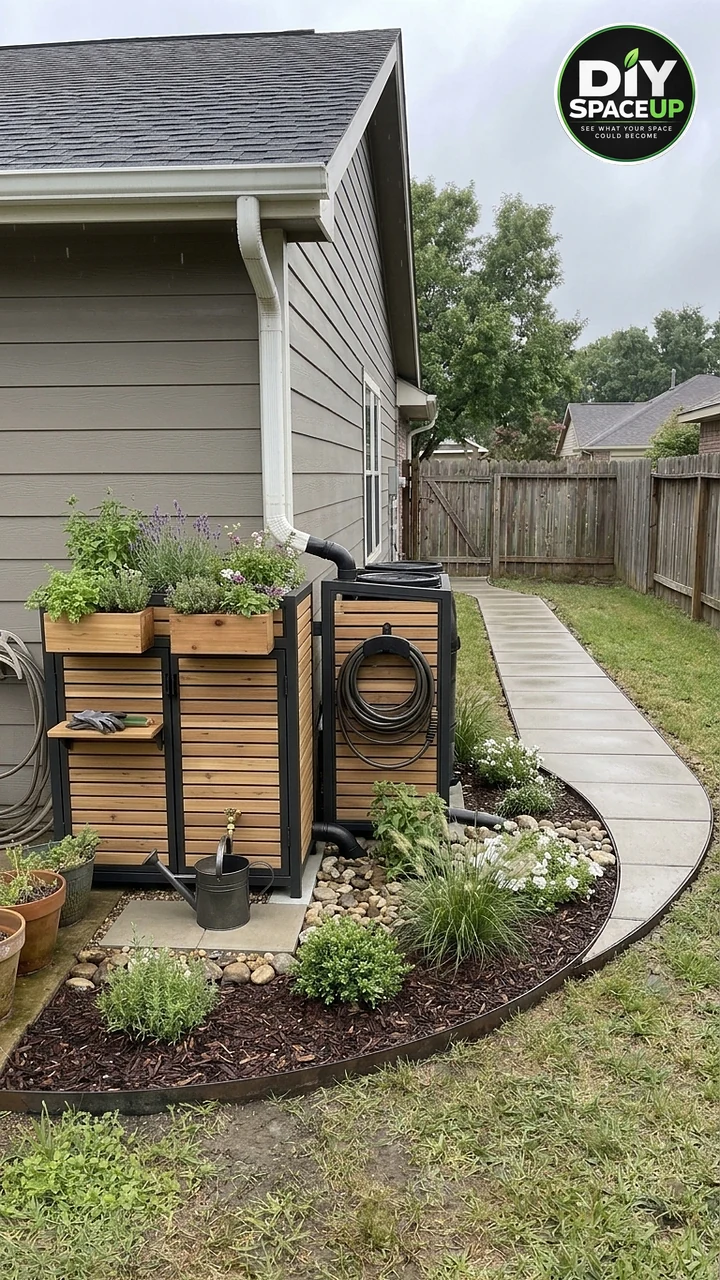
The opportunity was the water itself. Instead of letting it soak the foundation, the plan was to catch it: two rain barrels on a solid paver pad, fed from that same downspout, hidden inside a rain barrel enclosure with a black frame and cedar slats. Herb planters sit on top, a hose hanger rides on the side, a curved concrete walkway leads past it, and a mulched bed with river rock, steel edging, and plants turns the old mud patch into a small garden.
Why it is worth doing right: a full 55-gallon barrel weighs about 460 pounds, and two of them stand right next to the house. Short videos tend to skip the parts that decide whether the barrels stay level, whether the overflow ends up back against the foundation, and whether the station breeds mosquitoes. This guide fills those gaps: a compacted base and level pad, linked barrels with screened, sealed openings, an overflow route that carries extra water well away from the house, an enclosure you can still open to service the barrels, and winter care.
Treat this as a planning and building roadmap, not a site-specific design. Every dimension below is a planning example, not a measurement taken from the photos. Measure your own barrels and corner, follow the instructions that come with your barrels and fittings, and check your local rules. Costs are estimates.
Affiliate Disclosure: As an Amazon Associate I earn from qualifying purchases. Product links in this article may earn a commission at no additional cost to you.
What’s in This Post
- What We’re Building
- Is This Corner a Good Spot for Rain Barrels?
- Before You Start: Local Rules, 811, and Water Use
- Materials and Tools
- Example Enclosure Size and Cut List
- Step-by-Step Build
- Safety Checklist
- Estimated Cost
- Common Mistakes and Better Approaches
- Maintenance and Winter Care
- FAQ
What We’re Building
The finished corner is a compact DIY rainwater collection station. Two black rain barrels stand side by side on a level pad of square concrete pavers over a compacted gravel base, tight against the house under the downspout. A black elbow carries the roof water from the downspout into the barrels. Around them, a black-framed enclosure with horizontal cedar slats hides the barrels: the wider section has two cedar planter boxes of herbs and lavender on top and a brass spigot at the front, and the taller section holds a coiled garden hose on a wall-mount hanger. In front, a curved bed of dark mulch and river rock is planted with ornamental grass, herbs, and white flowers, edged in steel, and a curved concrete walkway runs along the bed toward the back of the yard.
| Component | Function |
|---|---|
| Compacted gravel base and paver pad | Carries roughly half a ton of water without settling or tipping, and keeps the barrels level |
| Two linked rain barrels with sealed, screened lids | Store the roof water and keep out mosquitoes, debris, children, and pets |
| Downspout diverter or sealed inlet | Sends roof water into the first barrel; a diverter can also bypass the barrels in winter |
| Linking hose | Lets both barrels fill and drain together |
| Overflow fitting and pipe | Carries extra water away from the foundation once the barrels are full |
| Brass spigot | Fills a watering can or feeds a hose by gravity |
| Black frame with cedar slats | Hides the barrels while letting air move through; includes a removable or hinged access panel |
| Lined cedar planter boxes | Herbs and flowers on top, sized so they never sit on the barrel lids |
| Hose hanger | Keeps the hose off the ground and ready to use |
| Curved concrete walkway on a compacted base | A firm, dry path past the station |
| Mulch bed, river rock, steel edging, plants | Soaks up splash and turns the old mud patch into a garden |
If you only want the water-saving part, the barrels, pad, and overflow are the core of the project. The enclosure, planters, walkway, and bed are what make it look finished. Our underground downspout drainage guide covers the other half of the story: moving the water you do not store away from the house.
Is This Corner a Good Spot for Rain Barrels?
How much water that downspout really sends
Texas A&M AgriLife puts it simply: each inch of rain on a roof yields about 0.62 gallons per square foot. A 1,000-square-foot roof sends about 620 gallons in a 1-inch storm, enough to fill eleven 55-gallon barrels. Even if only a few hundred square feet of roof drain to this downspout, two barrels (about 100 to 110 gallons) fill quickly in a decent rain. That is the main lesson for planning: the barrels will be full often, so the overflow route matters as much as the barrels themselves.
The weight is the other big number
Rutgers Cooperative Extension notes that a full 55-gallon barrel weighs about 460 pounds. Two barrels are close to half a ton on a footprint of about 2 by 4 feet. That load needs a compacted, level base. Soft lawn, a leaning stack of blocks, or a few pavers set on loose dirt can settle unevenly, and a barrel that tips is dangerous, especially with children around.
Planning dimensions to measure (examples only)
- Barrels: many 50 to 55-gallon barrels are roughly 23 to 25 inches across and 36 to 40 inches tall. Use the spec sheet for your exact model.
- Spigot height: barrels set directly on the pad leave room for a watering can under the spigot, as in this build. Raising them on solid blocks adds a little pressure; the University of Kentucky’s rain barrel guide notes that every 2.31 feet of height adds only about 1 psi, so a garden hose fed by gravity will always run slowly.
- Gap to the house: leave a small air gap (about 1 to 2 inches is a reasonable starting point) between the enclosure and the siding so the wall can dry.
- Overflow route: walk the path the extra water will take. It needs a destination away from the foundation: lawn, a mulched bed, a rain garden, or an existing drain line.
- Service space: plan room in front to remove a panel and slide an empty barrel out for cleaning.
Before You Start: Local Rules, 811, and Water Use
- Rainwater rules: most U.S. homeowners can use rain barrels, but a few places set limits. Colorado, for example, allows at most two barrels with a combined 110 gallons, with sealable lids, for outdoor use only, per Colorado State University Extension. Check your state, city, and HOA before you buy.
- HOA and appearance rules: some associations regulate structures or containers near the house. A tidy cedar enclosure helps, but ask first.
- Call 811: the pad and walkway are shallow digs, but utility lines often run along the side of a house. Call 811 a few days before you dig.
- Not for drinking: rooftop water is non-potable. Texas A&M AgriLife, Rutgers, and Colorado’s rules all say it is not for drinking. Label the spigot “Do not drink.”
- Edible plants: for herbs and vegetables, Clemson’s Home & Garden Information Center recommends watering the soil, not the leaves, and washing produce with drinking water before eating it.
- Roof treatments: Rutgers advises not collecting rainwater for a few months after a moss killer is applied to the roof.
Materials and Tools
Amazon links below are similar options unless the text names a product as the specific choice. Gravel, sand, pavers, lumber, mulch, river rock, and plants are usually best bought locally, and the plate compactor and wet saw are rentals.
| Item | What it is for | Where to get it |
|---|---|---|
| Two rain barrels, 50 to 55 gallons, with sealable lids | Water storage | RTS Home Accents 50-gallon ECO rain barrel, 2-pack with link kit (or any opaque barrels with screened, sealable lids) |
| Downspout diverter | Sends roof water to the barrel and back down the downspout when you close it | Anivia rain barrel diverter kit with valve and filter (black) |
| Linking kit | Joins the barrels near the bottom so they fill and drain together | RBL020 rain barrel linking kit with brass bulkhead fittings |
| Overflow fitting and hose | Carries extra water away from the foundation | EarthMinded rain barrel overflow kit plus solid or corrugated pipe for longer runs (local) |
| Spigot kit | A sealed, lead-free outlet near the bottom of the first barrel | lead-free brass rain barrel spigot kit with quarter-turn ball valve |
| Insect screen | Covering every inlet and opening against mosquitoes and debris | fiberglass window screen mesh, 48 x 102 inches |
| Mosquito larvicide (Bti) | Backup control if larvae ever show up | Summit Mosquito Dunks, 20 count |
| Thread seal tape | Sealing the threaded fittings | Gasoila PTFE thread seal tape for water lines |
| Hole saw kit | Clean holes for bulkhead fittings sized to the kit | Lenox bi-metal plumbers hole saw kit |
| Mason line, stakes, tape measure | Laying out the pad, walkway, and bed curve | Local hardware store |
| Hand tamper | Compacting the small pad base and edges | Walensee 10 x 10 inch steel hand tamper (rent a plate compactor for the walkway) |
| 4-foot level | Checking the pad, frame, and walkway | Johnson 48-inch aluminum box level |
| Crushed angular gravel base, bedding sand | Pad and walkway base | Local landscape supplier (bulk) |
| Concrete pavers or patio slabs | Barrel pad and walkway | Local |
| Frame lumber (2×2 or 2×3 cedar) or black metal tube | Enclosure frame | Local lumber yard or metal supplier |
| Cedar 1×4 boards | Slats and planter boxes | Local lumber yard |
| Exterior screws | Frame, slats, and planters | Grip-Rite Prime Guard #8 x 2-inch exterior star-drive screws (stainless for cedar where you want no staining) |
| Exterior black paint | Frame color | Local paint store |
| Gate hinges, turn buttons or latch | Hinged or removable access panel | 4-inch stainless steel ball-bearing gate hinges, 3-pack |
| Clear or transparent exterior finish | Protecting the cedar slats | Olympic WaterGuard transparent wood stain and sealer, Woodland Cedar |
| Planter liner | Keeping soil in the boxes while letting water drain | non-woven fabric planter liner |
| Hose hanger | Holding the hose on the enclosure frame | Gardzen 304 stainless steel wall-mount hose holder |
| Steel or metal landscape edging | Holding the curved bed and mulch line | WORTH Garden 33-foot metal landscape edging |
| Mulch, river rock, plants, potting mix | Bed and planters | Local garden center |
| Drill/driver, circular or miter saw, wet saw (rental), shovel, rake, gloves, eye and hearing protection | General build | Tool kit or rental |
Example Enclosure Size and Cut List
The enclosure in this build has two sections: a wider front section with the planters and spigot, and a taller section with the hose hanger. Size yours from your barrels, not from the photos. These formulas and numbers are a planning example for two barrels about 24 inches across and 38 inches tall, standing side by side on the pad.
| Dimension | Formula | Example |
|---|---|---|
| Inside width | (2 x barrel diameter) + about 2 in between + about 1 1/2 in each side | about 53 in |
| Inside depth | Barrel diameter + about 2 in front for the spigot and fittings + about 1 in back | about 27 in |
| Frame height | Barrel height + lid clearance of 4 to 6 in (more if the barrels sit on blocks) | about 44 in |
| Outside size with a 2×2 frame | Inside size + 3 in each way | about 56 x 30 x 44 in |
| Pad size | Outside footprint + 3 to 4 in on every side | about 64 x 38 in |
Example cut list for a 2×2 frame (1 1/2 inches actual) and cedar 1×4 slats (3 1/2 inches actual). Recalculate after you measure your barrels.
| Part | Quantity | Example length | Notes |
|---|---|---|---|
| 2×2 corner and middle posts | 6 | 44 in | Four corners plus one front and one back middle post to frame the access panel |
| 2×2 front and back rails | 4 | 53 in | Top and bottom, between the corner posts |
| 2×2 side rails | 4 | 27 in | Top and bottom on each end |
| 2×2 top cleats for the lid area | 2 | 27 in | Carry a lift-off top or leave the lid area open; never rest planters on the barrel lids |
| Cedar 1×4 side slats | about 22 | 30 in | About 11 per side with 3/8-in gaps on a 44-in height |
| Cedar 1×4 back slats (optional) | about 11 | 56 in | Skip them if the back faces the siding and you want more airflow |
| Cedar 1×4 front slats on fixed panel and access panel | about 22 | about 26 in | Two front panels; one lifts off or swings on hinges |
| Cedar 1×4 planter boxes | 2 boxes | about 24 x 8 x 7 in each | Bottom boards with 1/4-in gaps or drilled drain holes |
Step-by-Step Build
The order matters. The overflow route and the base come first, the plumbing gets tested before anything hides it, and the enclosure goes on last so you can still reach every fitting while you work.
Step 1: Map the Downspout, the Roof Area, and the Overflow Route
Start where the water starts. Note which part of the roof drains to this downspout, where the water lands today, and which way the ground slopes. In this corner the downspout emptied onto a splash block right at the foundation, leaving a muddy patch in the lawn. That is exactly the water you will now catch, and the same amount will need somewhere safe to go whenever the barrels are full.
Pick the overflow destination now. Rutgers recommends sending rain barrel overflow to a pervious area such as a garden, mulched bed, or lawn, at least 6 feet from the foundation if the house has a basement and at least 2 feet if it has a crawl space. Farther is better when your lot allows it. If the yard is flat or tight, plan a buried pipe to daylight or a rain garden instead of a short hose that dumps beside the wall.
Step 2: Lay Out and Dig the Pad
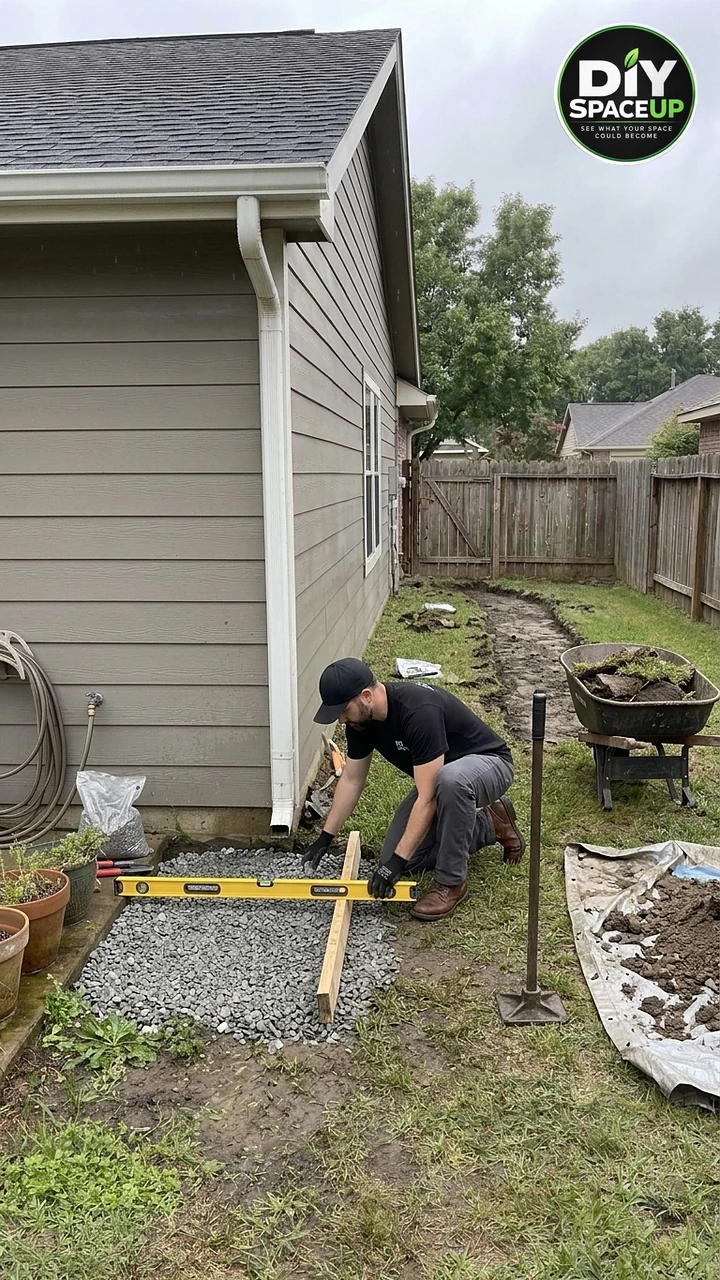
Mark the pad with stakes and mason line: the enclosure footprint plus 3 to 4 inches on every side. Keep the long side parallel to the house and centered under the downspout so the inlet hose stays short. Strip the sod and dig down about 6 to 7 inches, enough for about 4 inches of compacted gravel, an inch of bedding material, and the pavers. Mark the walkway curve and the bed outline with a hose or spray paint at the same time, so the pad, path, and bed meet cleanly.
Step 3: Build a Compacted Gravel Base and Set the Pavers Level
Spread crushed, angular gravel in 2-inch layers and compact each one with the Walensee 10 x 10 inch steel hand tamper. Angular stone locks together; round pea gravel rolls and is a poor base for a heavy load. Bring the base up to the right height, then screed an inch of bedding sand or fine screenings and set the pavers. The pad surface has to be level both ways, because a full barrel on a tilted surface puts uneven pressure on its base. Check every direction with the Johnson 48-inch aluminum box level.
Level pad does not mean flat grading. The soil around the pad should still fall away from the house, so splash and overflow move outward, not toward the wall. A 3 to 4-inch strip of gravel around the pavers, as in this build, helps catch drips from the spigot and lids.
Step 4: Prepare the Barrels: Spigot, Fittings, and Screens
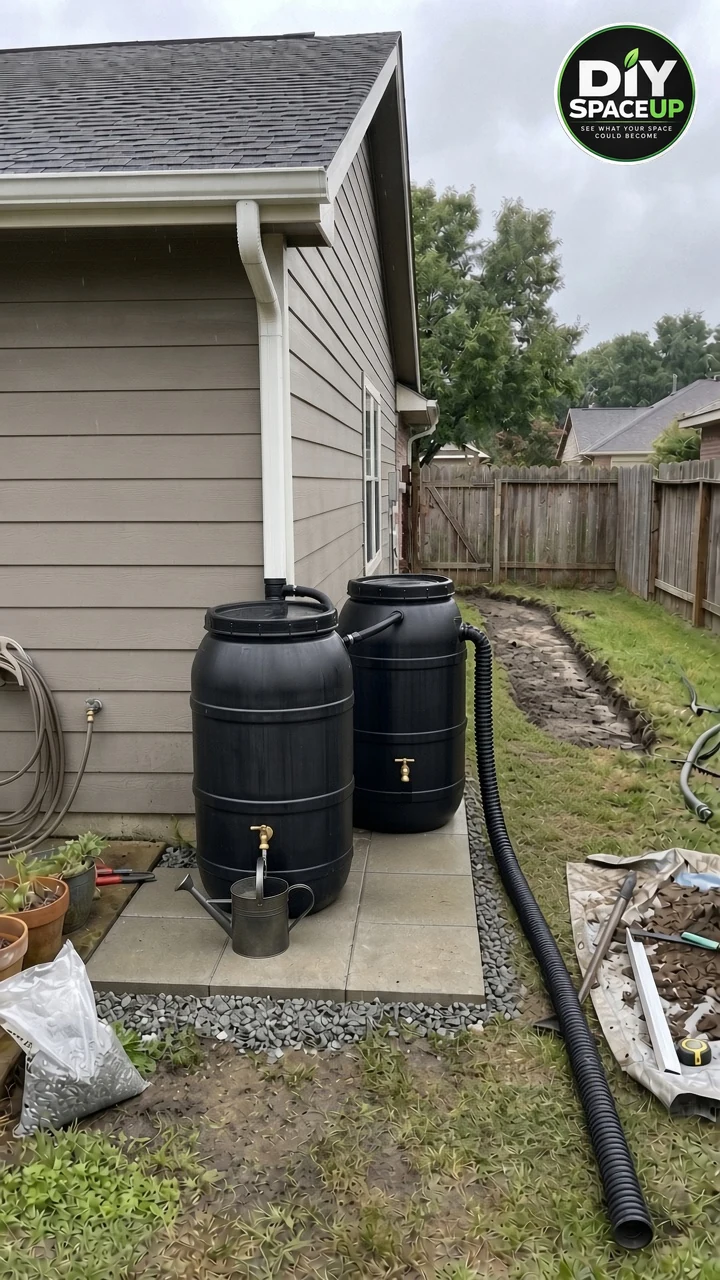
Use opaque, food-grade barrels that never held chemicals. Install the lead-free brass rain barrel spigot kit with quarter-turn ball valve near the bottom of the first barrel, wrapping the threads with Gasoila PTFE thread seal tape for water lines and tightening the bulkhead gaskets as the kit directs. Drill the linking holes low on the facing sides of both barrels, sized to the RBL020 rain barrel linking kit with brass bulkhead fittings, with the Lenox bi-metal plumbers hole saw kit. Drill the overflow hole near the top of the second barrel, below the lid. The University of Kentucky guide reminds builders not to set the overflow too low, since water above that point is not stored.
Every opening needs a screen. Rutgers recommends keeping screen on all openings at all times, and the overflow too, since mosquitoes can enter there. Cut pieces of fiberglass window screen mesh, 48 x 102 inches for the inlet and the inside of the overflow fitting, and make sure the lids lock or screw down so a child or pet cannot open them.
Step 5: Set the Barrels, Link Them, and Connect the Downspout
Set the empty barrels on the pad, spigot facing out, and connect the linking hose low between them. Southwest Florida Water Management District’s rain barrel guide explains why low links are handy: when barrels are joined at or below spigot height, the water level drops evenly and one spigot can drain both. If you link them at the top instead, each barrel needs its own spigot, because the water below the link has no other way out.
For the inlet, there are two common setups. A Anivia rain barrel diverter kit with valve and filter (black) fits into the downspout at about lid height and sends water through a short hose into the first barrel; when the barrels are full, or when you close it for winter, the water continues down the downspout. The other option is to cut the downspout and run a flexible elbow into a screened inlet on the lid, as this build appears to do. Either way, follow the kit’s height instructions, cut the downspout with a hacksaw, and dull the cut edge.
Step 6: Route the Overflow Away From the Foundation
This is the step the video does not show, and it is the one that protects the house. With a direct inlet, attach the EarthMinded rain barrel overflow kit or a larger pipe to the overflow fitting on the last barrel and run it to the destination you chose in Step 1: lawn, a mulched bed, a rain garden, or a drain line. With a diverter, the extra water goes back down the downspout, so the bottom of the downspout needs an extension or a buried line that carries it away just the same. Do not let either one end beside the pad.
Keep the overflow outlet open and screened at all times. A short run can lie in the gravel and mulch, ending on a pad of river rock that slows the water. For longer or buried runs, the approach in our gravel AC pad with a buried downspout works here too. Then test everything before you build around it: run a garden hose into the inlet until the barrels fill and the overflow starts, check every fitting for drips, and watch where the overflow water goes.
Step 7: Build the Enclosure Frame
Cut the frame parts from the cut list and paint them black before assembly; the paint lasts longer when the end grain is sealed too. Build the two end frames first (two posts plus top and bottom side rails), then join them with the front and back rails and add the middle posts that frame the access panel. Pre-drill the 2x2s near their ends, check every corner for square by measuring the diagonals, and confirm the frame is plumb on the pad.
Two rules keep the enclosure serviceable. First, it stands on the pad as its own structure and does not lean on, or get screwed into, the barrels or the siding. Second, the barrels must be able to come out: plan one front panel to lift off or swing open, and leave the area above the lids open or covered by a lift-off top so you can check screens and lids. If you prefer the look of the black metal frame in the photos, square steel or aluminum tube with bolted brackets works the same way; just keep the same clearances.
Step 8: Add the Cedar Slats, the Access Panel, and the Hose Hanger
Screw the 1×4 cedar slats to the frame with Grip-Rite Prime Guard #8 x 2-inch exterior star-drive screws, two per end, using a 3/8-inch spacer to keep the gaps even. The gaps are not just a style choice: they let air move through so the barrels and wood dry after rain. Build the access panel as a separate slatted frame and hang it with 4-inch stainless steel ball-bearing gate hinges, 3-pack and a simple turn-button latch, or make it lift off onto two cleats.
Plan around the spigot. If it passes through a slatted panel, that panel must still be able to open or come off. Cut an open-ended notch from the panel edge so it slides clear, or keep the spigot on a fixed panel and put the access door beside it. Mount the Gardzen 304 stainless steel wall-mount hose holder into the frame posts or a solid backer, not into a single thin slat. Finish the cedar with Olympic WaterGuard transparent wood stain and sealer, Woodland Cedar or let it weather to gray.
Step 9: Build Lined Planter Boxes for the Top
Build two shallow cedar boxes sized for the top of the planter section. Drill drain holes or leave small gaps in the bottom boards, line the sides and bottom with non-woven fabric planter liner, and set the boxes on small spacers so the bottoms dry between waterings. Fasten them to the frame rails, never to the barrel lids. Keep them small: wet soil is heavy, and a lighter planter is easier to lift off when you need to reach the barrels. Herbs such as thyme, oregano, and lavender like the drainage and the sun.
Step 10: Lay the Curved Walkway
The walkway follows the same rules as any paver path. Excavate along the marked curve, compact the subgrade, and build at least 4 inches of compacted aggregate base, which is the minimum the Concrete Masonry and Hardscapes Association’s installation guidance gives for walkways on well-drained soil (more in cold climates or wet soils). Add an inch of bedding sand, set the concrete pavers or slabs, and cut the curved edge with a rented wet saw. Wet cutting and a respirator help with silica dust, which OSHA lists as a serious lung hazard. Restrain the edge and fill the joints. For a full walk-through, see our curved paver walkway with drainage.
Step 11: Edge, Plant, and Mulch the Bed, Then Test Again
Set the WORTH Garden 33-foot metal landscape edging along the curve between the bed and the lawn and between the bed and the walkway. Plant first, then spread 2 to 3 inches of mulch, keeping it a few inches below the siding and off the plant stems. Put river rock where water lands: under the spigot, around the overflow outlet, and along the pad edge. The copper rain chain garden we built shows the same idea of letting rock take the splash.
Finish with a second full test. Fill the barrels with a hose, open the spigot, and confirm both barrels drain together. Then let them overflow and watch the water move away from the house. Label the spigot as non-potable, add a Bti dunk if you ever see larvae, and water the new plants.
Safety Checklist
- Local rainwater, HOA, and permit rules checked; 811 called before digging.
- Pad built on compacted, angular gravel, level both ways, sized larger than the enclosure.
- Barrels opaque, food-grade, never used for chemicals, with lids that lock or screw down.
- Every opening screened, including the inlet and the overflow; no standing water left in buckets or trays.
- Overflow and downspout water carried away from the foundation to lawn, a bed, a rain garden, or a drain; at least 6 feet with a basement, per Rutgers.
- Enclosure freestanding, not attached to the barrels or the siding; one panel opens for service.
- Planters fastened to the frame, never resting on the barrel lids.
- Spigot labeled non-potable; edible plants watered at the soil line.
- Cutting pavers wet, with eye, hearing, and respiratory protection.
- Barrels drained before the first hard freeze.
Estimated Cost of a Rain Barrel Enclosure
These are rough 2026 ranges for a two-barrel station, a curved walkway of about 20 to 30 feet, and a small planted bed, built mostly DIY. Prices vary by region, lumber prices, and delivery fees, so treat them as a starting budget.
| Category | Typical DIY range | Notes |
|---|---|---|
| Two rain barrels | $120 to $350 | Some cities sell discounted barrels; check before buying |
| Diverter, link kit, overflow, spigot, screens, tape, Bti | $60 to $180 | |
| Pad: gravel, sand, pavers | $60 to $200 | |
| Enclosure: cedar slats, frame lumber or metal tube, paint, screws, hinges | $250 to $750 | Cedar and metal tube prices vary widely |
| Planter boxes, liners, soil, herbs | $60 to $200 | |
| Walkway: base, sand, concrete pavers or slabs | $300 to $1,200 | Depends on length, width, and paver style |
| Bed: edging, mulch, river rock, plants | $150 to $500 | |
| Rentals: plate compactor, wet saw | $100 to $250 | One day each, often the same day |
All in, a DIY version often lands somewhere around $1,100 to $3,600. The barrels, plumbing, and pad alone come to roughly $250 to $750. Buried drain lines, a rain garden, and professional hardscaping are not included.
Common Mistakes and Better Approaches
| Mistake | Better Approach |
|---|---|
| Barrels set on lawn, loose soil, or wobbly blocks | Build a compacted gravel base and a level paver pad sized beyond the enclosure |
| No overflow, or an overflow that ends beside the pad | Route it to lawn, a bed, a rain garden, or a drain, at least 6 ft from a basement foundation and farther when possible |
| A diverter with the downspout still dumping at the wall | Add an extension or buried line at the bottom of the downspout |
| Open or unscreened lids and fittings | Screen every opening and use lids that lock or screw down |
| Linking at the top with one spigot | Link low so one spigot drains both, or add a spigot to each barrel |
| Enclosure screwed to the siding or the barrels | Build it freestanding on the pad with a gap to the wall |
| No way to get the barrels out | Make one front panel removable or hinged and keep the lid area accessible |
| Planters resting on the barrel lids | Fasten small, lined planters to the frame rails |
| Spigot through a door that can no longer open | Notch the panel edge or keep the spigot on a fixed panel |
| Solid panels with no gaps | Leave slat gaps so air moves and the wood dries |
| Using rain barrel water for drinking or spraying edible leaves | Label it non-potable and water edibles at the soil |
| Leaving water in the barrels over winter | Drain before the first hard freeze and reconnect the downspout extension |
Maintenance and Winter Care
- Clean the gutters and the inlet screen regularly. Clemson recommends clearing a rain barrel’s screened inlet at least four times a year and gutters at least twice.
- Use the water. Emptying the barrels between storms keeps it fresher and leaves room for the next rain.
- Look for mosquito larvae after rains. If you see any, check the screens and add Bti, such as Summit Mosquito Dunks, 20 count, following the label; the University of Kentucky’s rain barrel tips also remind owners to keep barrels covered.
- Once a year, open the access panel, drain and rinse the barrels, and check the fittings and link hose for leaks.
- Before the first hard freeze, drain the barrels, leave the spigot open, disconnect or close the diverter, and add a downspout extension so winter rain still flows away from the house. Rutgers’ winterizing steps cover storing barrels upside down or indoors.
- Refresh the cedar finish every year or two if you want to keep the warm color, and touch up the black frame paint where it chips.
- Top up mulch and river rock, and keep mulch a few inches below the siding.
FAQ
Do I need a diverter, or can the downspout go straight into the barrel?
Both work. A diverter sends water to the barrel and lets the rest continue down the downspout, and most can be closed for winter. A direct inlet into a screened lid is simple, but then the last barrel needs an overflow pipe that carries the extra water away. In both cases, the water must end up away from the foundation.
How far should rain barrel overflow go from the house?
Rutgers Cooperative Extension recommends at least 6 feet from the foundation if you have a basement and at least 2 feet with a crawl space, onto lawn, a garden, or a mulched bed. Farther is better, and a rain garden or a drain line is a good destination.
How heavy is a full rain barrel?
About 460 pounds for a full 55-gallon barrel, according to Rutgers. Two barrels are close to half a ton, which is why a compacted gravel base and a level paver pad matter.
Is it legal to collect rainwater where I live?
In most of the U.S., yes, but rules vary. Colorado, for example, allows up to two barrels with a combined 110 gallons for outdoor use. Check your state, city, and HOA before installing.
Can I water herbs and vegetables with rain barrel water?
Many gardeners do. Clemson recommends watering the soil rather than the leaves, avoiding watering on harvest day, and washing produce with drinking water. Never drink rain barrel water.
How do I keep mosquitoes out of a rain barrel enclosure?
Screen every opening, including the overflow, use sealed lids, keep the gutters clean, and use the water regularly. Bti dunks are a backup if larvae appear.
How much does a rain barrel enclosure cost?
A DIY cedar enclosure with two barrels, plumbing, and planters often runs around $550 to $1,700. Adding a curved walkway and a planted bed brings the whole corner to roughly $1,100 to $3,600, depending on materials and region.
What do I do with rain barrels in winter?
Drain them before the first hard freeze, leave the spigot open, close or remove the diverter, and add a downspout extension so water still flows away from the house.
Final Thoughts
A rain barrel enclosure turns a wet, forgotten corner into something useful, but the parts that matter most are hidden: a base that will not settle, screened and sealed barrels, and an overflow that sends the extra water away from the house. Get those right and the cedar, the herbs, and the walkway are the easy, fun part. For more on that water, the EPA rain barrel page lists more state and local guides, and our sinking paver patio and roof water fix and side yard dry creek bed show other ways to handle it.