
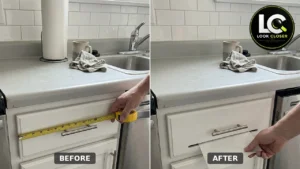

In a lot of kitchens, the paper towel holder ends up in the worst possible spot: right next to the sink, on the one stretch of counter you actually need for dishes, cutting boards, and drying racks. That was the situation in this white shaker-style kitchen. A chrome stand with a full roll sat between the range and the sink, and everything else had to work around it.
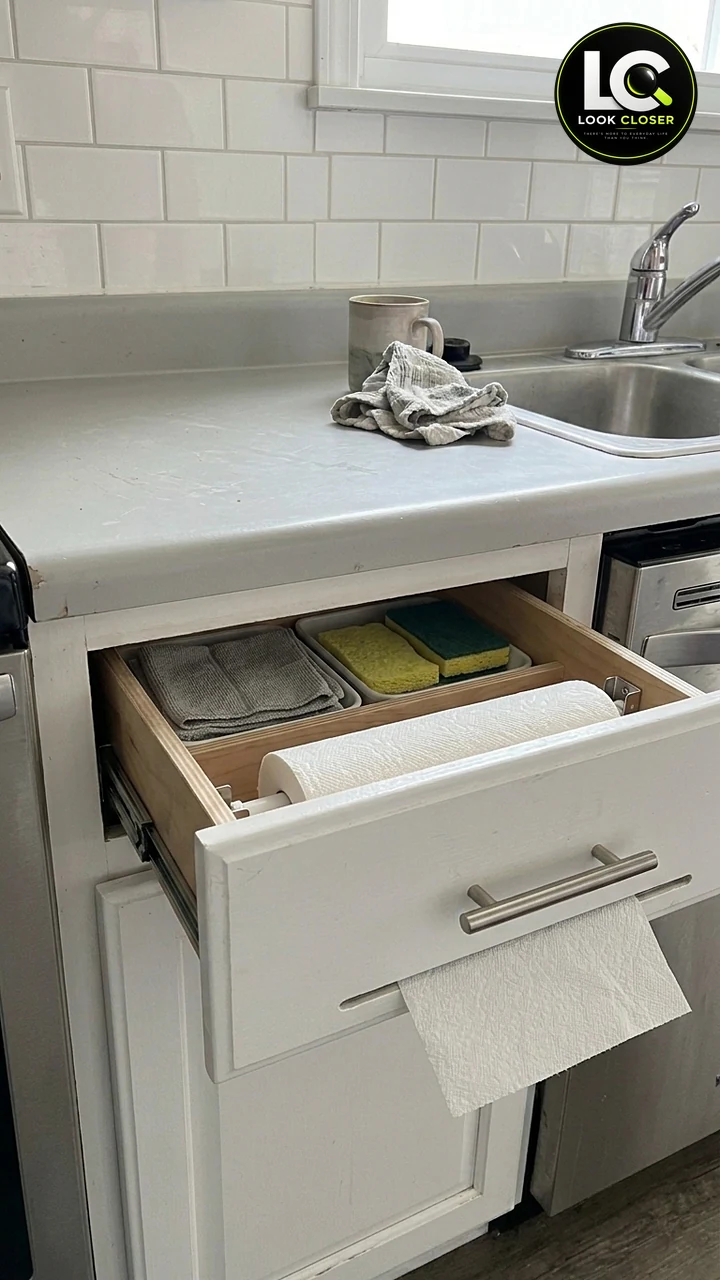
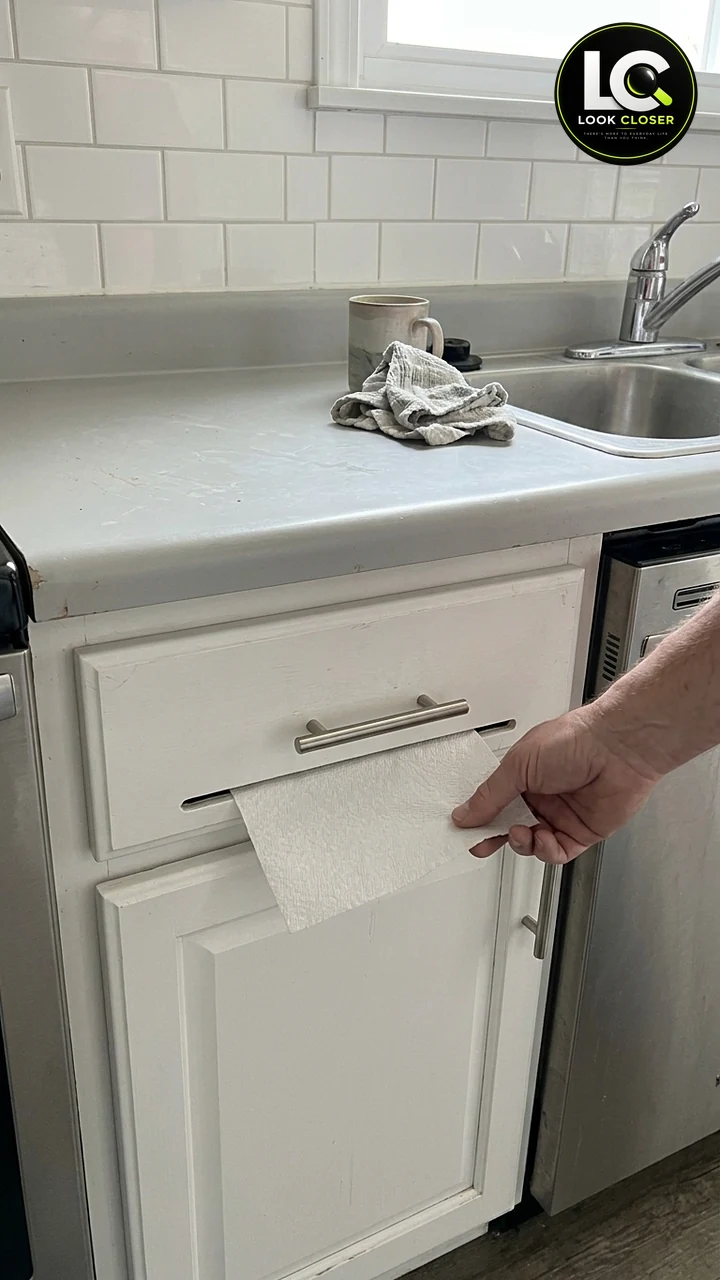
The opportunity was hiding one level down. The top drawer directly below that spot, between the range and the dishwasher, held the usual sponges and dish cloths, and its box had room to spare right behind the drawer front. So Look Closer turned it into a hidden paper towel drawer: a narrow slot cut into the drawer front just under the bar pull, a roll on a rod inside the drawer, and a sheet that pulls straight out through the slot with the drawer closed. Open the drawer and the roll, the sponges, and the cloths are all right there.
Why it is worth doing: you get the counter back, the towels stay right where wet hands need them, and the roll is protected from splashes. The short video makes it look like a two-second swap, though, and it skips every construction step. It also shows the roll going onto a rod that already looks fixed at both ends, which is not something you can do in real life, because a rod held at both ends cannot pass through a roll. This guide fills those gaps: how to check that your drawer is big enough, how to cut a clean slot without splitting the drawer front, how to seal the cut edges next to a sink and a dishwasher, and how to hang the roll on a rod that lifts out for easy refills.
Every measurement here is an example from this one drawer, not a standard. Cabinets, drawer boxes, slides, and paper towel rolls vary a lot, so measure your own before you cut anything.
Affiliate Disclosure: As an Amazon Associate I earn from qualifying purchases. Product links in this article may earn a commission at no additional cost to you.
What’s in This Post
- What We’re Building
- Will a Hidden Paper Towel Drawer Fit Your Kitchen?
- Make the Rod Lift Out (The Part the Video Skips)
- Safety First
- Materials and Tools
- Step-by-Step Build
- How to Change the Roll
- No-Cut Options for Renters
- Estimated Project Cost
- Common Mistakes and Better Approaches
- Care and Maintenance
- FAQ
What We’re Building
The finished drawer looks almost exactly like it did before from the front. The only visible change is a thin horizontal slot with rounded ends, centered just below the brushed-nickel bar pull and running most of the way across the drawer front, with its cut edges painted to match the white cabinet. Inside, a full roll sits on a rod that spans the drawer box close to the front, and the rest of the drawer still holds shallow trays of sponges and folded cloths behind it.
| Component | Function |
|---|---|
| Existing top drawer next to the sink | Houses the roll below the counter, where wet hands need it |
| Pull-through slot in the drawer front | Lets one sheet feed out with the drawer closed |
| Lift-out rod near the front of the drawer box | Holds the roll so it spins freely and comes out for refills |
| Sealed and painted slot edges | Keep moisture, steam, and wet fingers from swelling the raw wood or MDF |
| Sponge and cloth trays behind the roll | Keep the rest of the drawer useful as a sink-side cleaning station |
If you like small sink-side upgrades like this one, the hidden cutting board drawer insert uses a drawer in a similar spot, and the two-level under sink pull-out tackles the cabinet right below the sink.
Will a Hidden Paper Towel Drawer Fit Your Kitchen?
This project lives or dies on a few numbers. Check all of them before you buy anything or drill a single hole.
1. Drawer front width
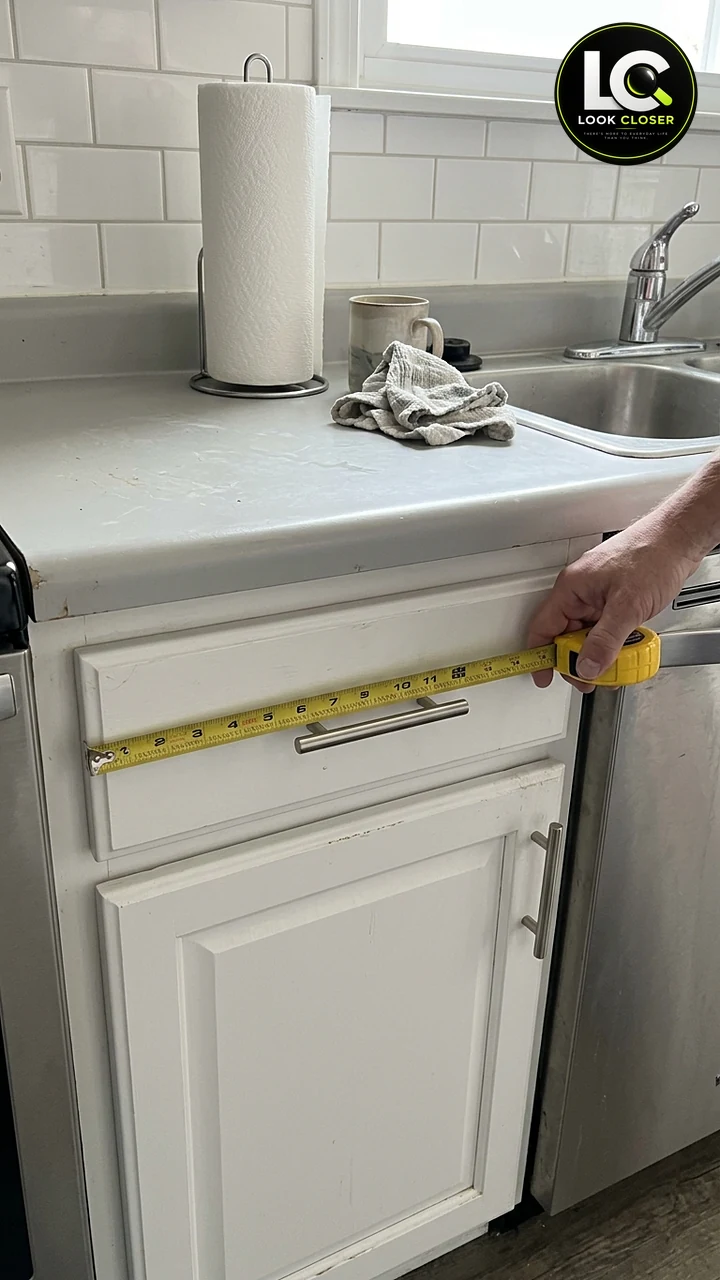
The slot has to be a little longer than the sheet is wide, and it still needs solid wood on both sides and around the pull. Most standard rolls in the US are about 11 inches wide, so plan on a slot around 11-1/4 to 11-1/2 inches long. In this kitchen, the tape across the drawer front reads roughly 14-1/2 inches, which leaves a comfortable margin on each end.
2. Inside width of the drawer box
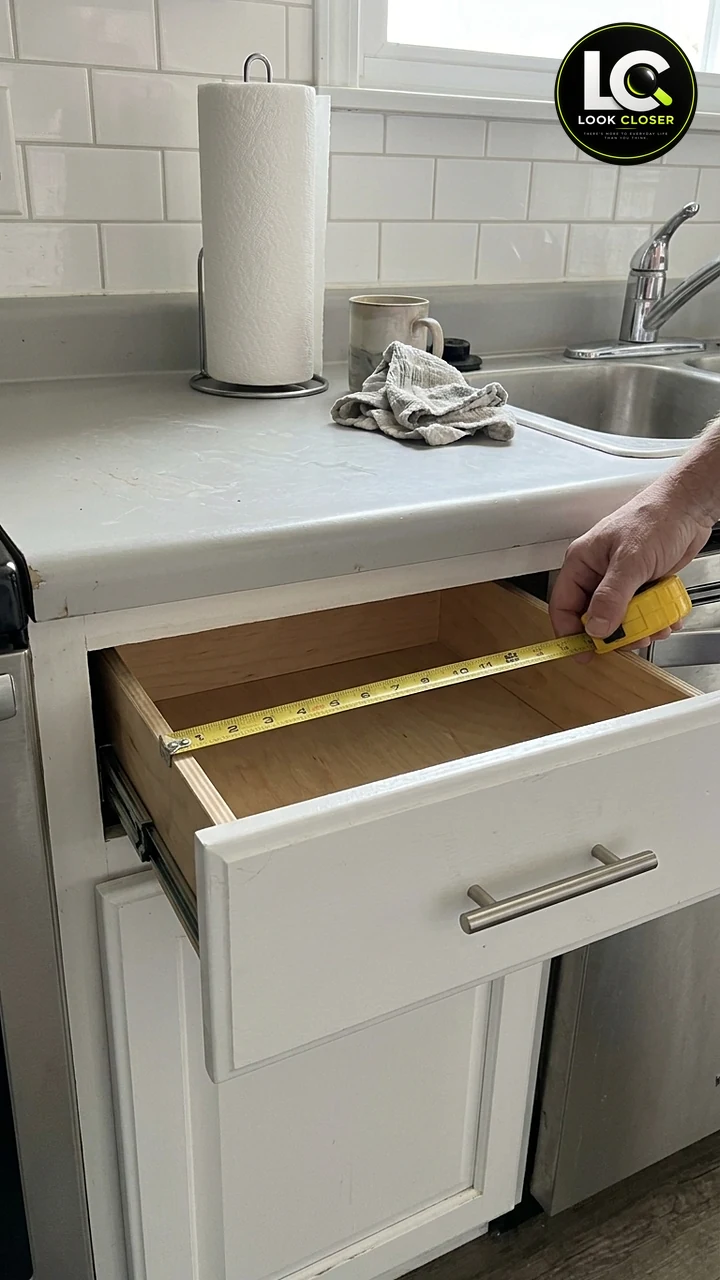
The roll has to spin between the drawer sides without rubbing. Measure wall to wall inside the box, near the front where the roll will sit. Here the inside reads about 12-1/4 to 12-1/2 inches, so an 11-inch roll has room to turn. If your inside width is under about 11-3/4 inches, a full-size roll will drag, and this layout is not a good fit.
3. Roll diameter vs. drawer height and closing clearance
This is the number most people forget. A brand-new roll can be anywhere from roughly 5 to 6-1/2 inches across, and the larger “double” and “mega” rolls are the fattest. Measure a full roll of the brand you actually buy. The roll can sit higher than the drawer sides, but when the drawer closes, the top of the roll has to slide under the cabinet rail or the countertop above it. With the drawer closed, measure from the drawer bottom up to the lowest thing above the drawer box (the face frame rail, a countertop clip, or the underside of the counter). That height must be more than the roll’s diameter plus the gap under the roll, with at least 1/4 inch to spare. If a full roll will not clear, switch to a smaller roll size or skip the project.
4. Depth and what is behind the drawer
The roll only needs about 6 to 7 inches of depth right behind the drawer front, so most standard drawers have plenty. Still, pull the drawer all the way out and look behind it for anything it could hit, such as sink plumbing, a garbage disposal, or the dishwasher’s side. The extra height of the roll inside the box is what could catch.
5. Where the drawer sits
Right beside the sink is ideal for convenience but means water and steam. A drawer next to a dishwasher sees warm, moist air when the dishwasher door opens after a cycle. A drawer right beside a range sees heat and grease. None of these rule it out, but they are the reason the slot edges must be sealed and the slot should never sit directly next to an open flame or a cooktop edge.
| Measurement | Example from this drawer (approximate) | What to look for in yours |
|---|---|---|
| Drawer front width | About 14-1/2 in | At least 13 in for an 11-1/2 in slot plus solid ends |
| Inside width of drawer box | About 12-1/4 to 12-1/2 in | At least 11-3/4 in for an 11 in roll |
| Roll diameter | Measure your brand (often about 5 to 6-1/2 in) | Must clear the rail or countertop when the drawer closes |
| Depth needed for the roll | About 6 to 7 in behind the front | Leave the rest for trays and cloths |
Make the Rod Lift Out (The Part the Video Skips)
In the reel, the roll seems to slide onto a rod that is already fixed to both sides of the drawer. That cannot work. A rod that is held at both ends has no free end to thread a roll onto, and if you glued or screwed a dowel in place like that, you would have to take the drawer apart every time the roll ran out. The caption promises an easy-to-replace roll, so the rod has to come out without tools. Here are three ways to do it.
Option 1 (used in this guide): drop-in notches and a dowel
Cut an open-topped U-shaped notch into the top edge of each drawer side, near the front, and rest a 3/4-inch birch dowel in the two notches. To refill, you lift the dowel straight up, slide the new roll on, and drop it back in. Nothing projects inward from the drawer sides, so the roll gets the full inside width of the box, which matters in a narrow drawer like this one. Cut the dowel so its ends sit just inside the outer faces of the drawer sides, so nothing rubs on the cabinet or the slides.
Option 2: a spring tension rod (no holes in the drawer box)
A small spring tension rod (an 11 to 18 inch size fits a drawer like this) can span the inside of the box near the front. You twist it short, slip the roll on, and press it in place. It is quick and needs no notches, but use only light tension. Too much spring pressure can bow thin drawer sides outward and make the drawer rub in the cabinet. The rod is also thin, so the roll will sit a little loose on it.
Option 3: a factory pull-out paper towel drawer
Some cabinet hardware makers sell complete paper towel drawers that replace a standard drawer, with a built-in holder and front opening. They need a specific cabinet opening width, height, and depth, so they make the most sense when you are installing or replacing cabinets anyway.
Whatever you choose, do not use closet-rod sockets that stick out from the drawer sides in a narrow drawer. Each cup can eat close to an inch of width, and two of them can leave less room than an 11-inch roll needs.
Safety First
- Wear eye protection for drilling, cutting, and sanding. Sealed anti-fog safety goggles are comfortable for close work.
- Many drawer fronts are MDF or painted particleboard, which make very fine dust. Work outside or in a garage, and wear a fitted N95 respirator such as the 3M 8511. OSHA notes that airborne wood dust can cause respiratory problems.
- Composite wood can also contain formaldehyde-based resins. Products sold in the US are covered by EPA formaldehyde emission standards for composite wood, but it is still smart to keep the dust out of the kitchen.
- Clamp the drawer to a sturdy bench or sawhorses. Never hold it on your lap or against your body while you cut.
- Unplug the jigsaw or router before you change a blade or bit, and keep both hands behind the cutting path.
- Drawer slides can pinch. Use the release levers or clips as designed rather than forcing the drawer off its runners.
- Shellac primer is flammable while wet. Use it with ventilation and away from pilot lights and open flames, and follow the label.
Materials and Tools
Most of these are small, inexpensive items. If you do not own a jigsaw or router and only need it for this one slot, borrowing one or renting from a tool library is a reasonable choice.
| Item | Why you need it |
|---|---|
| STANLEY FATMAX 25 ft tape measure | Drawer front, inside width, roll diameter, and closing clearance |
| ScotchBlue painter’s tape | Marks the slot and helps reduce chipping on painted fronts |
| IRWIN QUICK-GRIP 6-inch bar clamps (2-pack) | Hold the drawer and a straightedge guide steady |
| IRWIN Marples Forstner bit set | Clean 1/2-inch holes for the rounded slot ends and 7/8-inch holes for the rod notches |
| BLACK+DECKER 5-amp jigsaw | Cuts between the slot end holes and the notch sides (or use a router you already own) |
| Bosch clean-for-wood T-shank jigsaw blade set | Fine blades such as T101B and T101BF leave a cleaner edge on painted fronts |
| 3M SandBlaster dual-grit sanding sponge | Smooths the slot edges so the paper and your fingers glide |
| Zinsser B-I-N shellac-based spray primer | Seals raw MDF or wood edges before paint |
| Rust-Oleum Painter’s Touch semi-gloss white | Touch-up color for the slot edges (match your cabinet color if it is not white) |
| 3/4-inch birch dowel | The lift-out rod |
| Spring tension rod (11 to 18 inch) | Optional no-notch rod for a renter-friendly version |
| DEWALT anti-fog safety goggles | Eye protection |
| 3M 8511 N95 respirator | Dust protection when cutting and sanding |
| Drill/driver, small paintbrush, scrap board | Drilling, touch-up, and a backer board to prevent tear-out |
Step-by-Step Build
Step 1: Empty the drawer and take it out
Take everything out, then find out what kind of slides you have. Side-mounted ball-bearing slides, like the metal runners on this drawer, usually have a small plastic lever on each side: pull the drawer all the way out, press one lever down and the other up at the same time, and slide the drawer free. Undermount slides usually release with clips or levers under the front corners of the drawer box. Older epoxy-coated roller slides often lift up and out at full extension. If you are not sure, check the slide maker’s instructions so you do not bend a runner.
Step 2: Find out how the drawer front is built
Look inside the drawer box behind the front. Many face-frame cabinets have a separate decorative front screwed onto the drawer box’s own front panel. Others use the front as part of the box. Note what you have, because a two-layer front means the slot goes through both layers. Also note where the pull’s screws come through, and whether the front is solid wood, plywood, or MDF. A slot weakens MDF more than solid wood, so keep generous solid areas at the ends and above and below the slot.
Step 3: Plan the rod height and the slot position
Sit a full roll in the drawer box near the front, propped at the height you plan to use. The sheet should come off the underside of the roll and travel straight forward through the slot. A good starting point is a slot whose center sits roughly level with the rod, or slightly below it, just under the bar pull. Check three things before you mark anything: the full roll clears the drawer bottom, the top of the roll clears the rail or countertop when the drawer closes (test this now, with the drawer back on its slides and the roll held in position), and the slot will stay at least 1/2 inch from the pull’s screw holes.
Step 4: Mark the slot
Put painter’s tape across the face of the drawer front where the slot will go. Find the center of the front and mark the slot length evenly on both sides, for example 11-1/2 inches overall for an 11-inch roll. Mark the slot height, about 3/8 to 1/2 inch is plenty for a single sheet. Draw the two long lines with a square, then mark a circle at each end for the rounded ends.
Step 5: Drill the slot ends
Clamp the drawer face-up on your bench with a scrap board pressed tight behind the front to stop tear-out on the inside. Drill the two end holes with a 1/2-inch Forstner bit (or a bit that matches your slot height), keeping the drill straight. If you have a two-layer front, drill through both layers in the same pass if you can, so the openings line up.
Step 6: Cut the slot
The cleanest method is a router with a straight bit the same width as the slot, guided by a straightedge or a slot template clamped to the drawer front, taking several shallow passes. If you use a jigsaw, fit a fine clean-for-wood blade, set the saw to its non-orbital (straight) setting, start in one end hole, and cut along each line to the other hole, keeping the shoe flat on the tape. Go slowly. A clamped straightedge for the saw shoe to ride against makes the long lines much straighter. Remove the tape gently once the cut is done.
Step 7: Cut the rod notches and fit the dowel
On the top edge of each drawer side, near the front, mark the rod position you chose in Step 3. Mark both sides at the same distance from the front and the same depth from the top so the rod sits level. Drill a 7/8-inch hole through each side at that point, then cut two straight lines from the top edge down to the hole to form an open U. Keep the notches above the slide hardware and its screws. Cut the 3/4-inch dowel so it rests in both notches with its ends just inside the outer faces of the sides, then sand the dowel smooth so the roll spins freely.
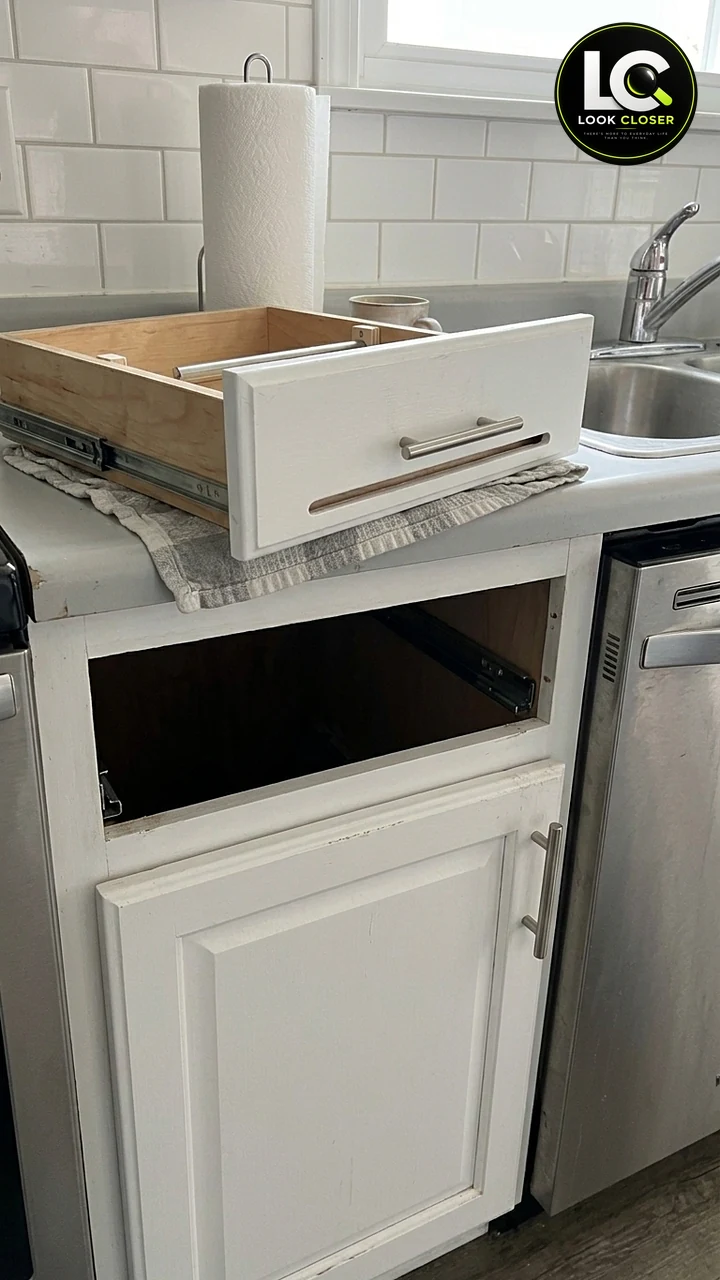
At this point the drawer has its slot and its rod, but the cut edges are still raw. Do not skip the next step, especially on a drawer between a sink and a dishwasher.
Step 8: Sand and seal the cut edges
Round the slot edges slightly with a fine sanding sponge, inside and out, so the paper does not snag and your fingers do not catch a sharp corner. Wipe off the dust. Then seal every raw surface, including the slot edges and the notches, with a shellac-based primer such as Zinsser B-I-N, which seals porous wood and MDF edges well. Once it is dry, lightly scuff it and brush on two thin coats of a durable semi-gloss enamel that matches the cabinet. Raw MDF swells when it gets wet, and a sink-side drawer will get wet. Let the paint cure as long as the label recommends before heavy use.
Step 9: Reinstall the drawer and load the roll
Slide the drawer back onto its runners until it clicks in, and check that it opens and closes as smoothly as before. Lift the rod out, slide a full roll on, and drop the rod back into the notches. Feed the first sheet under the roll and out through the slot from inside, then close the drawer. Put the trays and cloths back behind the roll.
Step 10: Test it
Pull a few sheets with the drawer closed. They should feed straight out without bunching. Tear by pulling the sheet down and slightly to one side against the lower edge of the slot. Then open and close the drawer a few times with a full roll to make sure it never scrapes the rail or the underside of the countertop. If the sheet drags, ease the slot edges a little more with the sanding sponge. If the roll spins too freely and unrolls, a slightly thicker rod or a small felt pad under the roll can add a little friction.
How to Change the Roll
- Open the drawer all the way.
- Lift the dowel straight up out of its notches and slide off the empty core.
- Slide on a new roll so the sheet comes off the underside, toward the drawer front.
- Drop the dowel back into the notches and feed the first sheet out through the slot.
- Close the drawer and pull a test sheet.
That is the whole point of the lift-out rod: about 30 seconds, no tools, and nothing to unscrew.
No-Cut Options for Renters
If you rent or do not want to cut a cabinet, you can still get the roll off the counter. Put a spring tension rod across the inside of a deep drawer and simply open the drawer to tear off a sheet. You lose the closed-drawer pull-through, but you keep the counter clear, and nothing is drilled. Another option is a horizontal paper towel holder that sits loose in a deep drawer. Check the drawer height against the full roll before you buy one. When you move out, the drawer is exactly as you found it.
For more renter-friendly storage ideas in tight kitchen spots, see the kitchen corner coffee station and the pull-out trash cabinet guides.
Estimated Project Cost
Prices change often, so treat these as rough planning ranges.
| Category | Typical range | Notes |
|---|---|---|
| Dowel or tension rod | $5 to $12 | One 3/4 in birch dowel covers it |
| Painter’s tape, sanding sponge | $8 to $15 | Often already in the toolbox |
| Primer and touch-up paint | $20 to $35 | Small cans are enough for one slot |
| Jigsaw blades and Forstner bits | $25 to $60 | Skip if you already own them |
| Jigsaw (if you need one) | $50 to $80 | Or borrow or rent |
| Total if you own the basic tools | About $35 to $60 | Excludes trays, rolls, and cabinet repair |
Common Mistakes and Better Approaches
| Mistake | Better approach |
|---|---|
| Gluing or screwing the rod in place | Use drop-in notches or a tension rod so the roll can be replaced without tools |
| Measuring only the drawer, not the roll | Measure a full roll of your brand and the closing clearance under the rail or countertop |
| Cutting a slot narrower than the sheet | Make it about 1/4 to 1/2 in longer than the roll width |
| Cutting into the pull screws or too close to the edges | Keep at least 1/2 in from screw holes and leave solid wood at both ends |
| Freehand jigsaw cuts on a painted front | Tape, drill the ends, and guide the saw or router with a clamped straightedge |
| Leaving raw MDF edges next to the sink | Prime with a shellac-based primer and paint before the drawer goes back in |
| Closet-rod sockets in a narrow drawer | They can steal almost an inch per side; use notches instead |
| Forcing the drawer off its slides | Use the release levers or clips for your slide type |
Care and Maintenance
- Wipe the slot area with a barely damp cloth and dry it. Do not let wet towels hang through the slot for long.
- Check the painted slot edges once in a while. Touch up any chip right away so water cannot reach the core.
- If the drawer starts to drag, check whether a fatter roll brand is rubbing the rail, and switch sizes if needed.
- Keep the sponges and cloths in trays so the roll stays dry.
FAQ
Can any kitchen drawer become a hidden paper towel drawer?
Not every drawer. A hidden paper towel drawer needs an inside width of roughly 11-3/4 inches or more for a standard 11-inch roll, a front wide enough for an 11-1/4 to 11-1/2 inch slot with solid ends, and enough vertical clearance for a full roll when the drawer closes. Shallow top drawers under thick countertops are the usual problem.
Will cutting a slot weaken the drawer front?
A narrow slot with solid wood left at both ends and around the pull screws is usually fine in solid wood or plywood. MDF is weaker and more moisture sensitive, so keep the slot modest and seal it well. If the front flexes noticeably or cracks at the slot ends, do not use it.
Why not just leave the roll on a fixed dowel like in the video?
You would have no way to change the roll without taking the rod or the drawer apart. A lift-out rod in open notches, or a tension rod, gives you the same look with an easy refill.
Does the paper tear cleanly against the slot?
Pull the sheet down and slightly sideways against the lower edge of the slot. Quilted and select-a-size towels usually tear at the perforation. A very soft, thick towel may need a quick two-handed tear.
Is it safe next to a dishwasher or range?
Next to a dishwasher, the issue is warm steam when the door opens, so sealed and painted edges matter. Next to a range, keep the slot away from the cooktop edge and any open flame, and never store the roll where burner heat reaches it. Check your range manual for any side clearances it requires.
What if my drawer is too small?
Use the no-cut tension rod idea in a deeper drawer, or move the roll into a nearby base cabinet. Our toe kick drawer guide is another way to find hidden storage below the counter.
Final Thoughts
A hidden paper towel drawer is a small project with a big daily payoff: a clear counter by the sink and a towel exactly where you reach for one. The two things that make it work in real life are the ones the clip does not show. Measure a full roll against the drawer and its closing clearance, and use a rod that lifts out so a refill takes seconds. Seal the cut edges well, and the slot should hold up to life beside the sink.
[…] clutter behind a door, this pairs well with our lift-up kitchen corner coffee station and the hidden paper towel drawer: same idea, different corner of the […]